Exploring JObject in C# and Json.NET: A Complete Guide to JSON

Exploring JObject in C# and Json.NET: A Complete Guide to JSON

JObject Json.NET
JObject Json.NET

What is JObject in Json.NET?

JObject typically refers to a class or data structure used in the context of JSON (JavaScript Object Notation) parsing and manipulation. JSON is a lightweight data interchange format commonly used for data exchange between a server and a web application, as well as for configuration files and other data storage formats.
In the case of C#, the JObject class is part of the Json.NET library (also known as Newtonsoft.Json), which is a popular JSON framework for .NET.

The class provides various methods and properties for manipulating JSON data. Here are some common methods and properties:

  1. Adding and Modifying Properties:
    • Add: Adds a property to the JObject.
    • Remove: Removes a property from the JObject.
    • RemoveAll: Removes all properties from the JObject.
    • Remove (indexer): Removes a property with a specific name from the JObject.
    • RemoveAt: Removes a property at a specified index.
    • Merge: Merges another JObject into the current one.
  2. Accessing Properties:
    • Indexer: You can use the indexer to get or set the value of a property.
  3. Querying:
    • SelectToken: Gets a JToken using a JSONPath expression.
    • Descendants: Gets a collection of tokens that contains all the descendants of the JObject.
    • GetValue: Gets the value of a property.
  4. Serialization and Deserialization:
    • ToString: Converts the JObject to a JSON-formatted string.
    • Parse: Parses a JSON-formatted string to create a JObject instance.
  5. Miscellaneous:
    • DeepClone: Creates a deep copy of the JObject.
    • GetEnumerator: Gets an enumerator for the properties of the JObject.
    • ContainsKey: Checks if the JObject contains a property with a specific name.

Here’s an example of how you can parse and merge a JSON using JObject.Parse and JObject.Merge:

using Newtonsoft.Json.Linq;
using System;

class Program
{
    static void Main()
    {
        // JSON string to be parsed
        string jsonString = @"{
            ""name"": ""John Doe"",
            ""age"": 30,
            ""city"": ""New York"",
            ""isStudent"": false
        }";

        // Parse JSON string to JObject
        JObject person = JObject.Parse(jsonString);

        // Access properties
        string name = (string)person["name"];
        int age = (int)person["age"];
        string city = (string)person["city"];
        bool isStudent = (bool)person["isStudent"];

        // Display parsed data
        Console.WriteLine($"Name: {name}");
        Console.WriteLine($"Age: {age}");
        Console.WriteLine($"City: {city}");
        Console.WriteLine($"Is Student: {isStudent}");

        // Adding and modifying properties
        Console.WriteLine("\nAdding and Modifying Properties:");

        // Add a new property
        person["occupation"] = "Software Developer";

        // Modify an existing property
        person["age"] = 31;

        // Display updated data
        string updatedJson = person.ToString();
        Console.WriteLine($"Updated JSON: {updatedJson}");

        // Example JSON for merging
        string jsonStringToMerge = @"{
            ""experience"": 5,
            ""salary"": 90000
        }";

        // Parse JSON string to JObject for merging
        JObject additionalData = JObject.Parse(jsonStringToMerge);

        // Merge the two JObjects
        person.Merge(additionalData, new JsonMergeSettings
        {
            MergeArrayHandling = MergeArrayHandling.Union // Specify how to handle arrays during the merge
        });

        // Display merged data
        Console.WriteLine("\nMerged Data:");
        string mergedJson = person.ToString();
        Console.WriteLine($"Merged JSON: {mergedJson}");
    }
}

Delving further into the topic, we’ll explore its intricacies and nuances, gaining a more profound understanding.

What is Json.NET in C#?

Json.NET, also known as Newtonsoft.Json, is a popular open-source library for working with JSON data in .NET applications. Developed by James Newton-King, Json.NET has become the de facto standard for JSON parsing and serialization in the .NET ecosystem. Here’s a comprehensive overview of Json.NET:

Introduction to Json.NET:

High-performance

Json.NET is a high-performance JSON framework for .NET. Its high performance is a result of a combination of factors, including efficient algorithms, streaming support, customization options, optimized data structures, caching mechanisms, and ongoing community contributions and optimizations. These features collectively make Json.NET a robust and performant JSON framework for .NET applications.


Serialization

It supports both serialization (converting objects to JSON) and deserialization (converting JSON back to objects). These processes are crucial in scenarios where you need to exchange data between different parts of a system or between different systems. For example, when sending data over a network, storing data in a file, or persisting data in a database, you often need to convert your objects to a format that can be easily transmitted or stored—hence serialization. Then, when you retrieve that data, you need to convert it back to objects that your code can work with—hence deserialization.


Here are examples:
Serialization (Object to JSON) is the process of converting an object’s state or data into a format that can be easily stored, transmitted, or reconstructed.
Json.NET Usage: When you serialize an object using Json.NET, it transforms the object and its properties into a JSON-formatted string. JSON (JavaScript Object Notation) is a lightweight data interchange format that is easy for humans to read and write and easy for machines to parse and generate.

// Serialization using Json.NET
MyClass myObject = new MyClass { Property1 = "value1", Property2 = 42 };
string jsonString = JsonConvert.SerializeObject(myObject);
// jsonString now contains the JSON representation of myObject
//Output:
//{"Property1":"value1","Property2":42}


Deserialization (JSON to Object) is the process of reconstructing an object from a serialized format (such as JSON).
Json.NET Usage: When you deserialize a JSON string using Json.NET, it takes the JSON data and converts it back into an object of the specified type.

// Deserialization using Json.NET
string jsonString = "{\"Property1\":\"value1\",\"Property2\":42}";
MyClass deserializedObject = JsonConvert.DeserializeObject<MyClass>(jsonString);
// deserializedObject now contains the data from the JSON string

The deserializedObject now has the same values for its properties as the original myObject that was serialized.

Versatility

The library is versatile and can be used in different types of applications, including web applications (both server-side and client-side), desktop applications, mobile apps (iOS, Android, Xamarin), and more. This versatility makes it a go-to choice for developers working in diverse environments.

Features of Json.NET:

LINQ to JSON

LINQ to JSON is a feature provided by Json.NET (Newtonsoft.Json) that offers a LINQ-based API for querying and manipulating JSON data. LINQ (Language Integrated Query) is a set of language extensions to C# and VB.NET that provides a uniform way to query data from different types of data sources. With LINQ to JSON, developers can leverage LINQ syntax to work with JSON data in a natural and expressive manner.


LINQ syntax:

JObject jObject = JObject.Parse(json);
var result = from item in jObject["items"]
where (int)item["price"] > 10
select item;

How LINQ to JSON works and how it makes it easy to query and manipulate JSON data:

1. Creating a JSON Object:

JObject person = new JObject(
new JProperty("name", "John Doe"),
new JProperty("age", 30),
new JProperty("city", "New York")
);

2. Querying with LINQ:

var name = person["name"]; // Accessing a property directly
// Using LINQ to query the JSON object
var age = from p in person
where p.Key == "age"
select p.Value;

3. Modifying JSON Data:

// Adding a new property
person.Add("isStudent", false);

// Modifying an existing property
person["age"] = 31;

// Removing a property
person.Remove("city");

4. Converting Between LINQ and JSON:

// Convert LINQ result to a new JObject
JObject resultObject = new JObject(age.Select(a => new JProperty("newAge", a)));

// Convert JObject to LINQ query
var resultAge = from r in resultObject
where r.Key == "newAge"
select r.Value;

JSON Schema

JSON Schema is a powerful tool for defining the structure and constraints of JSON data. It allows you to specify the expected format of your JSON data, including the types of values, required properties, and more. Json.NET (Newtonsoft.Json) provides support for JSON Schema validation, allowing you to validate JSON data against a predefined schema. Here’s an overview of how JSON Schema works in Json.NET:

1. Defining a JSON Schema:
You can define a JSON Schema using the JSON Schema Draft 4, Draft 6, or Draft 7 specification. A JSON Schema typically describes the expected structure of JSON data, including properties, types, formats, and constraints.

{
"type": "object",
"properties": {
"name": { "type": "string" },
"age": { "type": "integer", "minimum": 0 }
},
"required": ["name", "age"]
}

Json.NET can generate a JSON Schema from a .NET type using the JsonSchemaGenerator class.

JsonSchemaGenerator generator = new JsonSchemaGenerator();
JSchema generatedSchema = generator.Generate(typeof(MyClass));

This is useful when you want to ensure that your JSON data conforms to the expected structure based on your .NET class.

Json.NET allows you to use a JsonValidatingReader that wraps around a standard JsonReader. This reader validates JSON data against a specified schema as it reads it.

JSchema schema = JSchema.Parse(schemaJson);
JsonReader reader = new JsonValidatingReader(new JsonTextReader(new StringReader(jsonData)))
{
Schema = schema
};

// Read data using the validating reader
while (reader.Read())
{
// Process JSON data
}

2. Validating JSON Data:
Json.NET provides a JsonSchemaValidator class that allows you to validate JSON data against a specified JSON Schema.

JSchema schema = JSchema.Parse(schemaJson);
JToken data = JToken.Parse(jsonData);

IList<string> errors;
bool isValid = data.IsValid(schema, out errors);

isValid will be true if the JSON data is valid according to the schema. If there are errors, the errors list will contain descriptions of the validation issues.

Error Handling in Json.NET:

Error handling in Json.NET typically involves managing exceptions that may occur during JSON parsing or serialization. Here are some common scenarios and how you can handle errors:


JsonReaderException:

This exception occurs when there is an error during JSON deserialization.

try
{
MyClass obj = JsonConvert.DeserializeObject<MyClass>(jsonString);
}
catch (JsonReaderException ex)
{
// Handle JsonReaderException
Console.WriteLine($"Error reading JSON: {ex.Message}");
}

JsonReaderException:

This exception occurs when there is an error during JSON deserialization.

try
{
MyClass obj = JsonConvert.DeserializeObject<MyClass>(jsonString);
}
catch (JsonReaderException ex)
{
// Handle JsonReaderException
Console.WriteLine($"Error reading JSON: {ex.Message}");
}

JsonSerializationException:

This exception may occur if there is an issue with the JSON structure that prevents successful deserialization.

try
{
MyClass obj = JsonConvert.DeserializeObject<MyClass>(jsonString);
}
catch (JsonSerializationException ex)
{
// Handle JsonSerializationException
Console.WriteLine($"Error serializing JSON: {ex.Message}");
}

JsonWriterException:

This exception can occur during JSON serialization if there is an issue writing the JSON data.

try
{
string jsonString = JsonConvert.SerializeObject(myObject);
}
catch (JsonWriterException ex)
{
// Handle JsonWriterException
Console.WriteLine($"Error writing JSON: {ex.Message}");
}

Handling Other Exceptions:

It’s also a good practice to catch more general exceptions to handle unexpected errors.

try
{
// Your JSON processing code here
}
catch (Exception ex)
{
// Handle other exceptions
Console.WriteLine($"An unexpected error occurred: {ex.Message}");
}

Custom Error Handling:

You can implement custom error handling by checking specific conditions before or after the serialization/deserialization process.

try
{
// Your JSON processing code here

// Check for specific conditions
if (someCondition)
{
// Handle the condition
}
}
catch (Exception ex)
{
// Handle exceptions and specific conditions
Console.WriteLine($"An error occurred: {ex.Message}");
}

Always be sure to log or handle exceptions appropriately based on the requirements of your application.

How to Serialize Deserialize in Json.Net:

Serialization:

string json = JsonConvert.SerializeObject(myObject);

Serialization with Formatting:

string formattedJson = JsonConvert.SerializeObject(myObject, Formatting.Indented);

Deserialization:

MyObject myObject = JsonConvert.DeserializeObject<MyObject>(json);

Handling Deserialization Errors:

try
{
MyClass deserializedObject = JsonConvert.DeserializeObject<MyClass>(jsonString);
// Process deserializedObject
}
catch (JsonException ex)
{
// Handle deserialization error
Console.WriteLine($"Error during deserialization: {ex.Message}");
}

How to Setup JSON.NET

The most common way is to use the NuGet Package Manager to install the Json.NET NuGet package. Here are the steps:

Using Visual Studio in Package Manager Console:

  1. Open Visual Studio:
  2. Open your Visual Studio project.
  3. Access the Package Manager Console:
  4. In Visual Studio, go to Tools -> NuGet Package Manager -> Package Manager Console.
  5. In the Package Manager Console, run the following command to install the Json.NET package:

Install-Package Newtonsoft.Json

This command downloads and installs the Json.NET NuGet package into your project.

Using Visual Studio (Package Manager UI):

  1. Open Visual Studio:
  2. Open your Visual Studio project.
  3. Access the Package Manager UI:
  4. In Visual Studio, go to Tools -> NuGet Package Manager -> Manage NuGet Packages for Solution.
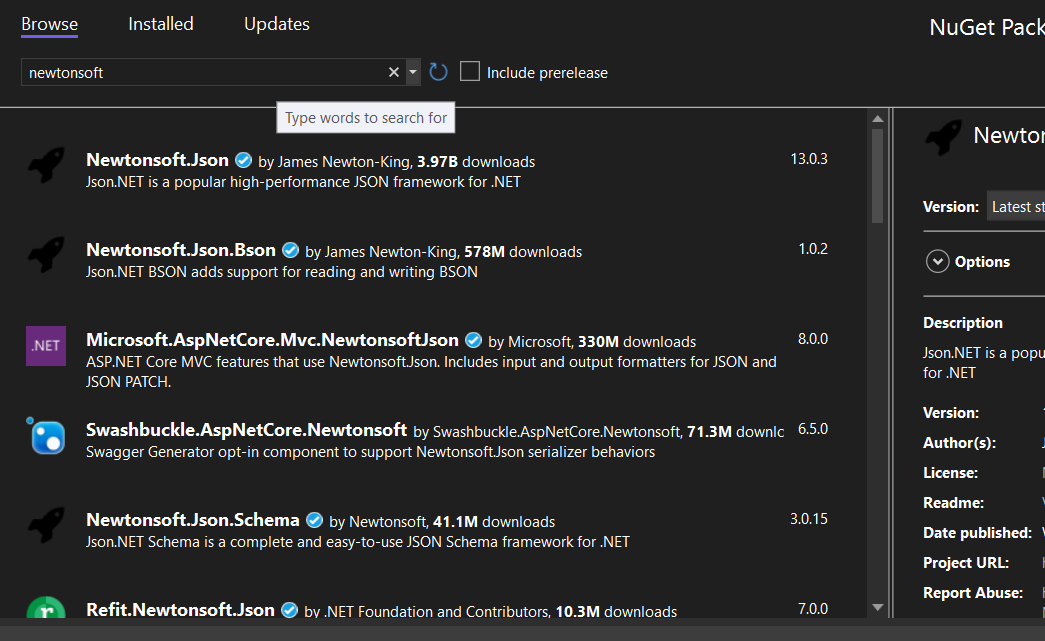
  5. In the Browse tab, search for “Newtonsoft.Json.”
Using Visual Studio (Package Manager UI)

Using .NET CLI:

To use the .NET CLI, you need to have the .NET SDK (Software Development Kit) installed on your machine.
Open a Command Prompt or Terminal:
Navigate to your project’s directory using the command prompt or terminal.
Run the .NET CLI command:

dotnet add package Newtonsoft.Json

Once you’ve installed Json.NET, you can start using it in your code by importing the Newtonsoft.Json namespace:

using Newtonsoft.Json;

Now, you’re ready to perform JSON serialization, deserialization, and other operations using Json.NET in your .NET project.

Json.NET allows customization through various settings and configurations.

JsonSerializerSettings settings = new JsonSerializerSettings
{
Formatting = Formatting.Indented,
NullValueHandling = NullValueHandling.Ignore,
// ... other settings
};

string json = JsonConvert.SerializeObject(myObject, settings);

What are Alternatives to Json.NET?

In summary, what is the main alternative to Json.NET? System.Text.Json. Indeed, Json.NET has been the standard for JSON handling in .NET for many years. However, with the introduction of .NET Core, Microsoft introduced a new JSON library called System.Text.Json to provide built-in JSON support in the .NET framework. Here’s a brief comparison of Json.NET and System.Text.Json:

Json.NET (Newtonsoft.Json):

What are the Advantages of Json.Net?

  1. Mature and well-established library.
  2. Rich feature set and customization options.
  3. Good performance.

What are the Disadvantages of Json.Net?

  1. External dependency (needs to be added as a NuGet package).
  2. More configuration options might lead to a steeper learning curve.

System.Text.Json:

What are the Advantages of System.Text.Json?

  1. Part of the .NET framework (no need for external dependencies in .NET Core and later).
  2. Good performance, especially in simple scenarios.
  3. Simpler API compared to Json.NET.

What are the Disadvantages of System.Text.Json?

  1. Less feature-rich compared to Json.NET.
  2. Limited customization options.

Other Alternatives:

Utf8Json:

  1. A third-party library that focuses on performance and claims to be faster than both Json.NET and System.Text.Json in certain scenarios.
  2. It is lightweight and optimized for high-throughput scenarios.

ServiceStack.Text:

  1. Another alternative that provides JSON and CSV parsing. It’s known for its fast performance.

Jil:

  1. A fast JSON (de)serializer, designed to be as quick as possible.

When choosing a JSON library, consider the specific needs of your project. For new projects using .NET Core and later, System.Text.Json is a good default choice due to its integration with the framework. However, for more advanced scenarios or if you have specific requirements that System.Text.Json doesn’t meet, Json.NET or other third-party libraries might be more suitable.

Review of the Best Javascript IDEs | KoderShop

Review of the Best Javascript IDEs | KoderShop

IDE for JS
IDE for JS

Best JavaScript Editor and IDE Comparison in 2023

If you want, you can also write JS code in a text editor without IDE – nothing prevents you from creating a simple website in Notepad, saving a file with the .html extension. However, if you want to make this process more comfortable and faster, you should pay attention to integrated development environments (IDEs) or advanced JavaScript editors.

In this article we are going to look at actually only three most popular and handy JS IDEs are Visual Studio Code, Atom and Webstorm

What Is IDE For JavaScript and Why Do You Need It

In essence, a code editor or IDE is a text editor with additional features tailored to the specific programming language. For example, all code editors have syntax highlighting for different programming languages: key words and constructions are highlighted in different colors, comments are italicized. This makes it easier to navigate and notice typos and inconsistencies at once. In addition, there is usually auto-formatting in accordance with accepted standards, syntax checking, auto-completion of language keywords, function and variable names.

An Integrated Development Environment (IDE) is a software application that helps programmers develop JS program code efficiently. It increases developer productivity by combining capabilities such as editing, creating, testing, and packaging software into an easy-to-use application. Just as writers use word processors and accountants use spreadsheets, software developers use IDEs to simplify their work.

In search of the best IDE for JavaScript we will look at are several key differences between VS Code, Atom and Webstorm, VS Code and Atom unlike Webstorm is completely free, but in the case of Webstorm we just install the program and we have a full set of functionality by default, so to speak “from box”, while when installing VS Code or Atom we get a “bare” editor and can add plugins and configure it completely for ourselves.

What to Pay Attention to When Choosing a IDE for JS

  1. Support for the operating system (OS) you need. You should pay special attention to this point if you work in a team. It is best to give preference to cross-platform JS IDE solutions.
  2. Collaborative development capabilities. This again applies to teams that are going to work with a shared repository. The platforms we’ll look at below integrate with Git.
  3. Supported languages (programming, of course). Keep the long term in mind here – you may someday decide to add features to your project that are implemented in some other language. It’s worth choosing an environment that supports multiple programming languages.

Webstorm

WebStorm is a JetBrains IDE product that focuses on JavaScript development.

It supports multiple technologies and languages such as JavaScript, HTML, CSS, Angular JS, TypeScript, Node.js, Meteor, ECMAScript, React, Vue.js, Cordova, etc. WebStorm is compatible with Windows, Mac and Linux.


Features:

  • You can easily test your code using tools like Mocha, Karma test runner, Jest, and more.
  • Trace (the process of checking code manually) your JavaScript code.
  • This IDE offers a wide range of plugins and templates.
  • Code style, fonts, themes and shortcodes are customizable.
  • A built-in terminal is available.
  • Integration with VCS (Veritas Cluster Server)
  • Parameter hints
  • Git integration
  • Intelligent code completion
  • TODO (programmer’s notes) support

Pros:

  • As with the JetBean product, the user interface is very similar to the famous IntelliJ.
  • JS static code scanning from the package is very convenient.
  • Auto-correct is also a very productive feature worth mentioning.
  • By default it has good integration with Angular, TypeScript, Vue, React

Visual Studio Code

Don’t confuse this with Visual Studio which is mainly for .NET development. It is one of the best IDEs for JavaScript development. It is a very powerful JS editor with a rich set of features and above all, it is free.


Features:

  • Support for multiple languages (JavaScript, TypeScript, etc.). Custom extensions can be installed to support C#, C++, Python, etc. ecosystems.
  • Syntax highlighting
  • Autocomplete with IntelliSense
  • Ability to debug code by joining running applications and enabling breakpoints
  • Ability to set breakpoints
  • A bunch of extensions to support many additional features (e.g., extensions for Docker)
  • Integration capabilities with Visual Studio Code Online
  • Version control with extensions

Pros:

  • Powerful multilingual IDE
  • Good built-in features such as auto highlighting of repeated variables
  • Lightweight
  • Useful for quick modification of scripts
  • Better UI, easy plugins and good integration with git

Atom

Atom is an open source IDE that gained a lot of popularity even before Visual Studio Code. It is supported by GitHub, which was another reason for its popularity. Atom is an application of Electron.

Atom is similar to VS Code in many ways. It supports Windows, Mac, and Linux. It is free to use and is under the MIT license. It also has automatic code completion, supports multiple projects and multiple section editing etc.


Features:

  • Has a built-in package manager.
  • You can find, view and replace text typed in a file or in the entire project.
  • IDE supports command palette to run available commands.
  • You can easily find and open a file or project.
  • Quickly find and replace text as you type in the file.
  • This javascript code editor can be used on Windows, OS X, and Linux.

Pros:

  • Git integration
  • Cross-platform support
  • Support for multiple cursors

Minuses:

  • Occasionally unstable performance
  • Lack of code execution capability
  • Slower than some other editors

Conclusion of the Search for the Best Javascript IDE:

There is no single JS source code editor or IDE that is a one-size-fits-all solution for everything. Therefore, it would be unfair to call any one IDE the best, as each of them has its own strengths and weaknesses. Therefore, you need to accurately state all your requirements before choosing one of them.

I hope the above list will help you make the right decision. Besides, tell us about your favorite IDEs in t

he comments below.

What Is Iteration In a Project? Iterative Process Meaning

What Is Iteration In a Project? Iterative Process Meaning

Agile Iteration
Agile Iteration

Theoretical Aspects and Practical Implementation of Iterative Agile Systems

Iterative project management represents an approach to orchestrating software DevOps specialists. This method entails the division of the project into smaller phases or cycles, with each phase yielding a functional software increment.

By adopting iterative agile management, teams can expedite the delivery of value to their customers, garner feedback regularly, and effortlessly accommodate shifting demands and priorities.

In contemporary teams which develop software, various strategies for implementing agile iterative project management are employed, contingent on the framework or methodology they embrace.

What Is Iteration?

Iterative Process Definition

The concept of an iterative agile process entails developing a soft in repetitive phases. Within each iterative life cycle, there is a sequence of activities involving initial project planning, design, coding, testing, and subsequent product increment assessment. An iteration, in this context, signifies a singular run-through of this procedure, typically spanning a duration of one to four weeks. These iterations serve as a mechanism for expediting the delivery of functional software, gathering input from customers and stakeholders, and smoothly accommodating alterations in prerequisites and prioritization.

Some Examples of Iterations

Within the Scrum framework, a team engages in a bi-weekly cycle, referred to as a “sprint,” during which they put into action a collection of stories told by users to be selected from the product backlog. Upon concluding the sprint, they present the resulting product increment to the product owner for assessment and feedback. Additionally, the team holds a meeting aimed at evaluating their workflow and pinpointing potential enhancements.

Another iteration example can be observed when a team adopts the Kanban approach. In this scenario, fixed iteration cycles are not employed; instead, they embrace a continuous stream of tasks derived from the backlog. The team enforces constraints on the maximum number of tasks allowed to be concurrently in progress, known as the “work in progress” or WIP limit. They closely monitor the cycle time, which signifies the duration required to complete a task from inception to completion. Visual aids like Kanban boards are harnessed to monitor task statuses and identify bottlenecks and inefficiencies. Furthermore, they institute regular feedback loops and initiate actions for continuous improvement.

Lastly, another illustration of the iterative process meaning comes into play when a team opts for the Feature Driven Development (FDD) methodology. This approach assumes that the segmentation of the project into features, which represent petite yet client-valued functions. These features are then systematically developed through a series of two-week iterations. Each of these iterations encompasses a sequence of five key activities, which encompass the creation of a comprehensive model, the compilation of a feature inventory, feature-specific planning, design tailored to each feature, and the actual implementation of these features. After each iteration, the team yields a fully operational feature, subsequently integrating it seamlessly into the broader system.

Iterative vs Agile Models

Numerous engineers hold a keen curiosity about whether iterative development is the same as agile development. Consequently, we’ve compiled several elucidations to facilitate your profound comprehension of these methodologies.

The difference between agile and iterative models lies in the fact that agile represents a particular variant of the iterative model. Agile adheres to a defined set of principles and techniques, whereas iterative constitutes a broad approach that can be implemented across various software development procedures.

Agile iteration represents a time-limited and step-by-step strategy for delivering software, progressively developing the product from the project’s outset until it’s delivered in its entirety toward the project’s conclusion. Agile places importance on engaging customers, functional software, adaptability, and human connections over rigidly adhering to a plan, extensive documentation, contract discussions, and procedural tools. Additionally, Agile employs diverse frameworks and approaches like Scrum, Kanban, XP, and others to put its principles and methodologies into action.

Iterative development signifies an approach to software development that advances by continually refining the product through incremental enhancements. Developers engage in building the product even when they are aware that numerous segments remain unfinished. The team focuses on these incomplete aspects, incrementally improving the product until it reaches a state of completion and satisfaction. Following each iteration, customer feedback plays a pivotal role in enhancing the software as additional intricacies are incorporated into the product. The iterative methodology is adaptable and can be seamlessly integrated into various software development processes, including but not limited to waterfall and spiral models.

Here are some key distinctions between agile and iterative models:

  • Iterative development serves as a broad methodology, typically applicable to any software creation process, whereas agile iteration represents just one variant of iterative methodology
  • Agile operates within defined rules and principles, while iteration lacks adherence to specific guidelines and practices.
  • Agile emphasizes rapid product delivery, typically within 1-4 weeks, whereas the iterative approach tends to extend the timeline.
  • Agile consistently involves customers in project collaboration and feedback, while iterative project management may assume limited customer engagement in the process.
  • Agile draws upon various methods and frameworks, whereas the iterative process doesn’t anticipate any predefined frameworks or specific methodologies.

Below, you’ll find a comparison table outlining the primary distinguishing features of agile and iterative models.

Methodology

Development process

Product inspection

Stages of development

Product review

Roles

Tests

Deployment

Agile Model

A type of methodology or idea that incorporates several techniques and principles used to approach project management Combines various principles and techniques in one project

The development process is called Sprint, which has a fixed period of execution (2-4 weeks). Potentially growing product is delivered within this period.

Agile foresees a meeting calling to inspect a product improvement and adaption when necessary. It is called the Sprint Review meeting.

The previous Sprint influences the next one as the product backlog is updated and set according to the priorities based on the changes and given feedback.

Teams collaborating during Sprints or special meetings called “Retrospective of the Sprint” can revise products from time to time. They think about how to improve their workflow.

Agile iterative development includes 2 roles – Team Member and Scrum Master. Team Member estimates, develops, tests, and makes the product design. Scrum Master organizes team cooperation and removes all possible barriers.

Since each Sprint includes testing, team members prepare, identify, and perform all test cases.

Software demonstration and deployment is carried out at the end of every Sprint or at the Demonstrating Sprint meeting, where the team members demonstrate the product improvements to the stakeholders.

Iterative Model

One technique is used in several projects, which succeeds due to the subsequent improvement by increasing the product

The process is called iterative development, which is a small part of creating, testing and improvement of the product.

To estimate the product and plan the next iterative cycle a meeting (Iteration Review) is organized.

Since the product is changed and updated based on the changes and feedback, the initial product iteration affects the further one.

Teams may collaborate to make product reviews based on the iteration as well as on the meeting called “Retrospective of iteration” where they define learned lessons and practices.

The model of iterative project management involves two persons in the iterative development process:  the Project Manager, who makes estimation, iteration planning, and completing, and the Member of the Team, who designs, develops, and tests products.

Since testing is made product iteration, testers prepare, identify, and perform all test cases.

At the end of every software iteration, the team performs deployment and demonstrates the product to the stakeholders.

How Is The Iteration Plan Made?

In project management, the process of iteration planning involves a series of sequential steps:

Goal Definition: The team establishes a clear objective and scope for the software iteration, drawing from the customer’s requirements, the project’s vision, and the product backlog. It is crucial that the iteration goal is unambiguous, quantifiable, and attainable within the allotted time frame.

Iteration Backlog Creation: The team identifies the specific features or user stories to be incorporated into the iteration software development, taking into account their priority, interdependencies, and estimated effort required. The iteration backlog should be pragmatic, manageable, and closely aligned with the established goal.

Agile Iteration Planning Involves a Structured Series of Steps:

Task Breakdown:

The team dissects features or user stories into smaller, manageable tasks. These tasks are then assigned to individual team members, with estimates provided for their duration and required resources. The iteration plan should be comprehensive, foster collaboration, and allow for adaptability.

Execution:

The team diligently executes the tasks according to the iteration plan, adhering to established processes and best practices. Continuous communication is maintained, progress is closely monitored, and any emerging issues or risks are promptly addressed.

Review:

The team showcases the incremental product to both the customer and relevant stakeholders, gathering their feedback. This feedback is used to assess the quality and functionality of the iterative software. Additionally, the team measures progress toward the established goal and evaluates customer satisfaction.

Iteration Retrospective:

The team conducts a reflective session to evaluate their performance. They identify successful practices and areas for improvement. Together, the team agrees on actionable items to enhance future iterations. This stage also serves as an opportunity to celebrate achievements and express appreciation for each team member’s contributions.

Why Agile Iteration Is Important and Beneficial?

The iterative model lies at the heart of Agile methodologies. The inaugural principle of the Agile Manifesto declares: “Our utmost priority is to gratify the client by means of early and uninterrupted delivery of valuable software.” The key term in this context is ‘uninterrupted.’ Diverging from conventional project management frameworks, where the focus is on delivering a single, final product, Agile teams engage in an iterative cycle of production, yielding outcomes at consistent intervals. Consequently, clients gain visibility into the product’s evolution well before its completion and have the opportunity to contribute feedback, enhancing the ongoing iterative development software.

Within the realm of Agile iteration, a sequence of actions is reiterated in a continuous loop until the most favorable final outcome is achieved. This methodology empowers Agile teams to swiftly identify potential risks and proactively address them before they escalate. Each iterative life cycle should surpass its predecessor—developers may fine-tune a glitch, enhance an existing feature, or introduce a novel one. This agile iterative progress persists until the product attains readiness for launch.


The iterative Agile methodology offers a range of advantages for software development teams:

  • Adaptability: It allows for flexibility in implementing changes at various stages of the iterative development
  • Customer Engagement: Customers are actively involved during the Design and Adjustment phases of the PCDA cycle, fostering collaboration and ensuring their needs are met
  • Early Risk Mitigation: It enables the early identification and mitigation of risks, minimizing potential issues down the road
  • Swift Delivery: Rapid and incremental delivery ensures that results are delivered consistently and promptly
  • Efficient Testing: Testing throughout the iterations is more manageable and effective compared to testing at the end of the development process
  • Encourages Innovation: The iterative approach empowers diverse teams to experiment and innovate, harnessing a wide range of perspectives
  • Ideal for Evolving Scopes: The Agile iterative approach is particularly well-suited for projects or businesses operating within dynamic and ever-changing scopes

Conclusion

The Agile iteration and Iterative project management methodologies share a common thread of iteration in software development, yet they diverge in several key aspects. Agile represents a specialized iteration model within this spectrum. The primary distinctions between the two revolve around their emphasis on customer value, cycle nomenclature, collaboration intensity, adaptability to change, and planning strategies.

In the realm of software development, iteration assumes a pivotal role, facilitating error rectification, enhancement of quality, integration of new features, and the attainment of objectives through recurrent adjustment cycles.

Mastering DataTable Merging in C#: A Comprehensive Guide

Mastering DataTable Merging in C#: A Comprehensive Guide

DataTable C#

DataTable Merging in C#: A Comprehensive Guide

In C# programming, managing data efficiently is crucial, and the DataTable class is a powerful tool for this purpose. A DataTable is an in-memory data structure that organizes data into rows and columns, akin to a database table. It provides a flexible way to store, manipulate, and analyze data in C# applications.

This article will guide you through the essential aspects of working with DataTable. You’ll learn how to create, populate, and manipulate data, including adding and deleting rows, working with columns, applying filters, and performing aggregate operations. Additionally, you’ll master the art of merging two DataTables.

How to Create DataTable in C#?

In C#, you can create a DataTable by following these steps:

  • Import Required Namespace:
    Before you can work with DataTable, make sure you import the System.Data namespace. You can do this at the top of your C# file:
using System.Data;

  • Instantiate a DataTable:
    You can create a new DataTable instance using the DataTable constructor:
DataTable dataTable = new DataTable();

  • Define Columns:
    A DataTable consists of columns that define the structure of your data. You must define the names of the columns and their data types. You can do this using the Columns property:
dataTable.Columns.Add("ID", typeof(int));
dataTable.Columns.Add("Name", typeof(string));
dataTable.Columns.Add("Age", typeof(int));

  • Add Rows:
    To add data to your DataTable, you can create new DataRow instances and populate them with values, then add these rows to the DataTable. Here’s an example of adding a row:
DataRow row = dataTable.NewRow();
row["ID"] = 1;
row["Name"] = "John";
row["Age"] = 30;
dataTable.Rows.Add(row);

  • Here’s a complete example of how to create a simple DataTable with columns and a few rows:
using System;
using System.Data;

class Program
{
static void Main()
{
DataTable dataTable = new DataTable();
dataTable.Columns.Add("ID", typeof(int));
dataTable.Columns.Add("Name", typeof(string));
dataTable.Columns.Add("Age", typeof(int));

DataRow row = dataTable.NewRow();
row["ID"] = 1;
row["Name"] = "John";
row["Age"] = 30;
dataTable.Rows.Add(row);

 // Add more rows here...
// Now, you have a populated DataTable.'
// Display the DataTable, if needed.
foreach (DataRow dataRow in dataTable.Rows)
{
Console.WriteLine($"{dataRow["ID"]}, {dataRow["Name"]}, {dataRow["Age"]}");
}
}
}

This code snippet creates a DataTable, defines its structure with columns, adds a row of data, and displays it.

DataTable Properties

The DataTable class in C# provides several properties that allow you to manipulate and retrieve information about the data stored in the table. Here are some important properties of the DataTable class:

  • Columns:
    Description: Gets the collection of columns that belong to this table.
    Usage: DataTable.Columns
  • Rows:
    Description: Gets the collection of rows that belong to this table.
    Usage: DataTable.Rows
  • TableName:
    Description: Gets or sets the name of the DataTable.
    Usage: DataTable.TableName
  • PrimaryKey:
    Description: Gets or sets an array of columns that function as primary keys for the DataTable.
    Usage: DataTable.PrimaryKey
  • ParentRelations:
    Description: Gets the collection of parent relations for this DataTable.
    Usage: DataTable.ParentRelations
  • ChildRelations:
    Description: Gets the collection of child relations for this DataTable.
    Usage: DataTable.ChildRelations
  • CaseSensitive:
    Description: Gets or sets whether string comparisons within the table are case-sensitive.
    Usage: DataTable.CaseSensitive
  • Rows.Count:
    Description: Gets the total number of rows in the table.
    Usage: DataTable.Rows.Count
  • Columns.Count:
    Description: Gets the total number of columns in the table.
    Usage: DataTable.Columns.Count
  • MinimumCapacity:
    Description: Gets or sets the initial starting size for this table.
    Usage: DataTable.MinimumCapacity
  • ExtendedProperties:
    Description: Gets the collection of customized user information.
    Usage: DataTable.ExtendedProperties

DataTable Methods

The DataTable class in C# provides a variety of methods to perform operations on the data stored within the table. Here are some important methods of the DataTable class:

  • NewRow():
    Description: Creates a new DataRow with the same schema as the DataTable.
    Usage: DataRow newRow = dataTable.NewRow();
  • Rows.Add(DataRow row):
    Description: Adds a new row to the DataTable.
    Usage: dataTable.Rows.Add(newRow);
  • Rows.Remove(DataRow row):
    Description: Removes the specified DataRow from the DataTable.
    Usage: dataTable.Rows.Remove(row);
  • Clear():
    Description: Removes all rows from the DataTable.
    Usage: dataTable.Clear();
  • ImportRow(DataRow row):
    Description: Imports a row into the DataTable with all of its data.
    Usage: dataTable.ImportRow(existingRow);
  • Clone():
    Description: Creates a new DataTable with the same schema and data as the original DataTable.
    Usage: DataTable newDataTable = dataTable.Clone();
  • Copy():
    Description: Creates a new DataTable with the same schema and data as the original DataTable, including original row states.
    Usage: DataTable newDataTable = dataTable.Copy();
  • Compute(string expression, string filter):
    Description: Computes the given expression on the specified rows that pass the filter criteria.
    Usage: object result = dataTable.Compute(expression, filter);
  • Select(string filterExpression, string sortExpression):
    Description: Retrieves an array of DataRow objects that match the filter criteria and sort order.
    Usage: DataRow[] foundRows = dataTable.Select(filterExpression, sortExpression);
  • Rows.Find(object[] keyValues):
    Description: Finds a specific row using the primary key values.
    Usage: DataRow foundRow = dataTable.Rows.Find(keyValues);
  • Merge(DataTable table):
    Description: Merges another DataTable into the current DataTable.
    Usage: dataTable.Merge(anotherDataTable);
  • WriteXml(string fileName):
    Description: Writes the contents of the DataTable to an XML file.
    Usage: dataTable.WriteXml(“data.xml”);
  • ReadXml(string fileName):
    Description: Reads XML data into the DataTable.
    Usage: dataTable.ReadXml(“data.xml”);

How To Merge Two DataTables

Merging DataTables in C# is a powerful technique used to combine data from multiple tables into a single DataTable. This operation is particularly useful in scenarios where you have data distributed across different tables, and you need to consolidate or analyze it collectively. Here are a few key points about merging DataTables:

  • Combining Data:
    Use Case: Merging is handy when you have related data spread across different sources or databases.
    Flexibility: You can merge entire tables or merge specific rows based on criteria using primary key matching.
  • Preserving Data Integrity:
    Schema Matching: Merging ensures that the schemas (columns and data types) of the tables being merged match to maintain data integrity.
    Primary Key Consideration: If your tables have primary keys defined, the merge operation uses them to uniquely identify and merge rows.
  • Handling Conflicts:
    Duplicate Rows: If there are rows with the same primary key in both tables, you can specify how to handle these conflicts, whether to preserve changes from one table or merge conflicting values.
    Custom Resolution: You can customize conflict resolution logic by handling the MergeFailed event.
  • Performance Considerations:
    Volume of Data: Large datasets can impact performance during merge operations. It’s essential to optimize your code, especially for significant amounts of data.
    Data Processing: Be mindful of the data processing complexity, especially when dealing with complex relationships or conditions during the merge.
  • Post-Merge Operations:
    Data Analysis: After merging, you can perform various operations like filtering, sorting, or aggregations on the merged data to derive insights.
    Serialization: You can serialize the merged DataTable to persist the combined data for future use or for sharing with other components/systems.
  • Error Handling and Validation:
    Input Validation: Ensure that the input DataTables are correctly formatted and contain the expected data before performing a merge to prevent runtime errors.
    Error Handling: Implement robust error handling to deal with exceptions that might occur during the merge operation, such as schema mismatches or other unexpected issues.


Here’s an example that demonstrates how to create a DataTable, populate it with data, perform operations like adding, updating, and deleting rows, and then merge it with another DataTable. In this example, we’ll create two DataTables and merge one into the other:

using System;
using System.Data;

class Program
{
static void Main()
{
// Create the first DataTable
DataTable dataTable1 = new DataTable("Table1");
dataTable1.Columns.Add("ID", typeof(int));
dataTable1.Columns.Add("Name", typeof(string));
dataTable1.Rows.Add(1, "Alice");
dataTable1.Rows.Add(2, "Bob");

// Create the second DataTable
DataTable dataTable2 = new DataTable("Table2");
dataTable2.Columns.Add("ID", typeof(int));
dataTable2.Columns.Add("Name", typeof(string));
dataTable2.Rows.Add(3, "Charlie");
dataTable2.Rows.Add(4, "David");

// Merge the second DataTable into the first DataTable
dataTable1.Merge(dataTable2);

In this example, we first create two DataTables, dataTable1 and dataTable2, each with columns “ID” and “Name”. We populate these tables with some sample data. Then, we use the Merge method to merge dataTable2 into dataTable1. Finally, we loop through the merged DataTable (dataTable1) and print the merged data.

Upon running this program, it will produce the following output:

Merged DataTable:
ID: 1, Name: Alice
ID: 2, Name: Bob
ID: 3, Name: Charlie
ID: 4, Name: David

Exploring the Power of FileStream in C# – File I/O Operations Made Easy

Exploring the Power of FileStream in C# – File I/O Operations Made Easy

Filestream in C#
Filestream in C#

Exploring the Power of FileStream in C#

In this article, we will delve into the FileStream class in C# through practical examples. FileStream is an essential component for working with file I/O operations. Join us as we explore its functionalities and applications in the world of C# programming.

What is FileStream Class in C#?

FileStream class is a part of the System.IO namespace and is used for reading from and writing to files. It provides a way to interact with files using streams of bytes. FileStream allows you to perform various operations such as reading from a file, writing to a file, seeking within a file, and closing the file. The FileStream class in C# is useful in several scenarios:

  1. Working with Binary Files: FileStream is invaluable when dealing with binary files, where data is stored in a format that is not human-readable. Binary files include images, audio files, and other non-textual data. FileStream allows precise manipulation of binary data.
  2. Large File Operations: When working with large files, FileStream enables efficient reading and writing in smaller chunks, reducing memory overhead. It’s particularly helpful when you don’t want to load an entire file into memory at once.
  3. Network Operations: When dealing with network streams or network protocols, FileStream can be used to read from or write to network sockets, making it vital for network programming.
  4. Custom File Formats: If you’re working with custom file formats where data is structured in a specific way, FileStream allows you to read and write data according to the format’s specifications, enabling you to create or parse custom file formats effectively.
  5. Performance Optimization: In applications where performance is crucial, especially when dealing with large volumes of data, FileStream provides low-level access, allowing developers to optimize read and write operations for efficiency.

Using the FileStream Class in C#

To employ the FileStream Class in C#, start by importing the System.IO namespace. After that, initialize a FileStream class object. This object allows you to interact with a file in different ways, such as reading, writing, or both, depending on your specified mode and file access. When you explore the FileStream class’s definition, you’ll find various constructor overloads, each tailored for specific use cases as described in the following text.

Here are the commonly used constructors:

public FileStream(string path, FileMode mode);

public FileStream(string path, FileMode mode, FileAccess access);

public FileStream(string path, FileMode mode, FileAccess access, FileShare share);

public FileStream(IntPtr handle, FileAccess access);

public FileStream(IntPtr handle, FileAccess access, bool ownsHandle);

hese constructors provide various ways to create instances of the FileStream class, allowing developers flexibility in managing files and streams in their C# applications. To create an instance of FileStream Class you need to use the following overloaded version of one of these Constructors.

Here are some of the constructors explained in greater detail:

public FileStream(string path, FileMode mode)

This constructor requires two arguments:


  • path (String): This argument specifies the complete file path or the relative file path where the FileStream will be created or opened. It indicates the location of the file in the file system.
  • mode (FileMode Enum): The FileMode enumeration specifies how the operating system should open a file. It can have values like FileMode.Create, FileMode.Open, FileMode.Append, etc. The mode parameter determines the file’s behavior, such as creating a new file, opening an existing file, or appending data to an existing file.

public FileStream(string path, FileMode mode, FileAccess access)

This overloaded version requires three arguments. As mentioned earlier, the first two arguments are the path and mode parameters, which specify the file path and how the file should be opened or created, respectively.


Let’s focus on the third argument:

  • access (FileAccess Enum): The access parameter determines the operations that can be performed on the file opened by the FileStream. It is an enumeration of type FileAccess and can have values like FileAccess.Read, FileAccess.Write, or FileAccess.ReadWrite.

public FileStream(string path, FileMode mode, FileAccess access, FileShare share)

This constructor takes four arguments. The first three arguments, path, mode, and access, remain the same as previously described.


Now, let’s turn our attention to the fourth parameter:

  • share (FileShare Enum): The share parameter specifies the file-sharing mode to be used by the FileStream object. It is an enumeration of type FileShare and can have values like FileShare.None, FileShare.Read, FileShare.Write, or FileShare.ReadWrite.

public FileStream(string path, FileMode mode, FileAccess access, FileShare share, int bufferSize)

This overloaded version requires five arguments.


The fifth argument in the FileStream constructor is the bufferSize:

  • bufferSize (int): This parameter specifies the size of the buffer used for reading and writing operations. When data is read from or written to the file, it’s done in chunks determined by the buffer size. A larger buffer size can improve the performance of read and write operations, especially when dealing with large files. However, the optimal buffer size depends on the specific use case and the size of the data being processed.

FileStream(IntPtr handle, FileAccess access, bool ownsHandle)

This constructor in C# takes three parameters, with the third parameter being ownsHandle:

  • The ownsHandle parameter determines whether the FileStream instance should take ownership of the provided handle. If ownsHandle is set to true, the FileStream instance assumes ownership of the handle and will close it when the FileStream is closed or disposed of. If ownsHandle is set to false, the FileStream instance will not close the handle when it is closed or disposed of.

The path parameter is a string value, the bufferSize is an integer value, and ownsHandle is simply a bool. As for the remaining three parameters — FileMode, FileAccess, FileShare, and IntPtr handle — they are essential components of the FileStream constructor in C#. In the following discussion, we will explore these Enums and the IntPtr handle in depth, providing comprehensive explanations along with practical examples to enhance understanding.

FileMode in C#:

FileMode is responsible for dictating how the operating system should handle file operations. Let’s explore the six constant values associated with FileMode:

  1. CreateNew: This option instructs the operating system to create a new file. It necessitates System.Security.Permissions.FileIOPermissionAccess.Write permission. If the file already exists, it raises a System.IO.IOException exception.
  2. Create: Similar to CreateNew, this mode creates a new file, but if the file exists, it overwrites it without throwing an exception. It also requires System.Security.Permissions.FileIOPermissionAccess.Write permission. If the existing file is hidden, an UnauthorizedAccessException Exception is triggered.
  3. Open: This mode indicates that the operating system should open an existing file, with the ability to open contingent on the FileAccess specified in the System.IO.FileAccess Enumeration. If the file doesn’t exist, a System.IO.FileNotFoundException exception is raised.
  4. OpenOrCreate: Here, the operating system opens an existing file if available, otherwise creates a new one. If FileAccess is Read, System.Security.Permissions.FileIOPermissionAccess.Read permission is needed. If FileAccess is Write, it requires System.Security.Permissions.FileIOPermissionAccess.Write permission. For FileAccess ReadWrite, both Read and Write permissions are essential.
  5. Truncate: It directs the operating system to open an existing file and truncate it to zero bytes. This mode needs System.Security.Permissions.FileIOPermissionAccess.Write permission. Any attempt to read from a file opened with FileMode.Truncate results in a System.ArgumentException exception.
  6. Append: When used, it opens an existing file and appends content to the end, or creates a new file. This mode requires System.Security.Permissions.FileIOPermissionAccess.Append permission and can only be used in conjunction with FileAccess.Write. Attempting to seek a position before the end of the file triggers a System.IO.IOException exception, while any read attempt leads to a System.NotSupportedException exception.

Here’s an example demonstrating the use of FileMode to create or open a file:

using System;
using System.IO;

class Program
{
static void Main()
{
// File path
string filePath = "example.txt";

 // FileMode.Create: Creates a new file. If the file already exists, it will be replaced with the new content.
using (FileStream fileStream = new FileStream(filePath, FileMode.Create))
{
// Writing data to the file
string content = "Hello, FileMode!";
byte[] data = System.Text.Encoding.UTF8.GetBytes(content);
fileStream.Write(data, 0, data.Length);
Console.WriteLine("File created and data written successfully.");
}

 // FileMode.Open: Opens an existing file. Throws FileNotFoundException if the file doesn't exist.
using (FileStream fileStream = new FileStream(filePath, FileMode.Open))
{
// Reading data from the file
byte[] buffer = new byte[1024];
int bytesRead = fileStream.Read(buffer, 0, buffer.Length);
string result = System.Text.Encoding.UTF8.GetString(buffer, 0, bytesRead);
Console.WriteLine("Data read from the file: " + result);
}
}
}

In this example, the program first creates a file named “example.txt” using FileMode.Create and writes data into it. Then, it opens the same file using FileMode.Open and reads the data back.

FileAccess in C#:

FileAccess grants files read, write, or read/write access. When you inspect its definition, you’ll find it’s an Enum featuring three constant values:

  1. Read: Provides read access to the file, allowing data retrieval. It can be combined with Write for read/write access.
  2. Write: Offers write access to the file, enabling data to be written into it. It can be combined with Read for read/write access.
  3. ReadWrite: Grants both read and write access to the file, facilitating both data reading and writing operations.

Below is an illustrative example showcasing how FileAccess can be utilized:

using System;
using System.IO;
using System.Text;

class Program
{
static void Main()
{
string filePath = "example.txt";
string content = "Hello, FileAccess!";

 // Write data to the file with FileAccess.Write permission
using (FileStream fileStream = new FileStream(filePath, FileMode.Create, FileAccess.Write))
{
byte[] data = Encoding.UTF8.GetBytes(content);
fileStream.Write(data, 0, data.Length);
Console.WriteLine("Data written to the file successfully.");
}

// Read data from the file with FileAccess.Read permission
using (FileStream fileStream = new FileStream(filePath, FileMode.Open, FileAccess.Read))
{
byte[] buffer = new byte[1024];
int bytesRead = fileStream.Read(buffer, 0, buffer.Length);
string result = Encoding.UTF8.GetString(buffer, 0, bytesRead);
Console.WriteLine("Data read from the file: " + result);
}
}
}

In this example, the program first writes the string “Hello, FileAccess!” to a file named “example.txt” using FileAccess.Write permission. Then, it opens the same file with FileAccess.Read permission and reads the data back.

FileShare in C#:

FileShare in C# provides constants to manage access permissions for other FileStream objects attempting to access the same file. When multiple FileStream objects try to access a file simultaneously, FileShare determines how they can interact. Here’s a breakdown of its six constant values:

  1. None: Prevents sharing of the file. Any attempt to open the file will fail until it’s closed, either by the current process or another.
  2. Read: Permits subsequent opening of the file for reading. Without this flag, any read attempts will fail until the file is closed. However, additional permissions might still be necessary.
  3. Write: Permits subsequent access to the file for writing. Without this flag, any write attempts will fail until the file is closed. Additional permissions might also be required.
  4. ReadWrite: Enables subsequent opening of the file for both reading and writing. Without this flag, any read or write attempts will fail until the file is closed. Additional permissions may still be necessary.
  5. Delete: Grants permission to delete the file in the future.
  6. Inheritable: Makes the file handle inheritable by child processes, although this is not directly supported by Win32.

Here is a sample demonstrating the using of FileShare:

using System;
using System.IO;
using System.Text;

class Program
{
static void Main()
{
string filePath = "example.txt";
string content = "Hello, FileShare!";

// Write data to the file with FileShare.Read permission
using (FileStream fileStream = new FileStream(filePath, FileMode.Create, FileAccess.Write, FileShare.Read))
{
byte[] data = Encoding.UTF8.GetBytes(content);
fileStream.Write(data, 0, data.Length);
Console.WriteLine("Data written to the file successfully.");
}

// Read data from the file with FileShare.Write permission
using (FileStream fileStream = new FileStream(filePath, FileMode.Open, FileAccess.Read, FileShare.Write))
{
byte[] buffer = new byte[1024];
int bytesRead = fileStream.Read(buffer, 0, buffer.Length);
string result = Encoding.UTF8.GetString(buffer, 0, bytesRead);
Console.WriteLine("Data read from the file: " + result);
}
}
}

In this example, the program first writes the string “Hello, FileShare!” to a file named “example.txt” with FileShare.Read permission. Then, it opens the same file with FileShare.Write permission and reads the data back

IntPtr in C#:

IntPtr is a structure in C# that is designed to be an integer type whose size is platform-specific. On a 32-bit system, IntPtr is a 4-byte (32-bit) integer, and on a 64-bit system, it is an 8-byte (64-bit) integer. The purpose of IntPtr is to hold pointers or handles to memory locations, resources, or structures in unmanaged memory.

Characteristics and Usage:

  1. Interoperability: IntPtr is crucial for interacting with unmanaged libraries, COM objects, or platform-specific APIs, where memory addresses or handles need to be passed back and forth between managed and unmanaged code.
  2. Memory Pointers: IntPtr can hold memory addresses, allowing managed code to work with raw memory blocks allocated by unmanaged code or operating system functions.
  3. Handle Representation: In the context of FileStream(IntPtr handle, FileAccess access), IntPtr is used to represent a handle to a file, providing a way to work with files already opened or managed by external processes or libraries.
  4. Platform Independence: By using IntPtr, C# code can be written in a way that is platform-independent. The size of IntPtr adjusts according to the underlying architecture, ensuring consistency in memory addressing across different platforms.
  5. Security Considerations: When using IntPtr, it’s important to handle memory and resource management carefully to prevent security vulnerabilities such as buffer overflows or pointer manipulation.
  6. Resource Management: Since IntPtr often represents unmanaged resources, it’s essential to release these resources properly. In the context of file handles, ensuring that the handles are closed or released after use prevents resource leaks and potential issues with file access.

Here’s an example showcasing how IntPtr can be utilized:

using System;
using System.IO;
using System.Runtime.InteropServices;

class Program
{
static void Main()
{
// Assume you have an existing file handle obtained from some external source
IntPtr fileHandle = GetFileHandleFromExternalSource("example.txt");

 // Open the file using the provided file handle for both reading and writing
using (FileStream fileStream = new FileStream(fileHandle, FileAccess.ReadWrite))
{
// Read data from the file
byte[] buffer = new byte[1024];
int bytesRead = fileStream.Read(buffer, 0, buffer.Length);
string content = System.Text.Encoding.UTF8.GetString(buffer, 0, bytesRead);
Console.WriteLine("Read data from the file: " + content);

// Write new data to the file
string newData = "Updated content!";
byte[] newDataBytes = System.Text.Encoding.UTF8.GetBytes(newData);
fileStream.Write(newDataBytes, 0, newDataBytes.Length);
Console.WriteLine("Data written to the file successfully.");
}
}

 // Simulated method to obtain a file handle from an external source (e.g., WinAPI)
static IntPtr GetFileHandleFromExternalSource(string filePath)
{
// Simulate getting a file handle using an external API or method
// For demonstration purposes, we'll use a placeholder value
return IntPtr.Zero;
}
}

In this example, the GetFileHandleFromExternalSource method simulates obtaining a file handle from an external source. The obtained IntPtr file handle is then used to create a FileStream object with read and write access. Subsequently, the program reads the existing data from the file, prints it to the console, writes new data, and displays a success message. 

Index Error Handling: A Comprehensive Guide to ArgumentOutOfRangeException

Index Error Handling: A Comprehensive Guide to ArgumentOutOfRangeException

ArgumentOutOfRangeException
ArgumentOutOfRangeException cover

ArgumentOutOfRangeException: Handling Index Errors in Arrays and Collections

ArgumentOutOfRangeException is an exception that is commonly encountered in programming, particularly in languages like C# and .NET. The exception known as ArgumentOutOfRangeException is triggered when a method receives an argument that is neither null nor falls within the expected range of values. This particular exception type possesses the attributes ParamName and ActualValue, which aid in comprehending the underlying cause of the exception.

What are ParamName and ActualValue?

The ParamName attribute identifies the name of the parameter associated with the erroneous argument, while the ActualValue attribute pinpoints the flawed value, should one be present.

Where ArgumentOutOfRange is widely employed?

Typically, the occurrence of the ArgumentOutOfRangeException is attributable to developer oversight. If the argument’s value is sourced from a method call or user input before being passed to the method that generates the exception, it is advisable to perform argument validation prior to the method invocation.


This exception can occur in various situations, depending on the specific context in which it is used. Some common scenarios include:

  • Array or Collection Index: When trying to retrieve an element from an array or collection using an index that exceeds the array or collection’s boundaries.
  • String Manipulation: When working with strings, this exception may be thrown if an attempt is made to access a character at an index that does not exist within the string.
  • Numeric Ranges: In mathematical or numerical operations, this exception may be raised if a number is outside the acceptable range for a given operation. For example, attempting to take the square root of a negative number may trigger this exception.
  • Custom Validation: Developers can also throw ArgumentOutOfRangeException explicitly in their code when implementing custom validation logic for function or method parameters.

The ArgumentOutOfRangeException is widely employed by classes within the System.Collections namespace. A common scenario arises when your code attempts to remove an item at a specific index from a collection. If the collection is either empty or the specified index, as provided through the argument, is negative or exceeds the collection’s size, this exception is likely to ensue.

How Do Developers Handle ArgumentOutOfRangeException?

To handle this exception, developers can use try-catch blocks to catch and respond to it appropriately. When caught, the application can provide an error message or take corrective action, such as prompting the user for valid input or logging the issue for debugging purposes.

Here are examples of ArgumentOutOfRangeException:

using System;
using System.Collections.Generic;

class Program
{
  static void Main(string[] args)
  {
    try
    {
      var nums = new List<int>();
      int index = 1;
      Console.WriteLine("Trying to remove number at index {0}", index);

      nums.RemoveAt(index);
    }
    catch (ArgumentOutOfRangeException ex)
    {
      Console.WriteLine("There is a problem!");
      Console.WriteLine(ex);
    }
  }
}

/* Output:
Trying to remove number at index 1
There is a problem!
System.ArgumentOutOfRangeException: Index was out of range. Must be non-negative and less than the size of the collection. (Parameter 'index')
   at System.Collections.Generic.List`1.RemoveAt(Int32 index)
   at Program.Main(String[] args) in \C#\ConsoleApp1\Program.cs:line 14 */

In order to preempt the exception, we can verify whether the Count property of the collection exceeds zero, and that the specified index for removal is likewise less than the value stored in Count. Only then should we proceed with the removal of a member from the collection. We shall modify the code statement within the try block as follows:

var nums = new List<int>() { 10, 11, 12, 13, 14 };
var index = 2;
Console.WriteLine("Trying to remove number at index {0}", index);

if (nums.Count > index && 0 < nums.Count)
{
nums.RemoveAt(index);
Console.WriteLine("Number at index {0} successfully removed", index);
}

/* Output:
Trying to remove number at index 2
Number at index 2 successfully removed
*/

In summary, ArgumentOutOfRangeException serves as a valuable exception for managing situations in which an argument’s value deviates from the anticipated range. It assumes a pivotal role in maintaining the strength and dependability of software by affording developers the capability to detect and address improper input in a graceful manner, thereby averting unforeseen system failures or erroneous operations.