Email Marketing With Odoo – Complete Step By Step Overview by KoderShop

Email Marketing With Odoo – Complete Step By Step Overview by KoderShop

Email marketing Odoo

Email Marketing and Mailings Creation With Odoo

Every business needs to grow and to do this, it needs to work on attracting new customers, brand awareness, maintaining audience interest, and many other functions. This is what marketing is for, but in the modern world all processes are digitalized and go online, this happens with marketing tools too. One of the modern and effective ways of interacting with the audience is Email marketing.

How to Choose an Email Marketing Tool?

There are many tools with which you can send emails to a specific audience, but today we will talk about one of the most convenient and popular tools for Email marketing – Odoo.

The Odoo service includes all the functionality you need for sending emails and marketing, which is convenient because you do not have to use anything extra. Some of the key features you will need include:


  • Ready-made letter templates, with the ability to edit, as well as the ability to create your own templates.
  • Create an unlimited number of mailing lists with an unlimited number of contacts in each of them.
  • Detailed analytics of all stages of mailing, a large number of different filters, and the possibility of segmentation.
  • A/B testing of mailings, with which you can compare the effectiveness of email templates and audiences and choose the best strategy.
  • Dedicated server with high performance, which allows you to quickly send your newsletter to a large number of recipients.
  • Ability to integrate with other modules and services, such as CRM.

How to Create and Set Up an Email Newsletter

Let’s see in practice how Email newsletters work in Odoo. As we said above, this service is quite simple and easy to use, and at the same time, it has wide functionality for EMail marketing. Let’s imagine that you have already decided on the audience, topic, and content of the newsletter and you just have to set it up in Odoo.

Creating a Letter Template for an EMail Campaign in Odoo

The first step is to create the mailing body and there are several ways – take a ready-made template or customize your own. Odoo gives you the opportunity to use a large number of ready-made templates for any event or news. Therefore, if you want to simplify the process as much as possible, you can use them, or slightly modify them, for example, by adding your logo.

Click the button New in the upper left part of the screen to create a new newsletter:

Creating a newsletter for email marketing

After that, we get to the template selection menu for mailing. Odoo offers us a choice of:


  • Plain Text
  • Start From Scratch
  • Welcome Message
  • Event Promo
  • Blogging
  • Coupon Code
  • Newsletter
  • Big News
  • Promotion Program
Choosing a Mailing Template

We chose the Event Promo template, this is how it looks in the standard form, let’s try to customize and change it. To do this, there is a panel with editing tools on the right, in which we see 3 sections:

  • Blocks
  • Customise
  • Design


Blocks allows you to add new blocks to your template – header, footer, separator, call to action, and many more. With the help of this section, you can assemble any of your own letter templates as a constructor.

Customize is needed to change the current block or a new block you added from the section described above. In this block, you can set up padding, border, background color, replace or add an image, split the block into several parts, and much more. We can say that this block is responsible for the CSS of your letter.

Design is responsible for setting fonts and headings. You can also customize the design of buttons, separators, styles for links, background and size for the body of the entire template, and many other functions.

Mailing design tools

So, we changed the logo, the background color in the header, wrote our own texts, changed the color of the button, and edited the padding in the greeting. You can additionally change and set any styles in blocks and letters, depending on your needs.

Mailing letter design

Let’s imagine we’re done with the email design and move on to the next step. Above the email template, we wrote a subject, and after that, we went to the Settings tab. There we indicate from which email the letter will be sent and to which email the answers will come. There is also a Preview Text feature, which in many mailboxes will appear right after the subject line and can serve as an extra clickbait. In our case, we left this field empty.

Email Marketing Template Setup

Working With Mailing Lists for Email Marketing and Contacts

Properly compiling and segmenting mailing lists is no less important than creating a beautiful and informative letter. It is important to understand that you must accurately define your audience and send useful information to them, otherwise, you will be sent to spam and this threatens to block your domain.

Many people look for the easy way and buy a database, in which case it is very likely that there will be a lot of invalid emails in it, in addition, you will not understand the interests of this audience and most likely you will spam information that is not interesting for people. Conversions of such mailings are close to 1% and they also threaten you with hits from spam traps. Such mailings are called cold mailings and are best avoided.

Also, people often write invalid mail or their mail becomes outdated. For example, when a person worked for a company, he had his own corporate email, then the person moved to another company, and his email was deleted, but it is still on your mailing list. In such cases, we recommend that you validate your email list before sending a newsletter to it.

How to Add Contacts to a Mailing List

Let’s move on to the next step – start working with our mailing lists. On the top panel, we select the Mailing Lists section. Go to it and click on the New button in the upper left corner. After that, we need to give a name to our list.

The list has been created and automatically saved, we can see it by going to the Mailing Lists tab again in the top menu. After you do this, you will see that there are 0 contacts in your list, now you need to start adding them to it. In the upper right corner, you will see the Import Contacts button.

Importing Contacts to a Mailing List

Here you can enter a list of contacts manually or upload contacts in an Excel file
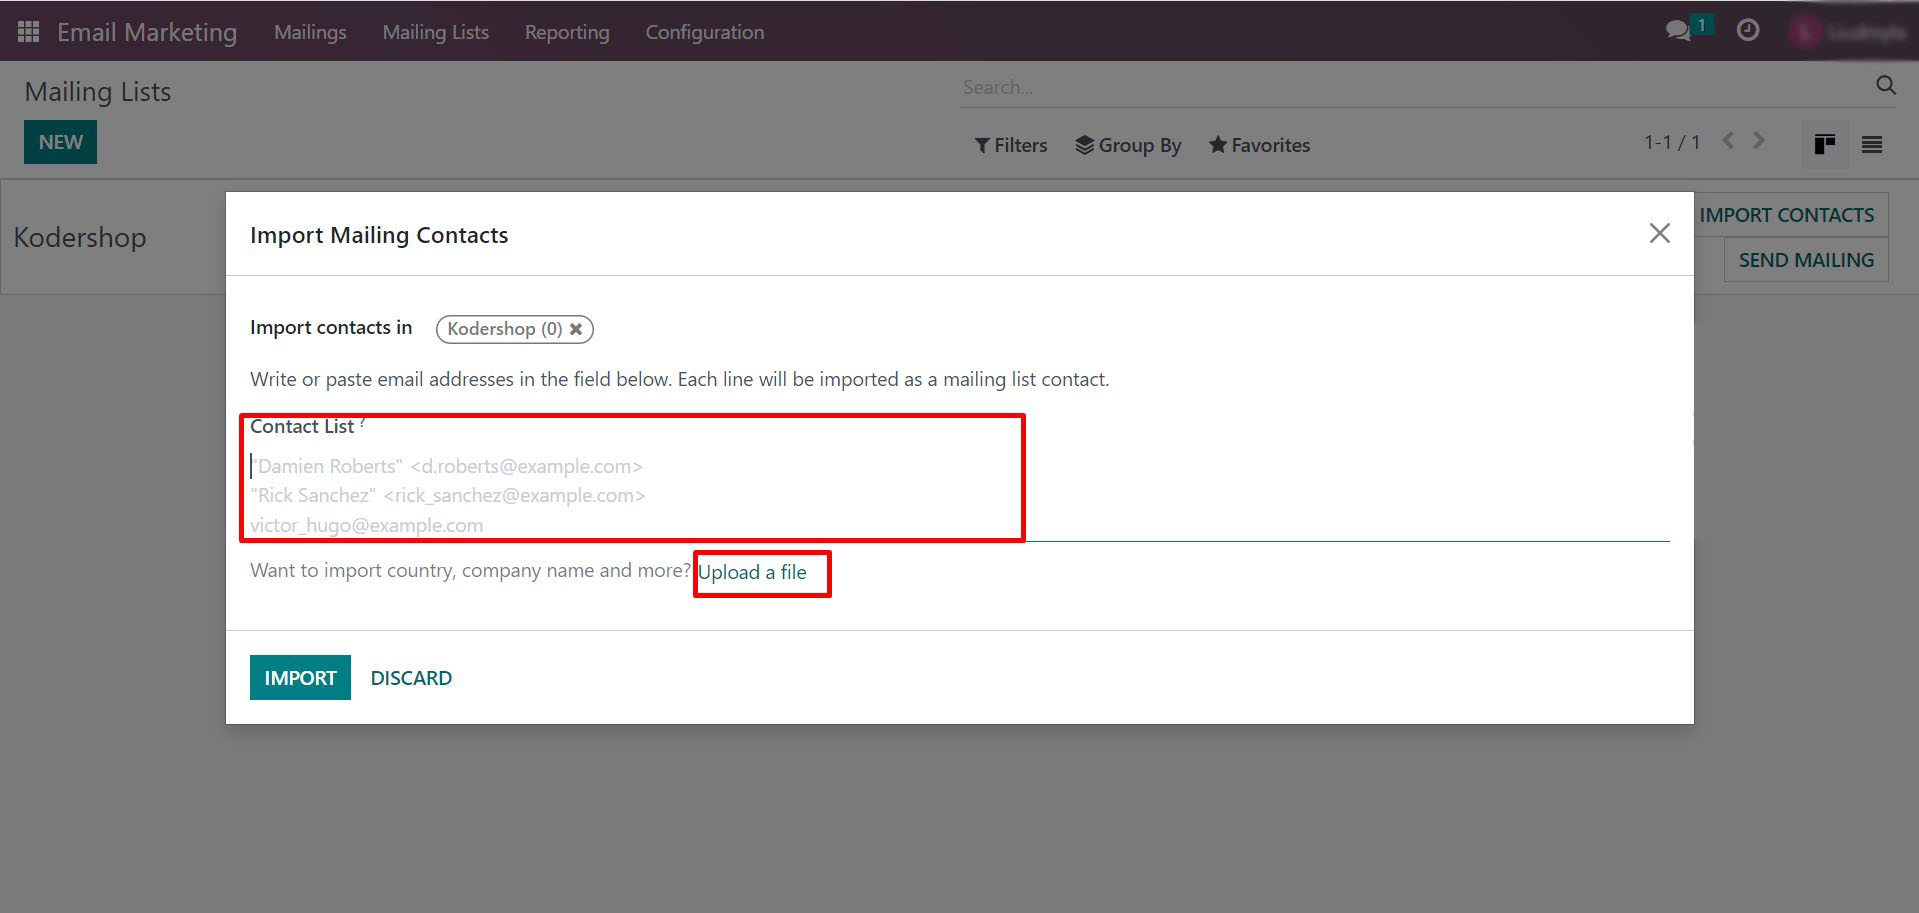
Email Marketing List

If you choose to download a file, then Odoo will offer you to download a template for contacts, it contains the fields:

  • External ID
  • Name
  • Company Name
  • Email
  • Country
  • Mailing List

You can edit these fields as you like – change, delete, or add new ones. The main condition is not to touch the first line, because it is needed to match information with Odoo.

Excel for mailing list

After you have imported the contacts to the mailing list, you can view them. You can also add more contacts to the list at any time, for this there is an Import button in the upper left corner. In addition, you can filter and group them in any order, you will find the tools for this in the top menu. You can also export the list or edit each contact individually.

Email Marketing

Sending Email Newsletter

So, all the settings are done, now you can go to the main thing – let’s send our newsletter. To do this, we click on Mailings in the top menu and return to our letter. Open it and in Select Mailing Lists select the mailing list we created.

It is important to send a test email before you send out a mailing list to all the emails in the list. In a test email, you need to check:

  • How it looks in different browsers and email clients
  • Have the blocks moved apart?
  • Are the fonts displayed correctly?
  • Have all the pictures loaded and are the links working?

It happens that different browsers display the email template differently, because they are designed to work with websites, and they use a different code processing technology. For example, in a mailing letter, CSS is not in a separate file, but in the letter itself. Only after you make sure that everything works and is displayed correctly, you can send the newsletter. To select a test send, select the Test button in the upper left menu.
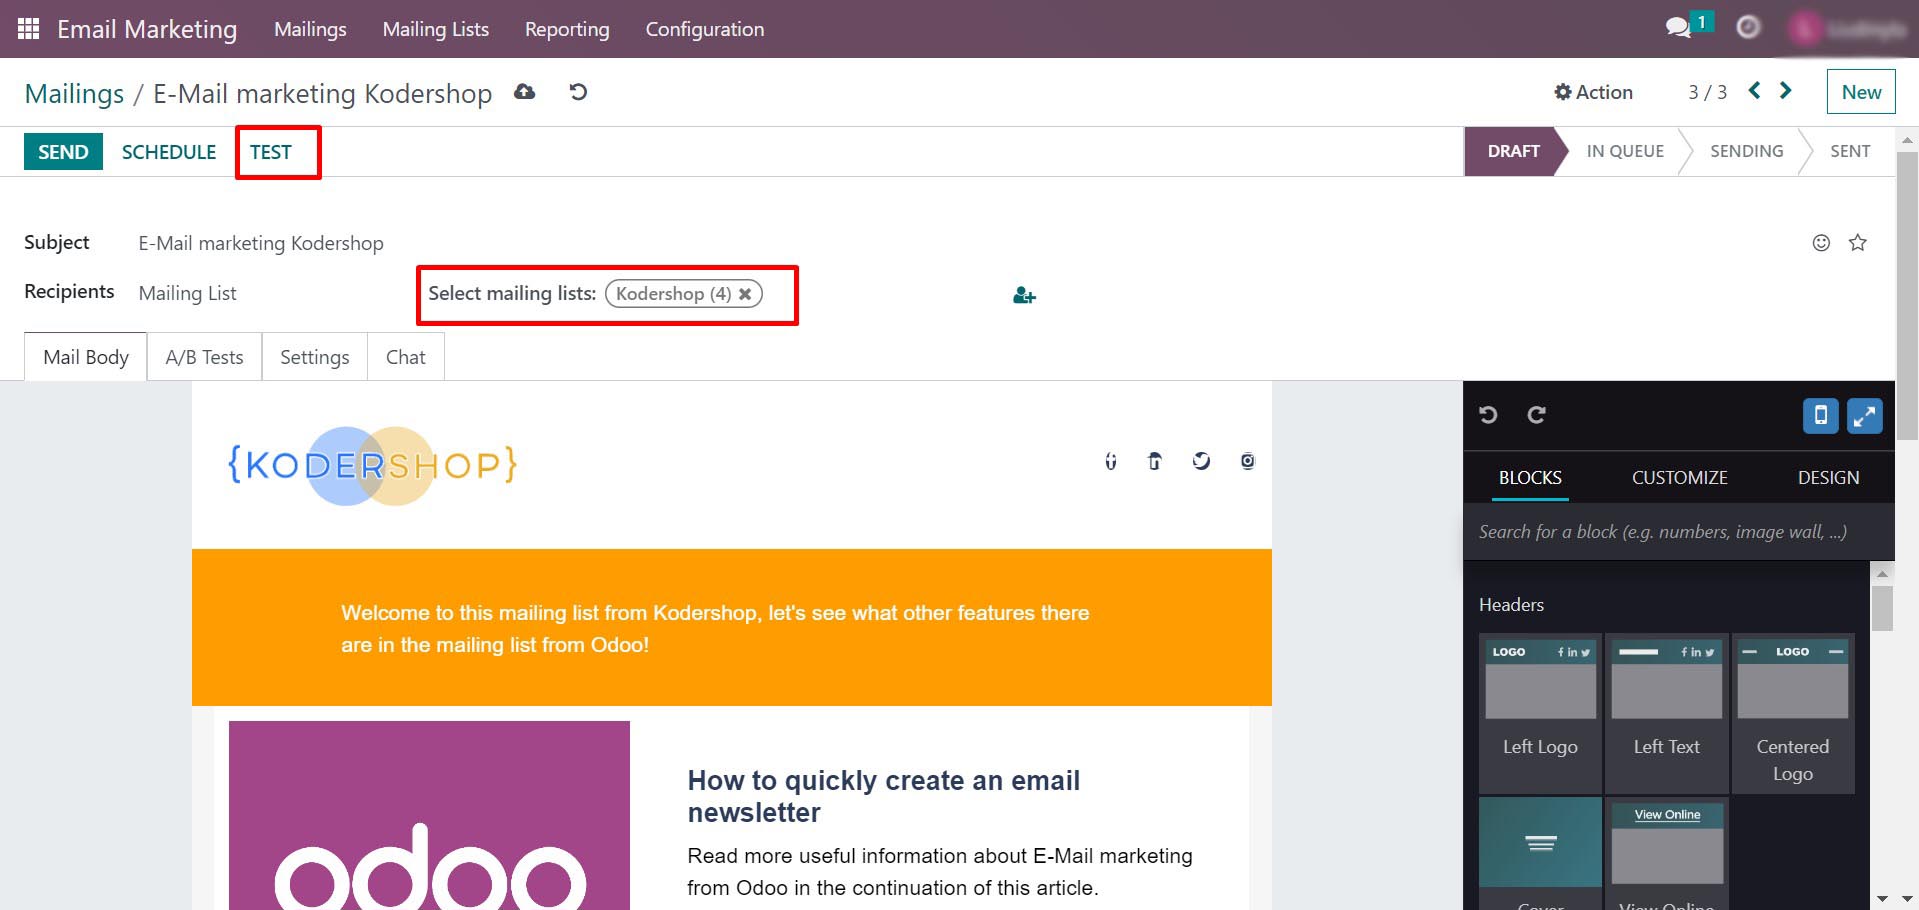
Sending a newsletter

After checking the test letter, the moment we were waiting for came – sending a newsletter to all emails. To do this, we go to the top menu and press the Send button there. Odoo will ask you if you are sure you want to send the newsletter, to confirm click the Sent To All button.

After sending, a bar will appear at the top of the screen, which will show the status of the mailing and the first analytics.
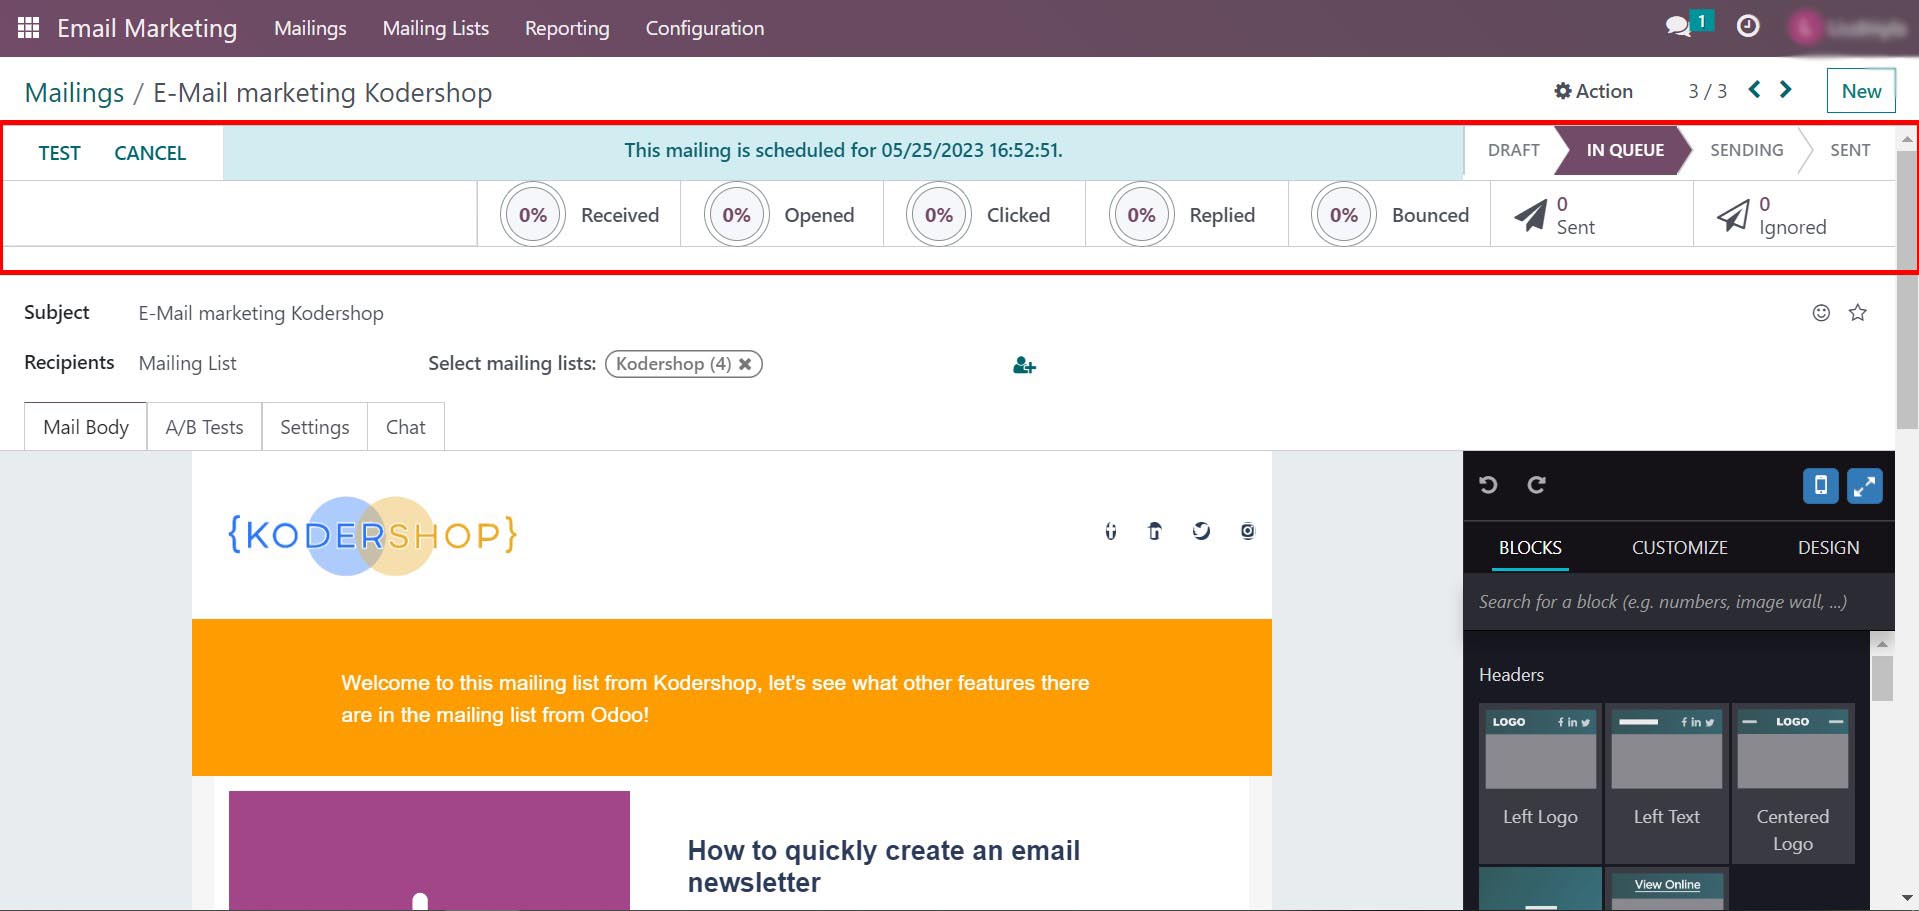
Sent email newsletter

The mailing list may be in the queue for some time, as you can see in the screenshot above. You need to wait and periodically refresh the page to check the status.

Newsletter Analytics in Email Marketing

An important part of email marketing is analytics. The first plus from working with it is the cleaning of the contact list after mailing. For example, you can segment all emails to which letters are not delivered and remove them from the mailing list. The second benefit is the ability to further segment your mailing list based on loyalty to your brand, interests, and more. For example, people who clicked on an article about Property Management Software are interested in the area of ​​leasing and you can invite them to an event where there will be an online demonstration of your software for landlords next time. People who rarely open your letters are unlikely to want additional mailings and we will disturb them less often.

How Mailing Analytics Works in Odoo

In Odoo, you can view analytics in several ways at once. Reports can be visualized and filtered in a way convenient for you, and extensive sorting and grouping options will help you quickly and conveniently work with mailing lists. You can view the first version of the report simply by clicking on your newsletter and opening it. The percentage shows the number of emails sent, opens, clicks, responses, etc.
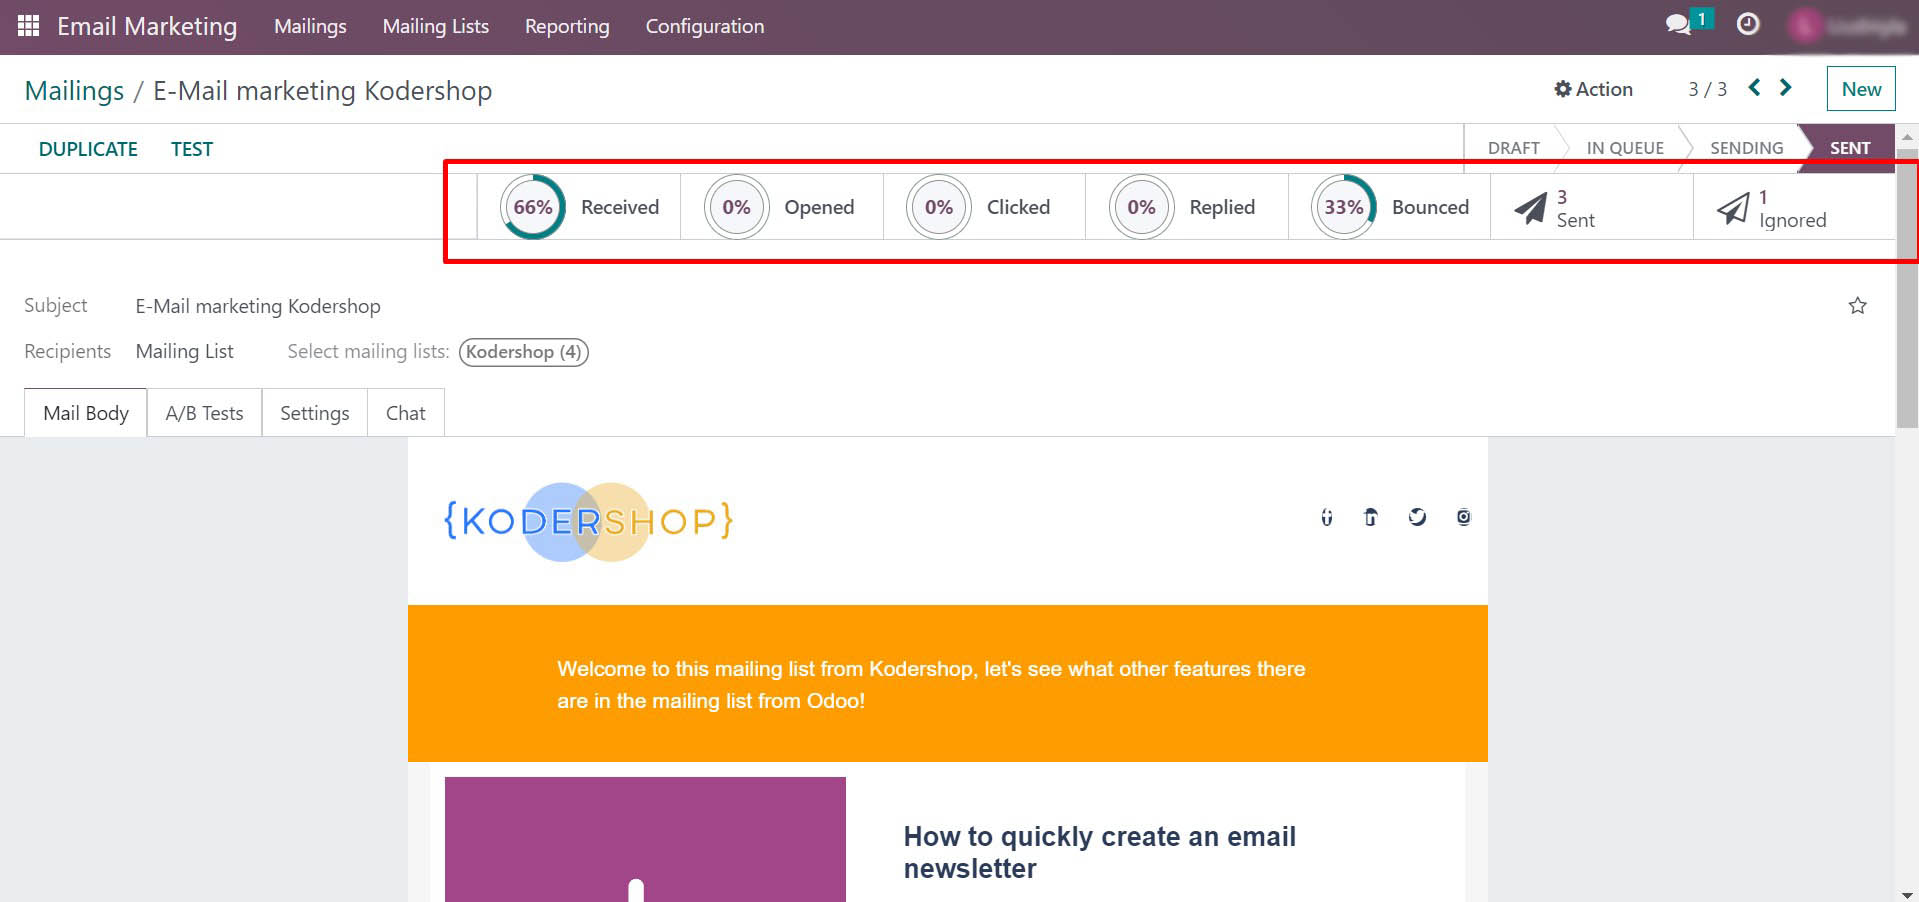
Email marketing analytics

You can view the details by clicking on any indicator you are interested in and Odoo will give you a detailed list. For example, as we see in the screenshot below, we have opened the list of sent emails.

Newsletter Analytics

The second option to view analytics is in the top menu. Click on Reporting and you will be taken to the advanced analytics option, which has a large number of visualizations and graphs. In the upper left corner is the Measures button, which will help you switch the graph to the metric you need. In the upper right corner, you can find buttons to switch between graphical and non-graphical displays of reports.

Email marketing reports

Finally

Email marketing solves many business tasks and is a modern tool for interacting with your audience. Choosing the right email marketing tool is just as important as choosing the right content for your email. Odoo solves all the tasks you need without any extra steps, as it has a simple and intuitive interface, as you saw after reading this article.

We can tell you more and test mailings in Odoo. We can also give you a demo and you can test the convenience of this email marketing tool yourself.

Exploring the Power of Pseudocode in Python: A Pathway to Seamless Idea Implementation

Exploring the Power of Pseudocode in Python: A Pathway to Seamless Idea Implementation

Pseudocode in Python

The Power of Pseudocode in Python

Pseudocode plays a vital role as a fundamental tool utilized by programmers for meticulously strategizing and conceptualizing algorithms prior to their implementation in a dedicated programming language such as Python. Widely employed in programming and algorithmic disciplines, it serves as a guiding framework for orchestrating a systematic and coherent sequence of actions or approaches tailored to address specific problems. By offering a structured and language-agnostic depiction, pseudocode effectively captures the logical steps entailed in resolving a given problem, facilitating comprehensive problem-solving strategies.
Simply, we can say that it’s the cooked up representation of an algorithm. Often, algorithms are represented with the help of pseudocodes as they can be interpreted by programmers no matter what their programming background or knowledge is.
Also it is called “false code” which can be understood by even a layman with some school level programming knowledge.

How can we use pseudocode to help us brainstorm and plan our code before we write it?

Pseudocode Advantages

Writing pseudocode is writing on the logic and steps of your code in plain English before you put it into the syntax of a specific coding language. Why do we want to take the time to do the extra step? Pseudo code is easy to write and helps you figure out the logic of a problem so that you can communicate what you’re doing and don’t run into errors later. It’s one of the best approaches to start writing your project.
Pseudocode serves as a bridge between human-readable instructions and machine-executable code. It allows programmers to express complex ideas in a more intuitive and structured manner. And also it works as a rough documentation, so the program of one developer can be understood easily when a pseudocode is written out.
It saves a ton of time during the ideation phase of writing a program and you’ll use this skill in any software engineering job even at the senior level. You can quickly whiteboard a problem and talk about technical solutions even with non-technical team members who might not know any programming syntax.
Many software engineering recruiters even say that it’s a red flag if they see someone jump into coding during an interview without making a plan in pseudocode first.

How to Write Pseudocode?

To write the pseudocode for a program we write each step of our code in plain english from top to bottom and use keywords to describe the different control structures that we would use in python.
Let’s look at examples for some of the python topics.
If your program requires output instead of writing out the print function in python we would use a keyword like print or display to describe what the code will do. Here you can see:

In Python:

print("Kodershop is the best!")

Pseudocode:

DISPLAY 'Kodershop is the best!'

Use appropriate naming conventions. The human tendency follows the approach to follow what we see. If a programmer goes through a pseudo code, his approach will be the same as per it, so the naming must be simple and distinct.
If your program uses input use keywords like read or get and describe how you’ll prompt the user for that input. Here you can see:

In Python:

age = input("Enter age:")

Pseudocode:

PROMPT for age
GET age

To describe a calculation that you’re doing in a python expression we would use math terms that you would normally use when talking about those computations like ‘multiply’. Here you can see:

In Python:

def Multiply(num1, num2): 
answer = num1 * num2 
return answer

Pseudocode:

MULTIPLY num1 by num2

Assigning variables can be described as ‘save’, ‘set’ or ‘store’. Here is an example:

In Python:

items = 0

Pseudocode:

SET items to 0

And more complicated code flows like conditional logic can use very similar keywords to their syntax in python because python uses almost plain english for these statements. Here’s the python code for a game score tracker.

In Python:

if win == True:
score_points += 1
else:
print("You lost!")

Pseudocode:

IF win is True THEN
Add 1 to score_points
ELSE
DISPLAY "You lost!"
ENDIF

Let’s pretend that we’re software engineers at a company that’s building a game review app. How should we implement a message to game developers that they just got a new rating?
Here is Python code:

rating = int(input("Enter rating:"))
if rating >= 5:
print("Thanks!")
else:
print("What do you want to improve?")

The user inputs their rating and then we send the message to the game developer based on the value.
What would we draw on the whiteboard though? Here is the pseudocode:

PROMPT for rating
GET the rating and make it a number
IF rating is greater than or equal to 5
DISPLAY "Thanks!"
ELSE
DISPLAY "What do you want to improve?"
ENDIF

No matter who is in the room they’ll be able to understand the logic that we suggested for the app because it uses simple keywords and plain English.

Also when designing pseudocode, it is important to focus on clarity and simplicity. It should be easily understandable by anyone familiar with programming concepts, even if they are not well-versed in a particular programming language. Pseudocode should also be free from syntactical constraints and specific implementation details, allowing for flexibility and adaptability when translating it into actual code. Here is an example:

Read the value of `num`.
If `num` is less than 2, print that it is not a prime number.
Initialize a variable `is_prime` to True.
Iterate from 2 to the square root of `num` (inclusive).
If `num` is divisible evenly by the current iteration value:
Set `is_prime` to False and break the loop.
If `is_prime` is True, print that the number is prime.
Otherwise, print that the number is not prime.

By keeping the pseudocode free from specific programming language syntax, it allows for flexibility and adaptability when translating it into actual code. The programmer can choose any programming language they are comfortable with and adapt the pseudocode to fit the language’s syntax and conventions.
This flexibility allows programmers to implement the algorithm in Python, Java, C++, or any other language of their choice without being tied to the exact pseudocode structure. They can make necessary adjustments and optimizations to fit the specific language while preserving the core algorithmic logic described in the pseudocode.

Using Pseudocode Python in Different Conditions

As we said before, developers can easily experiment and iterate with pseudocode in Python, testing different ideas and solutions before diving into actual coding. Let’s see that “diving” of Pseudocode.

Simple Examples:

Let’s dive into an example to demonstrate the power of pseudocode in Python. Suppose we want to create a program that calculates the sum of all even numbers in a given range. We can start by writing pseudocode to outline the algorithm:

Read the starting and ending values of the range.
Initialize a variable sum to 0.
Iterate over each number in the range.
If the number is even:
Add the number to sum.
Print the value of sum.

Now, let’s translate this pseudocode into actual Python code:

start = int(input("Enter the starting value: "))
end = int(input("Enter the ending value: "))
sum = 0

for num in range(start, end + 1):
if num % 2 == 0:
sum += num

print("The sum of even numbers in the range is:", sum)

In this example, we can observe how pseudocode provides a high-level overview of the algorithm’s logic.
Pseudocode is not limited to simple algorithms. It can also be used to design complex data structures, sort algorithms, search algorithms, and much more. By breaking down complex problems into smaller logical steps, pseudocode helps programmers approach problem-solving in a more organized and systematic manner.

Here are another simple examples of Pseudocode that can be useful and that show how it helps to solve problems efficiently.

Finding the Maximum Number In a List

Pseudocode:

Initialize a variable `max_num` to the first element of the list
Iterate over each element in the list
If the current element is greater than `max_num`:
Update `max_num` with the current element
Print the value of `max_num`

Python:

numbers = [5, 2, 9, 1, 7, 3] 
max_num = numbers[0] 

for num in numbers: 
if num > max_num: 
max_num = num 

print("The maximum number is:", max_num)

Calculating the Factorial of a Number:

Pseudocode:

Read the value of `n`
Initialize a variable `factorial` to 1
Iterate from 1 to `n` (inclusive)
Multiply `factorial` by the current iteration value
Print the value of `factorial`.

Python:

n = int(input("Enter a number: ")) 
factorial = 1 

for i in range(1, n+1): 
factorial *= i 

print("The factorial of", n, "is:", factorial)

Reversing a String

Pseudocode:

Read the string
Initialize an empty string `reversed_str`
Iterate from the last character to the first character of the string 
Append each character to `reversed_str`
Print the value of `reversed_str`.

Python code:

string = input("Enter a string: ") 
reversed_str = "" 

for char in reversed(string): 
reversed_str += char 

print("The reversed string is:", reversed_str)

Checking If a Number is Prime

Pseudocode:

Read the value of `num`
If `num` is less than 2, print that it is not a prime number
Initialize a variable `is_prime` to True
Iterate from 2 to the square root of `num` (inclusive)
If `num` is divisible evenly by the current iteration value:
Set `is_prime` to False and break the loop
If `is_prime` is True, print that the number is prime
Otherwise, print that the number is not prime.

Python code:

import math 

num = int(input("Enter a number: ")) 
is_prime = True 

if num < 2: 
is_prime = False 
else: 
for i in range(2, int(math.sqrt(num)) + 1): 
if num % i == 0: 
is_prime = False 
break

if is_prime: 
print(num, "is a prime number.") 
else: 
print(num, "is not a prime number.")

Complex Examples of Algorithms

After those simple examples, we can try to write our own algorithms using Pseudocode Python. Let’s start with the Hash Tables and data structures.

Designing a Complex Data Structure: Hash Table

Pseudocode:

Initialize an empty hash table `table`.
Function `hash(key)`:
Calculate the hash value of `key`.
Function `insert(key, value)`:
Compute the hash value using `hash(key)`.
Insert `value` into the hash table at the computed hash value.
Function `lookup(key)`:
Compute the hash value using `hash(key)`.
Return the value associated with the computed hash value in the hash table.

In Python:

class HashTable:
def __init__(self):
self.table = {}

 def hash(self, key):
# Calculate the hash value of the key
return hash(key)

 def insert(self, key, value):
# Compute the hash value
hash_value = self.hash(key)
# Insert value into the hash table
self.table[hash_value] = value

 def lookup(self, key):
# Compute the hash value
hash_value = self.hash(key)
# Return the value associated with the hash value
return self.table.get(hash_value)

hash_table = HashTable()
hash_table.insert("apple", 5)
hash_table.insert("banana", 10)

print(hash_table.lookup("apple")) 
# Output: 5
print(hash_table.lookup("banana")) 
# Output: 10

Sorting Algorithm: Bubble Sort

Pseudocode:

Function `bubble_sort(arr)`:
Set `n` as the length of the array `arr`.
Repeat the following steps `n` times:
Iterate from index 0 to `n-2`:
If the element at index `i` is greater than the element at index `i+1`:
 Swap the elements at index `i` and `i+1`.
Example usage:
Define an array `numbers`.
Call `bubble_sort(numbers)` to sort the array.

In Python:

def bubble_sort(arr):
n = len(arr)

for _ in range(n):
for i in range(n - 1):
if arr[i] > arr[i + 1]:
arr[i], arr[i + 1] = arr[i + 1], arr[i]

numbers = [5, 2, 9, 1, 7, 3]
bubble_sort(numbers)
print(numbers) 
# Output: [1, 2, 3, 5, 7, 9]

Search Algorithm: Binary Search

Pseudocode binary search:

Function `binary_search(arr, target)`:
Set `low` as the index of the first element of the array `arr`.
Set `high` as the index of the last element of the array `arr`.
Repeat while `low` is less than or equal to `high`:
Set `mid` as the middle index of the range from `low` to `high`.
If the element at index `mid` is equal to the target:
Return `mid`.
If the element at index `mid` is greater than the target:
Set `high` as `mid - 1`.
Otherwise:
Set `low` as `mid + 1`.
If the target is not found, return -1.

In Python:

def binary_search(arr, target):
low = 0
high = len(arr) - 1

while low <= high:
mid = (low + high) // 2

if arr[mid] == target:
return mid
elif arr[mid] > target:
high = mid - 1
else:
low = mid + 1

return -1

numbers = [1, 2, 3, 5, 7, 9]
target = 5
result = binary_search(numbers, target)
print("Element", target, "found at index", result) 
# Output: Element 5 found at index 3

So now let’s talk about pseudocode drawbacks.

Pseudocode Disadvantages

While pseudocode is a valuable tool for planning and designing algorithms, it also has certain disadvantages that should be considered:


  • Ambiguity: Pseudocode can sometimes be ambiguous or open to interpretation. Since pseudocode is a mix of natural language and programming constructs, different individuals may interpret the same pseudocode differently, leading to inconsistencies and potential errors when translating it into actual code.


  • Lack of regularization: Pseudocode does not have a standardized syntax or format. Different programmers may use different conventions, styles, and notations when writing pseudocode. This lack of standardization can make it challenging for team members to understand and collaborate effectively, especially when working on large projects.


  • Lack of rigorous error checking: Pseudocode does not undergo the same level of rigorous error checking as actual code. While pseudocode can help identify potential issues and design flaws, it does not provide the same level of validation and verification as a compiler or interpreter would for real code. This means that errors in logic or syntax may go unnoticed until the actual implementation phase.


  • Limited expressiveness: Pseudocode may not capture all the intricacies and details of a complex algorithm or data structure. It provides a high-level overview, focusing on the logical steps rather than fine-grained implementation details. This can sometimes result in a loss of precision or a lack of clarity when translating the pseudocode into code.


  • Time-consuming translation: Translating pseudocode into actual code can be a time-consuming process. The pseudocode may require careful consideration and translation into the syntax and constructs of a specific programming language. This translation step can introduce potential errors, especially if the pseudocode is ambiguous or lacks specific details.


  • Learning curve: While pseudocode is designed to be more human-readable and accessible, it still requires some understanding of programming concepts and logic. Individuals who are not familiar with programming may find it challenging to interpret and understand pseudocode effectively, limiting its accessibility to non-programmers.


Summary

By learning to read and write pseudocode, you can easily communicate ideas and concepts to other programmers, even though they may be using completely different languages. What’s more, algorithmic solutions to many problems are often provided in pseudocode on sites such as Wikipedia, meaning an ability to translate between pseudocode and a given programming language is a valuable skill.

Benefits of IHttpClientFactory with ASP.NET.Core for Apps Development

Benefits of IHttpClientFactory with ASP.NET.Core for Apps Development

IHttpClientFactory
IHttpClientFactory

IHttpClientFactory: A Tool for Efficiently Managing and Control HttpClient Instances

If you’re building web applications with .NET Core, you’ve probably heard of IHttpClientFactory. It’s a key component that allows developers to build and manage HttpClient inst. in a lightweight and flexible way. It is needful to ask the question, what does this mean for a specialist?

This class is a class used for interacting with external Primarily API, as well as other web-services. It’s a powerful instrument, but it can be tricky to use correctly. That’s where Http Client Factory comes in. Let’s take a look at a few ways to make building HttpClient easier and more efficient.

Examples of Using IHttpClientFactory

IHttpClientFactory avoids Unnecessary Instantiation: the tool creates and controls HttpClient instances for you, saving you the trouble of creating them yourself. This avoids unnecessary instantiation and reduces system load.

Imagine you’re building an e-commerce website that needs to connect to a payment gateway. Instead of building a new Http Client instance each time you need to make a request to the gateway, you can use the Http Client Factory to manage a single instance, which in turn makes things easier.

IHttpClientFactory Handles HttpClient Unreliability

Sometimes network-related errors can cause HttpClient instances to fail. IHttpClientFactory automatically handles restarting HttpClient instances when these errors occur, ensuring that your application remains reliable.

Example: Let’s say you’re building a weather app that needs to connect to a third-party API to get real-time weather data. If the API experiences a temporary outage, IHttpClientFactory can automatically restart the HttpClient instance, so your users don’t experience any downtime.

Efficiency in Managing Resources Allocated to a Given Client

Http Client Factory allows you to use tools and mechanisms to manage the number of Http Client instances, which certainly allows you to efficiently use resources, and as a result, reduce the load on the system.

Example: Suppose you’re building a chat application that needs to make many simultaneous requests to a server. With IHttpClientFactory, you can use the number of HttpClient instances to match the number of users, ensuring that your application doesn’t use more resources than it needs to.

Additional Benefits of IHttpClientFactory

In addition to these benefits, IHttpClientFactory allows you to configure HttpClient settings like timeouts, headers, and base URLs. It can also be integrated with other ASP.NET Core components, like authentication and authorization mechanisms.

Let’s Summarize the Above

Overall, this ClientFactory is an essential tool for any .NET Core developer building web applications that need to interact with external APIs or web services. It also simplifies the process of managing HttpClient instances, reducing system load and improving performance.

What are ElasticSearch and OpenSearch Engines? | KoderShop Overview

What are ElasticSearch and OpenSearch Engines? | KoderShop Overview

ElasticSearch OpenSearch

ElasticSearch vs OpenSearch – Basics and Overview

Nowadays, the development of technologies is very fast. And it’s no secret that one of the main fundamental entities is data. The data that we can digitize, write, store, and use is partly what promotes information technology. For such purposes, databases, or rather database management systems, were invented in the last century. However, with the growing volume of information, it has become extremely difficult to perform dynamic, fast, and customizable searches. For these purposes, technologies such as elastic search engine and opensearch have been developed to help solve this problem. In this article, we will look at two technologies that, in turn, have common roots, but different branches of development.

What is ElasticSearch?

ElasticSearch is an open-source search engine based on the well-known ApacheLucene library. This search engine uses full-text search technology as well as analysis of unstructured and large structured data. Elasticsearch indexes data from an infinite number of different sources, including the largest databases, log logs, and other data stores.

One of the most important features of Elasticsearch is its ability to scale automatically. Elastic searching can also run in a cluster from a single node or from multiple nodes, which allows you to distribute indexing and search across different nodes. Elastic search also supports data replication and sharding, which in turn ensures high availability and performance of the system as a whole.

How to Use ElasticSearch?

Use Elasticsearch provides a wide range of search features, including synonyms, autocomplete, phrase matching, advanced pattern matching, and so on. Elasticsearch also allows you to aggregate data, providing the ability to calculate statistics, summaries, measurements, and filtering.

Another important feature of the Elasticsearch algorithm is its ability to process and analyze data. Elastic search query can be used to detect anomalies and create dashboards to monitor data. It can also be used to process and analyze log data, making it easier to monitor and debug applications. Elasticsearch provides a wide range of search features, including phrase matching, synonyms, auto-completion, advanced pattern search, and more. Elasticsearch also allows you to aggregate data, providing the ability to calculate statistics, summaries, dimensions, and filtering.

Elasticsearch has an extensive community and a wealth of documentation, which makes it easier to develop and maintain applications that use Elasticsearch. It also integrates with many other technologies and frameworks, including Logstash, Kibana, Beats, and many others.

What is Open Search?

OpenSearch is an open standard for finding information on the Internet developed by Amazon. This standard allows sites to index their content and provide users with the ability to search for information on sites directly from search engines.

One of the main reasons for creating OpenSearch AWS was the need to simplify access to information found on sites. Thanks to this standard, users can search for information on websites without accessing them directly. This simplifies search and saves users time.

One of the main advantages of this open source search engine is the ability to easily search for information on sites that do not support standard RSS or Atom formats. The standard also allows sites to set their own logo and notifications so that users can easily distinguish search results from various other sites.

Where is OpenSearch Used?

Open Search AWS service has many different uses. It can be used to search for information on the site, search for the nearest shops or restaurants, search for flights, etc. Thanks to this standard, the search for information on sites has become much more convenient and faster.

In addition, OpenSearch is an open source search, which allows developers to easily create their own tools for working with search. The standard is also supported by various search engines, such as Google, Yahoo, and Microsoft Bing.

Elasticsearch and OpenSearch. What’s Better?

Elasticsearch and OpenSearch are two popular search engines that have a lot in common but also differ from each other. Both systems are based on the Lucene search engine, but they differ in their approaches to project management and development.

Elasticsearch is an open-source project and it was created by Elastic. It provides a distributed search and analysis system that is capable of processing large amounts of structured and unstructured data. Elasticsearch has a large community of users and developers who create additional tools and extensions.

Elasticsearch Tools:

  • Kibana
  • Logstash
  • Beats

OpenSearch is a fork project of Elasticsearch, created after Elastic started changing the licensing terms of its product. It is open source web search engine and is maintained and developed by the developer community. Open Search also provides a distributed search and analytics system that supports many of the features available in Elasticsearch.

Differences Between ElasticSearch and OpenSearch

However, there are a few differences between Elasticsearch and OpenSearch. First, Open Search has a more open development process than Elasticsearch, and it doesn’t depend on a single commercial vendor. Second, OpenSearch has a more transparent and accessible licensing model, which makes it more attractive to many users.

It’s also worth noting that OpenSearch is still in its infancy, and its ecosystem of tools and extensions is still not as developed as Elasticsearch. Some of the ingesting features available in Elasticsearch may not be available in OpenSearch, but this may change in the future as the project evolves and expands.

Conclusions

In general, the choice between the new Elasticsearch system or the basic OpenSearch system depends on your specific needs and preferences. If you are looking for a stable and widely used search engine, then Elasticsearch might be your best bet. If you are looking for a more open and accessible project, then OpenSearch may be preferable. In any case, the choice is always yours. Both of these projects have proven themselves very well in working with huge amounts of data, which makes it possible to simplify and speed up the search for information at times. Which in turn has a positive effect on large projects. As a result, the end user gets a fast response to search for data. You should also not forget that these technologies have the same past, and when moving from one technology to another, a programmer does not need to spend a lot of time studying a similar system.

Diagnosing “TemplateDoesNotExist” Error in Jinja2 Templating Engine

Diagnosing “TemplateDoesNotExist” Error in Jinja2 Templating Engine

TeamplateDoesNotExist error Jinja2
TemplateDoesNotExist error Jinja2

Troubleshooting “TemplateDoesNotExist” error in Jinja2 Templating Engine

A “TemplateDoesNotExist” error is a common issue in Python’s Jinja2 templating engine, and it can occur for a variety of reasons. When this error occurs, it means that Jinja2 is unable to locate the specified template file. This can be frustrating, but there are several steps you can take to resolve the issue.

Verify the Path to the Template File is Correct

One possible cause of the “TemplateDoesNotExist” error is an incorrect path to the template file. Make sure that the path is correct and that the file exists in the specified location. Additionally, check the permissions on the file to ensure that Jinja2 has the necessary permissions to access the file.

Incorrect Path Example:

from flask import Flask, render_template

app = Flask(__name__)

@app.route('/')
def index():
    return render_template('templates/index.html')

In this example, the Flask app is attempting to render the “index.html” template, but it specifies the incorrect path to the file. The correct path should be “index.html” without the “templates” directory prefix.

Check for Missing Template

Another possible cause of the error is a misnamed or missing template file. Double-check the name of the file to ensure that it matches the name used in the Jinja2 code. If the file is missing, make sure that it was not accidentally deleted or moved to a different location.

Missing File Example:

from flask import Flask, render_template

app = Flask(__name__)

@app.route('/')
def index():
return render_template('index_missing.html')

In this example, the Flask app is attempting to render the “index_missing.html” template, but the file is missing from the project directory. Make sure the file exists and is named correctly.

Ensure that Jinja2 Package or Module is Correctly Installed

Sometimes, the cause of the error is a missing Jinja2 package or module. Ensure that the package or module is correctly installed and configured. You can use the pip package manager to install Jinja2 or check if it is already installed.

Missing package example:

from flask import Flask, render_template

app = Flask(__name__)

@app.route('/')
def index():
return render_template('index.html')

In this example, the Flask app is attempting to render the “index.html” template, but the Jinja2 package is not installed or imported. Make sure Jinja2 is installed and added to the project’s requirements.txt or requirements-dev.txt file.

Review the Jinja2 Code for Any Errors or Typos

Another possible cause of the error is a typo or error in the Jinja2 code itself. Check your code for any errors or typos, and make sure that the correct template file name and path are specified.

Typo or Error Example:

from flask import Flask, render_template

app = Flask(__name__)

@app.route('/')
def index():
return render_templates('index.html')

In this example, there is a typo in the Jinja2 code that calls the render_template() function. The correct function name is render_template(), not render_templates().

Clear the Jinja2 Cache

If none of these solutions work, you can try to clear the Jinja2 cache. Caching can sometimes cause issues with locating template files, so clearing the cache can help to resolve the problem. To clear the cache, you can simply delete the contents of the cache directory.

Clearing Cache Example:

import jinja2

env = jinja2.Environment(loader=jinja2.FileSystemLoader('templates'))
env.cache.clear()

In this example, the Jinja2 cache is cleared to resolve any issues with locating template files. You can execute this code in your application startup process to ensure the cache is cleared each time the application runs.

If you’re still experiencing the “TemplateDoesNotExist” error after trying these solutions, you may want to seek assistance from the Jinja2 community or support team. They can help you to diagnose the problem and find a solution that works for your specific situation.

In summary, the “TemplateDoesNotExist” error in Jinja2 can be caused by a variety of factors, including incorrect file paths, missing or misnamed files, missing packages or modules, errors in the Jinja2 code, or issues with caching. By carefully checking these potential causes, you can often resolve the error and get your Jinja2 templates working properly. If you’re still having trouble, don’t hesitate to reach out to the Jinja2 community for help.