Test Plan vs Test Strategy in Detail About the Differences

Test Plan vs Test Strategy in Detail About the Differences

test plan vs test strategy

Test plan vs Test strategy: Where do they differ


Consider the following scenario: Over the course of many years, you and your development team worked very hard to design and create a product. There has been a lot of work put into making sure that all the proper stages and procedures were used while designing your product. There comes a time when you can finally release your product, and you are eager to do so. However, after the software is deployed, a number of flaws and faults are found by the users. Being in this circumstance is sad, and you frequently wonder, “How could this have been avoided?”

Software testing is what you need to do, therefore that’s the basic solution. Software testing is the process of running tests to detect any product flaws, such as errors, gaps, or unmet requirements, and comparing the finished result to the expected requirements to see if they match. It may also result in a decrease in the software’s overall cost. This approach involves things like product observation, analysis, and evaluation. Two crucial terms—”Test Plan” and “Test Strategy”—are frequently employed in the context of the process during software testing. These two concepts are frequently misused and used synonymously, which can cause misunderstanding. In order to avoid this, let’s look at what the phrases actually represent and what a test plan vs test strategy is.

What is a Test Plan?

A test plan is a document that details all of the procedures that will be used during testing, from a development approach to specific error detection standards. This document also outlines how to address any concerns that are found. It outlines the methodology, resources, and timetable for the anticipated testing operations. The scope and goal of the software testing process, the numerous aspects that must be tested, the duties that must be performed during testing, the methods used to design the tests, and much more are all identified. In essence, it documents the entire process of organizing tests that must be run on the product.

Test Plan Document

A test plan is a document that fully describes the testing tasks involved in a software project. It offers information about the testing’s scope, types, objectives, methodology, effort, risks, and contingencies, as well as the release criteria and test deliverables. It maintains track of potential tests that might be performed after coding on the system.

It is clear that the test schedule will change. On the basis of the project’s clarity at the outset, a draft test plan will be created first. The project’s basic plan will change as it goes along. The test plan document may be created by the test team manager or test lead. It describes the Specifications and may vary in accordance with those.

The test plan will specify who will conduct the tests, what will be tested, when, and how. A list of issues, dependencies, and underlying hazards will be sorted by Test Plan.

What types of Test Plan are there?

  • These plans are made for each level or type of testing. Level Specific Test Plans (Unit level, Integration level, System level, and Acceptance level).
  • Test plans that are specifically tailored to a certain type of test, such as functional test plans, performance test plans, etc., are known as type-specific test plans.
  • The product’s aims and objectives are contained in a single, high-level document called the master test plan. It contains all of the product’s other test programs.

Test plans are essential because they serve a lot of purposes. They make sure that you and your team are concordant at all times. They act as a guide and ensure that your final product is error-free and meets the expected requirements. They also help other individuals who aren’t part of your team, to understand the testing process. Since test plans detail everything regarding the testing process, they can be easily reviewed and re-used for testing similar products. These are built by test managers or test leads taking into account the input from team members. One important aspect to test plans is that they can constantly change and can vary from one product to another.
what is test plan

What is a Test Strategy?

The test design and the manner in which the testing process will be carried out are both determined by a test strategy, which is a set of instructions, principles, or rules. It creates criteria for the testing procedure. The test strategy document serves as the source of content for documents like test plans. A product’s review and approval prior to its official release can include the principles used to describe the scope and overview of the testing process, testing methodology, testing environment specifications, testing tools, release control, risk analysis, and mitigation, and release control.

Test Strategy Document

The test strategy’s goal is to specify the testing technique, the different kinds of tests to be conducted, the testing environments to be used, the testing tools to be used, and the broad strokes of how the test strategy will be in line with other processes. The test strategy document is meant to be a live document that will be updated** as more information about the requirements, SLA parameters, test environment, build management strategy, etc. becomes available.

The entire project team, which consists of project sponsors, business SMEs, application/integration development partners, system integration partners, data conversion teams, and build/release management teams, including technical leads, architecture leads, deployment, and infrastructure teams, is intended to use the test strategy.

** Some contend that a test technique should never be revised. In the majority of testing initiatives, it typically gets updated as the project moves forward.

The crucial sections a test strategy document needs to have are listed below:

Project Overview

An introduction of the company can be included in this area, followed by a succinct outline of the current project. It may contain the information below:

  • What was the project’s need?
  • What goals will the project achieve?

Table of Abbreviations It is preferable to add a table with acronyms that the reader of the text might think of when referring to it.

Scope overview

Application scope and functional scope are examples of requirements scope.

Application The system being tested and the effects of any new or altered functionality are both defined by the scope. Also defined are systems that are related.

Test strategy

High-Level Test Plan

A different document is the test plan. A high-level test plan may be incorporated into the test approach. Test scope and objectives might be included in a high-level test strategy. Both in-scope and out-of-scope activities should be specified in the test scope.

Test Approach

The testing strategy that will be used throughout the testing life cycle is described in this section. Testing will be carried out in two parts, namely test strategy and planning and test execution, as shown in the following diagram. In contrast, to test execution phases, test strategy and planning phases will be repeated for each cycle of the overall program. The execution approach is represented in the following diagram with its various phases, stages, and deliverables (outcomes).   The test strategy should cover the subsections below. a) Test Schedule: Describe in this part the intended project schedule. Using this subsection gives an overview of each step and its corresponding entry and exit criteria. b) Functional Testing Approach Unit testing, System testing, System Integration testing, User Acceptance Testing, and End-to-End Testing are the many testing steps. C) Test key performance indicators.
  • Establish the test case prioritizing strategy so that the test team may execute high-priority scenarios in the event of a time crunch. The project’s stakeholders should come to an understanding of the potential risks involved in not carrying out all of the planned scenarios.
  • Prioritizing defects is the next subject we’ll talk about in this section. Set each priority level’s description, such as “critical,” “high,” “medium,” etc. Also
Fault Turnaround Time: The time between when a defect is first reported and when it is corrected and ready for retesting is referred to as the defect turnaround time. Speedy testing and adherence to the project schedule are ensured by the quick turnaround.

Test Coverage

This section outlines the procedures the QA team will use to ensure that test scenarios and test cases adequately meet business/functional requirements. Use the Requirement Traceability Matrix (RTM) to link each requirement to its appropriate test cases and test scenarios.

Test Environment

Describe the many QA environments that are available. Mention what testing will be done, by whom, and in what setting. To handle emergencies, create a backup plan for the environment. Each environment’s access needs to be controlled and clearly identified.

This section can also indicate the testing tools that will be used:

  • HP ALM – used for Test Management
    JIRA – Defect Management

Defect Management

Create a defect workflow, a defect tracking technique, and a defect triage procedure to clearly describe a defect management strategy. Mention the duties of each tester’s responsibilities for defects. Periodic root cause and defect analysis will raise testing’s general level of quality.

Communication Management

Establish standards for status meetings, reporting, and onsite-offshore communication.

Assumptions, Risks, and Dependencies

Describe the underlying premise(s) of the project. Timing, resources, and system capabilities are a few examples. Describe any dependencies that might affect the project, such as those on other projects, the availability of temporary resources, or other deadlines.

Appendix

Include in this area information like Roles & Responsibilities, Work Time Zone, and References.

What types of Test Strategies are there?

Analytical Strategy – using this, testing based on requirements is carried out. To determine the parameters for testing, these needs are further examined. Finally, the tests are created and executed in accordance with these specifications.

Model-Based Strategy – This tactic is used when the testing team chooses the existing circumstance and creates a test model for it based on the tasks, inputs, outputs, and potential behaviors.

Methodical Strategy – This tactic enables test teams to adhere to a predetermined set of testing requirements. Checklists are included in specific testing types in this.

This test approach requires the test engineer to adhere to a set of processes that have been given forth by a group of industry experts as Standard Compliant or Process Compliant guidelines.

Reactive Strategy – Only after the final program has been created and delivered can we in this case design and run tests. This strategy’s testing is based on the product flaws found in the current version.

Consultative Strategy –  This approach is used to choose the test conditions scope and gather input from important stakeholders.

Regression averse Strategy –The test engineer gets to highlight the declining risks of regression for different product shares in this.

A test strategy’s major goal is to make sure that all of the stakeholders are aware of and comprehend all of the established aims. The project manager establishes these rules.

Key variations

We can now concentrate on the distinction between a test plan and a test strategy since we have a better understanding of what each term means. But let’s first look at the primary distinctions between the two instead of diving right in with the specific differences. The “how” questions related to testing are addressed by a test plan. in terms of the execution of the test plan. A test strategy, on the other hand, addresses the “what” elements. This covers inquiries like “What are the testing process’s objectives?” and “What is the testing process’ scope?” A test strategy is utilized at the organizational level, whereas a test plan varies from project to project. Additionally, the specifics of a test strategy remain somewhat more static while those of a test plan vary and are dynamic.

Difference Between Test Plan and Test Strategy

It’s time to concentrate on the specific variations between the test plan and test strategy now that we have seen their main distinctions. We must keep in mind the nuanced nature of these variations.

Parameter

Definition

Objective

Purpose

Level

Repetition

Change Susceptibility

Components

Performed by

Scope

Derivation

Existence

Basis

Types

Influence

Narration

Test Plan

A test plan is a written description of the scope and various steps involved in the testing procedure.

Determining how to test a product, what to test it on, when to test it, who will test it, and who will verify the results is the main objective here.

The goal is to find any potential inconsistencies in the finished product and eliminate them through testing.

It is only utilized at the project level.

It is very rarely used again and is only utilized by one project.

It is a dynamic document that is constantly subject to change based on testing requirements.

Its elements consist of the test plan ID, the features that must be tested, the procedures to be used, the testing tasks, the pass or fail criterion, timetables, etc.

A test plan is often written by a testing manager or lead and includes information on how, when, who, and what will be tested.

It fully describes all testing activities.

Use case documents, software requirement specification documents, and product description documents are used to derive it.

Typically, a test plan is discovered to exist independently.

It is founded on testing methods.

The various forms of test plans include level-specific test plans, type-specific test plans, and master test plans.

At any given time, just one project is impacted.

It describes the typical requirements for testing a certain project.

Test Strategy

A test strategy is a high-level document that includes the rules and ideas that will be used to conduct the testing procedure.

Here, defining the guidelines to be followed during the testing process is the main objective.

It is a strategy for the testing procedure over the long term.

On an organizational level, it is utilized.

It is utilized by numerous projects and is repeatable frequently.

As a static document, it cannot be altered.

Its elements consist of goals and parameters, documentation, test procedures, etc.

The project manager creates a test strategy as part of the testing procedure. The document details the technique to employ and the modules that should be examined.

It only concentrates on advanced test techniques and methodologies.

It comes from a document called the business requirement specification.

Test plans may include a test strategy, much like smaller projects sometimes do.

It is founded on previously established norms.

The various test strategies include analytical strategy, model-based strategy, methodical strategy, standard-compliant strategy, reactive strategy, consultative strategy, and regression-averse strategy.

Numerous projects are impacted at once.

It describes the methods used in testing.

Summary

One of the most frequent areas of uncertainty for QA aspirants is the distinction between a test plan and a test strategy. The aforementioned sections have discussed how the two differ from one another in a number of ways. Based on all we have discovered thus far, it is clear that these documents are a fundamental and crucial component of every project. This testing procedure will produce a top-notch product if it is carried out correctly. However, there is a potential that the finished output will still have defects if any phases are neglected. Therefore, being able to distinguish between the two will go a far way in assisting you.

C# Math Classes – Mathematic Functions Tutorial | KoderShop

C# Math Classes – Mathematic Functions Tutorial | KoderShop

C# Math class

c#_math_class

What is math class?

C# math provides constants and static methods for trigonometric, logarithmic, and other common mathematical functions. The Math library in C# gives programmers access to a number of general, trigonometric, statistical, and logarithmic mathematical functions and properties. This library is plug-and-play and ready to use. The library derives from Csuper #’s parent class, the Object class. The System namespace is where it sits.

Mathematical  properties in C#

E4

In mathematical equations, the little letter “e” designates the logarithmic base, which is known as E. The value of the natural logarithmic base is stored in this static attribute.

Code example:

 using System;
 public class Program
  {
    public static void Main()
     {
       Console.WriteLine("The value of logarithmic base E is " + Math.E);
     }
  }

Output:

math_class_1

PI

The reciprocal of the ratio of a circle’s circumference to its diameter is known as pi, which is often written as the letter p. (roughly 3.14). The value of p is contained in this static constant.

Code example:

 using System;
 public class Program
  {
    public static void Main()
     {
       Console.WriteLine("The value of PI is " + Math.PI);
     }
  }

Output:

math_class_2

Functions on C# Math

Abs-Absolute Function

Returns a given number’s absolute value (integer, decimal, floating-point, etc.). The highest conceivable decimal value that is higher than or equal to 0 but less than or equal to the number itself is the absolute value of any number.

Code example:

 using System;
 public class Program
  {
    public static void Main()
     {
       int num1 = 231;
       double num2 = -1.23456789;
       Console.WriteLine("The absolute value of {0} is {1} ", num1, Math.Abs(num1));
       Console.WriteLine("The absolute value of {0} is {1} ", num2, Math.Abs(num2));
     }
  }

Output:

math_class_3

BigMul-Big Multiplication

This function delivers the entire result of multiplying two extremely large integer numbers. It requires two 32-bit integer inputs and outputs a 64-bit result of the multiplication.
Code example:

 using System;
 public class Program
  {
    public static void Main()
     {
       int num1 = Int32.MaxValue;
       Console.WriteLine("Multiplication of {0}x{0} without Math function - {1}",num1, num1*num1);
       Console.WriteLine("Multiplication of {0}x{0} by Math BigMul function - {1}",num1, Math.BigMul(num1, num1));
     }
  }

Output:

math_class_4

Floor and Ceiling

The floor() and ceiling() functions provide back a number’s floor and ceiling values. Any number’s floor value is its greatest integer that is less than or equal to 1. The smallest integer larger than or equal to the given number is the ceiling value of any number.

Code example:

 using System;
 public class Program
  {
    public static void Main()
     {
       double num1 = 548.65;
       Console.WriteLine("Floor value of {0} is {1}", num1, Math.Floor(num1));
       Console.WriteLine("Ceil value of {0} is {1}", num1, Math.Ceiling(num1));
     }
  }

Output:

math_class_5

Sin, Cos and Tan

The sine, cosine, and tangent values of the supplied angle are provided by these trigonometric functions.

Code example:


 using System;
 public class Program
  {
    public static void Main()
     {
       double angle = 120.5;
       Console.WriteLine("Sine value of {0} is {1}", angle, Math.Sin(angle));
       Console.WriteLine("Cosine value of {0} is {1}", angle,Math.Cos(angle));
       Console.WriteLine("Tangent value of {0} is {1}", angle, Math.Tan(angle));
     }
  }

Output:

math_class_6

Tanh–Hyperbole, Cosh and Sinh

The hyperbolic sine, cosine, and tangent values of the specified angle are provided by these trigonometric functions.

Code example:

 using System;
 public class Program
  {
    public static void Main()
     {
       double angle = 120.5;
       Console.WriteLine("Hyperbolic Sine value of {0} is {1}", angle, Math.Sinh(angle));
       Console.WriteLine("Hyperbolic Cosine value of {0} is {1}", angle, Math.Cosh(angle));
       Console.WriteLine("Hyperbolic Tangent value of {0} is {1}", angle,Math.Tanh(angle));
     }
  }

Output:

math_class_7

Atan, Acos and Asin

The angles to which the supplied number is the sine, cosine, or tangent value are returned by these trigonometric functions.

Code example:

 using System;
 public class Program
  {
    public static void Main()
     {
       double value = 1;
       Console.WriteLine("The angle of sin({0}) is {1}", value, Math.Asin(value));
       Console.WriteLine("The angle of cos({0}) is {1}", value, Math.Acos(value));
       Console.WriteLine("The angle of tan({0}) is {1}", value, Math.Atan(value));
      }
  }

Output:

math_class_8

Remainder and DivRem–Division

This function figures out the outcome of dividing two numbers. A fractional value is not included in the returned result. Instead, the function’s return value is the quotient, and the remaining value is returned as an output parameter.

Code example:

 using System;
 public class Program
  {
    public static void Main()
     {
       int divisor = 8;
       int dividend = 45;
       int remainder = 0;
       int quotient = Math.DivRem(dividend, divisor, out remainder);
       Console.WriteLine("{0} divided by {1} results in {2} as the quotient and {3} as the remainder.", dividend, divisor, quotient, remainder);
     }
  }

Output:

math_class_9

Log, Log2, & Log10-Logarithm

The log function returns the base-specific logarithm of a given number. The natural logarithm is produced if no base is supplied; the default base is e.

Note that Log2 was made available in .Net Core. the .Net Framework does not have this technique.

Code example:

 using System;
 public class Program
  {
    public static void Main()
     {
       double num1 = 4.5;
       int new_base = 12;
       Console.WriteLine("Log({0}) to the base 'e' is {1}.", num1, Math.Log(num1));
       Console.WriteLine("Log({0}) to the base 10 is {1}.", num1,Math.Log10(num1));
       Console.WriteLine("Log({0}) to the base 2 is {1}.", num1,Math.Log(num1, 2));
       Console.WriteLine("Log({0}) to the base {1} is {2}.", num1,new_base, Math.Log(num1, new_base));
     }
  }

Output:

math_class_10

Round

The round() function rounds a provided number to the nearest integer or to a specified number of decimal places after the integer, as the name implies.

There are several significant modifications to the round() function. Either two or three arguments are required.

  • The amount to be rounded is the first input.
  • The amount of digits following the decimal point is the second input. The number is rounded to the nearest integer if this is not given.
  • The mode of rounding is the third argument. This is a list of two values that were taken from the enumeration MidpointRounding.

There are two modes:

  • AwayFromZero: A number is rounded to the next number that is farther from zero when it is midway between two numbers.
  • ToEven: A number is rounded to the next even number when it is exactly halfway between two numbers.

The mode AwayFromZero is the default mode if it is not provided.

Code example:

 using System;
 public class Program
  {
    public static void Main()
     {
       double num1 = 2.45;
       double num2 = 24.5;
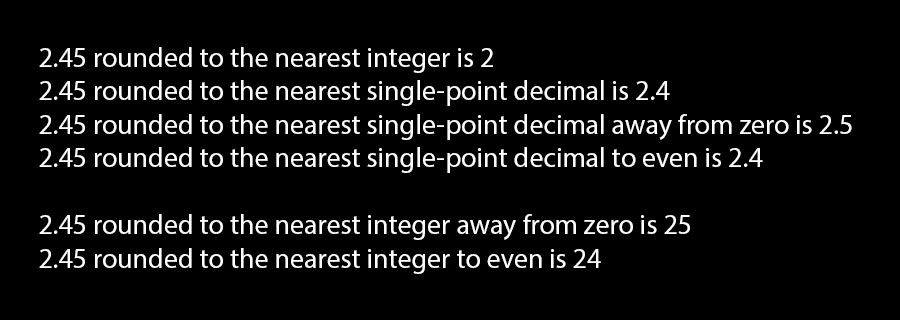
       Console.WriteLine("{0} rounded to the nearest integer is {1}", num1, Math.Round(num1));
       Console.WriteLine("{0} rounded to the nearest single-point decimal is {1}", num1, Math.Round(num1, 1));
       Console.WriteLine("{0} rounded to the nearest single-point decimal away from zero is {1}", num1, Math.Round(num1, 1, MidpointRounding.AwayFromZero));
       Console.WriteLine("{0} rounded to the nearest single-point decimal to even is {1}", num1, Math.Round(num1, 1, MidpointRounding.ToEven));
       Console.WriteLine("\n{0} rounded to the nearest integer away from zero is {1}", num2, Math.Round(num2, MidpointRounding.AwayFromZero));
       Console.WriteLine("{0} rounded to the nearest integer to even is {1}", num2, Math.Round(num2, MidpointRounding.ToEven));
     }
  }

Output:

math_class_11

Min & Max

These operations compare the two supplied numbers and output the smaller or greater of the two.

Code example:

 using System;
 public class Program
  {
    public static void Main()
     {
       double num1 = 4.5;
       double num2 = -3.4;
       int num3 = 981;
       int num4 = 123;
       Console.WriteLine("Minimum of {0} and {1} is {2}.", num1, num2,Math.Min(num1, num2));
       Console.WriteLine("Maximum of {0} and {1} is {2}.", num1, num2,Math.Max(num1, num2));
       Console.WriteLine("Minimum of {0} and {1} is {2}.", num3, num4,Math.Min(num3, num4));
       Console.WriteLine("Maximum of {0} and {1} is {2}.", num3, num4,Math.Max(num3, num4));
     }
  }

Output:

math_class_12
C# Database Connection and Interaction Between C# and SQL Server DB | KoderShop

C# Database Connection and Interaction Between C# and SQL Server DB | KoderShop

C# Database connection – how to set it up correctly

Before explaining the connection let’s explain what C# and a database are.

C_databese_connection_sql

What is C#?

C# (pronounced “See Sharp”) is a modern, object-oriented, and type-safe programming language. C# enables developers to build numerous types of safe and robust apps that run in .NET. C# has its roots in the C family of languages and will be immediately familiar to C, C++, Java, and JavaScript programmers. This tour provides an overview of the major components of the language in C# 8 and earlier. If you wish to explore the language through interactive examples, consider the introduction to C# tutorials.

Programming language C# is component- and object-oriented. C# has language structures that explicitly support these principles, making C# a natural language in which to develop and use software components. Since its origin, C# has added features to support new workloads and emerging software design practices. At its core, C# is an object-oriented language. You define types and their behavior.

What is SQL Server?

SQL Server is a relational database management system, or RDBMS, created and marketed by Microsoft.

Similar to other RDBMS software, SQL Server is built on top of SQL, a standard programming language for interfacing with relational databases. SQL Server is tied to Transact-SQL, or T-SQL, Microsoft’s implementation of SQL that adds a set of proprietary programming constructs.

SQL Server works exclusively on the Windows environment for more than 20 years. Microsoft made it available on Linux in 2016. In October 2016, the Windows and Linux-compatible SQL Server 2017 versions became generally available.

Database connectivity basics

C# and. Most databases, including Oracle and Microsoft SQL Server, can be used with Net. However, the reasoning behind using each database is largely the same.

We’ll examine using Microsoft SQL Server as our database in our examples. Download and use Microsoft SQL Server Express Edition, a free database program offered by Microsoft, for educational purposes.


The concepts that apply to all databases while working with them are listed below.

  1. Connection: The connection is the first and most evident step in working with database data. The following parameters are typically included in a database connection.
  • The first crucial argument is the name of the database to which a connection needs to be made, also known as the data source. Only one database can be used by each connection at once.
  • Credentials – The username and password that must be used to login into the database are the following crucial factor. It makes sure the credentials for the login and password are valid for connecting to the database.
  • Extra parameters – You can enter optional parameters for each type of database to give.net more details about how to manage the connection to the database. For instance, one can give a parameter for the duration of the connection’s active state. If no action is taken after a predetermined amount of time, the parameter would
  1. Choosing data from the database – After the connection has been made, fetching the data from the database is a crucial next step. The ‘SQL’ select command can be used to access the database in C#. You can retrieve information from a particular database table by using the “SQL” query.
  2. Database record insertion – C# can also be used to add records to the database. For each record that needs to be inserted into the database, values can be given in C#.
  3. Database data updating – C# can be used to update already-existing records in the database. Each row that needs to be modified in the database can have new values supplied in C#.
  4. Database record deletion – C# can also be used to remove records from databases. In C#, select instructions can be used to define which rows should be erased.


Let’s move on to the following sections to examine how to carry out database operations in C# now that we have examined the logic behind each action.

SQL Command in C#

The user can query and send commands to the database using sqlCommand in C#. The SQL connection object specifies the SQL command. ExecuteReader method is used for query results, and ExecuteNonQuery is used for insert, update, and delete instructions. It is the approach that works the best for the various commands.

How to connect C# to Database

Let’s now take a look at the code that must be maintained in order to establish a connection to a database. In our example, we’ll establish a connection to Demodb, a database. Below are the credentials used to connect to the database.

Username: sa

Password: demo123

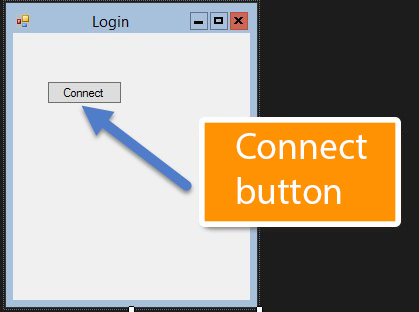
We’ll see a straightforward Windows forms database application. The database connection will be made using a straightforward “Connect” button.

So let’s take the following actions to accomplish this.

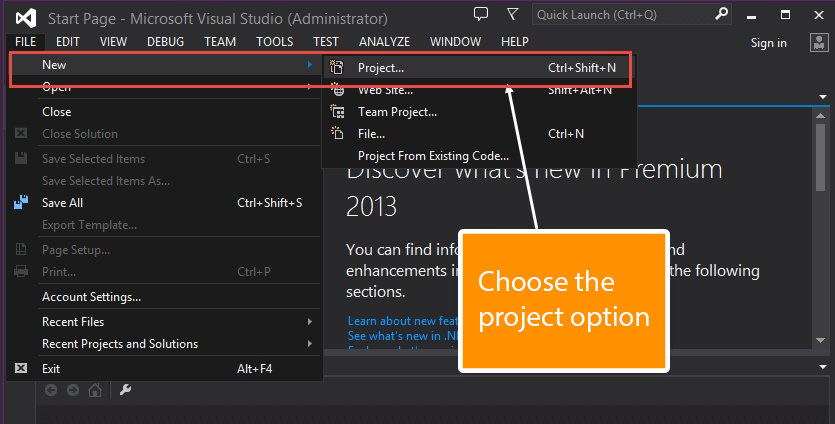
Step 1) Creating a new project in Visual Studio is the first step. After starting Visual Studio, you must select New->Project from the menu.

c_math

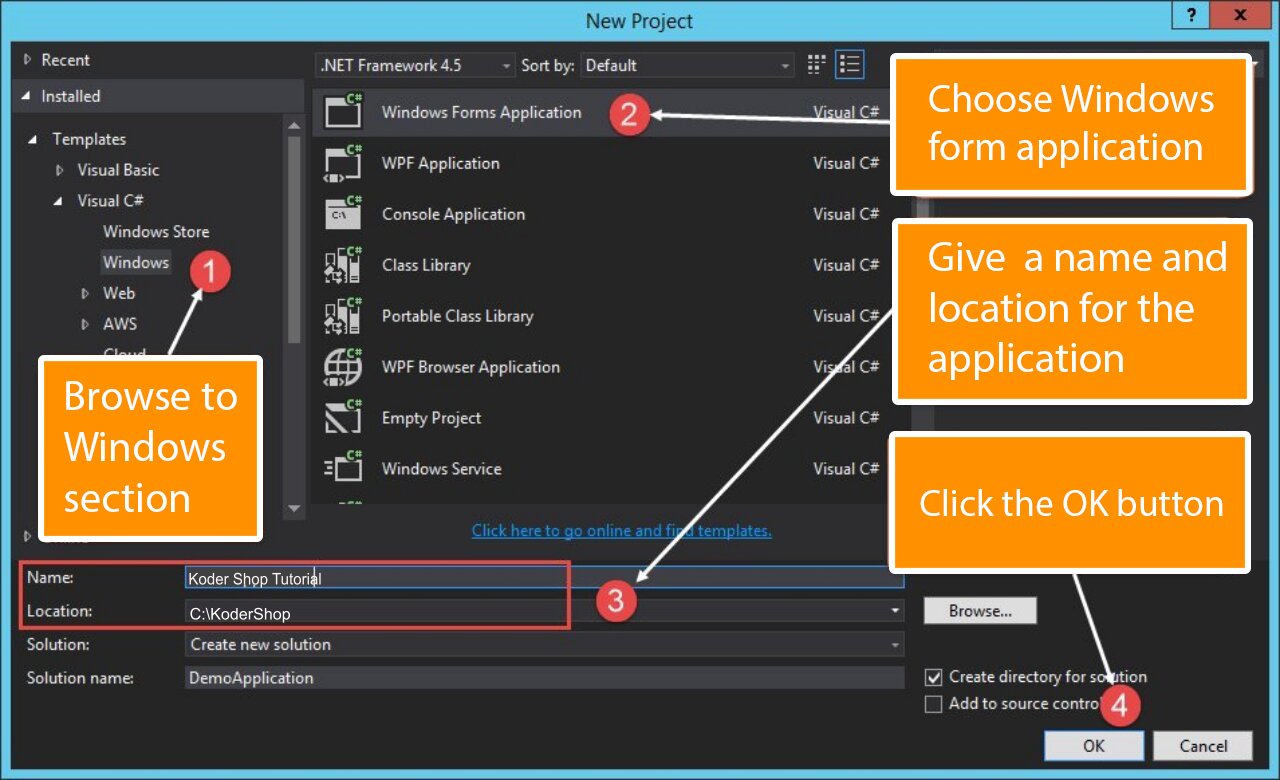
Step 2) The next step is to select a Windows Forms application as the project type. Additionally, we must state the project’s name and location here.

sql_database_connection
  • There are numerous options for creating various types of projects in the project dialog box in Visual Studio. Click the Windows option on the left-hand side.
  • We will be able to see an option for when we click the Windows choices in the previous stage.
  • Then we give the application a name, in this example “DemoApplication.” Additionally, we must give a place where our application can be kept.
  • We then press the “OK” button to instruct Visual Studio to start building our project.
connect_c_sql_server
  • Step 4) Double-click the form now to add an event handler to the button and click the event’s code. Add the following code to the event handler.
sql_connection_string

using System;
using System.Collections.Generic;
using System.ComponentModel;
using System. Data;
using System.Data.SqlClient;
using System. Drawing;
using System. Linq;
using System. Text;
using System.Threading.Tasks;
using System.Windows.Forms;

namespace DemoApplication1
{
 public partial class Form1: Form
 {
  public Form1()
  {
   InitializeComponent();
  }

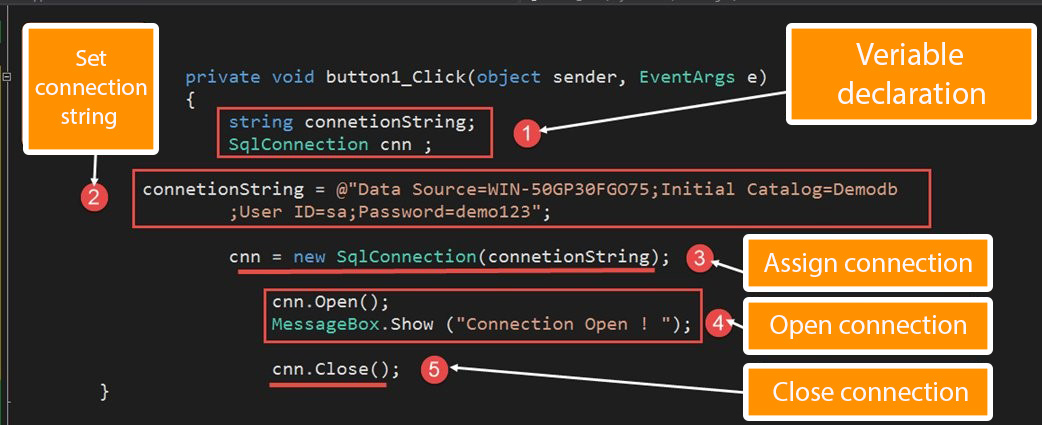
  private void button1_Click(object sender, EventArgs e)
  {
   string connetionString;
   SqlConnection cnn;
   connetionString = @"Data Source=WIN-50GP30FGO75;Initial Catalog=Demodb;User ID=sa;Password=demol23";
   cnn = new SqlConnection(connetionString);
   cnn.Open();
   MessageBox.Show("Connection Open  !");
   cnn.Close();
  }
 }
}

Code Explication

  1. Making variables is the first step in setting up the connection string and the connection to the SQL Server database.
  2. The connection string must be created next. In order for C# to understand the connection string, it must be properly defined. The following components make up the connection string:
  • The database’s server is identified by its name as the data source. In our situation, it is found on a computer known as WIN- 50GP30FGO75.
  • The database’s name is specified in the Initial Catalog.
  • The UserID and Password are required to connect to the database.
  1.  3. The connecting string is then assigned to the cnn variable. The connection to the database is made using the SqlConnection-type variable cnn.

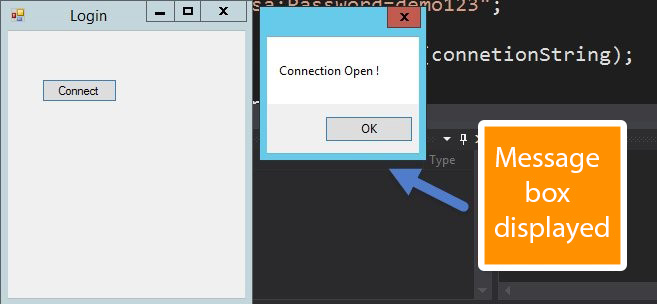
    4. Then, we open a connection to the database by using the Open method of the cnn variable. The user will then only see a notification indicating that the connection has been made.

    5. We then shut down the connection to the database once the process has been properly completed. If no more action has to be taken on the database, it is always a good idea to disconnect from it.

connect_database_c
“Cook” Your Software Impressively Using Agile Sprints! | KoderShop

“Cook” Your Software Impressively Using Agile Sprints! | KoderShop

Agile sprint

Sprints in Agile project management: what are they and how to plan them

Any more or less complex topic is always better to analyze on a simple and understandable example. The field of software development operates with a lot of terms and concepts that will not always be obvious to the average user of the same software, even if they are very easy to understand if you delve a little into the topic. In this article, we will explain in simple terms what is a sprint in Agile software development, and tell what the Scrum approach has to do with it.

Agile in a nutshell

To begin with, let’s imagine that you came to a restaurant and ordered five different dishes at once for a large company. In this analogy, you are the customer of the project, and the restaurant kitchen is its performer. If you ordered only one dish, the best solution for the contractor would be to apply the classic cascade project management method (waterfall): prepare the necessary set of products → cook the dish → put it on a plate beautifully → serve.

However, we are talking about five menu items at once. This formulation of the task requires a slightly different approach, since with the cascade method each time you have to wait until one dish is cooked before starting to cook another. This is where the Agile project management method comes into play. It involves dividing a project not into phases, but into smaller projects that are executed in parallel. The iterations of these subprojects are what we call sprints. At the same time, upon completion of each sprint, all plans and requirements are tested for relevance and expediency given the results already obtained.

Put your finger on the pulse and trust: the benefits of Agile

The main advantage of Agile is that the team releases the product in batches, which allows them to respond in time to end-user feedback, market trends, etc., without violating plans for months ahead.

Agile principles focus not on indicators, but on people and their natural interaction in solving certain problems. This allows agile-team members to decide for themselves which way to accomplish the task will be most effective. As practice shows, by placing such responsibility on the project executors, companies achieve greater success, because, understanding the level of trust shown, employees make every effort to justify it.

The mistake

So, we have already said what is sprint in Agile methodology: a kind of iteration of a subproject. More specifically, this is a fixed time period in which the team completes a certain piece of a global task (whereas iteration is understood not as a period, but as a piece of work itself). But we did not specify that in the Manifesto for Agile software development, which gave the name to the whole concept, sprints are not even mentioned.

For ease of understanding, project management methods such as Scrum or Kanban are often identified with Agile. However, this is a mistake. In its essence, Agile is not a method, but a set of principles that became the basis for the formation of the aforementioned Scrum and Kanban methods.

Moreover, sprints are inherent just in Scrum, while in Kanban the process is not interrupted (we will talk about this some other time). So, the correct wording of the question is not “what are sprints in agile?”, but “what are sprints in scrum?”

How to plan and implement a sprint cycle in software engineering?

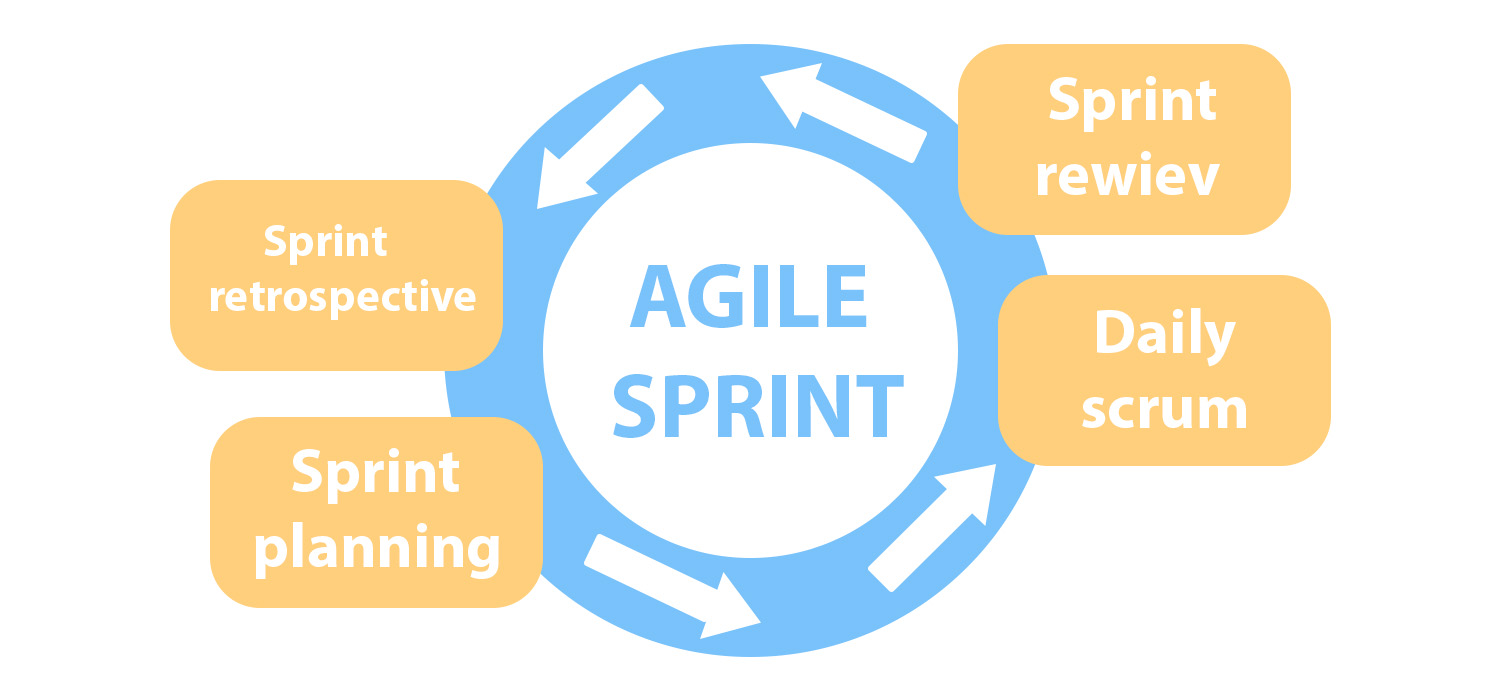
Well, we have another term here – the sprint cycle. And that’s one more thing you need to know. A sprint cycle is usually understood as the sequence of such sprint stages in Scrum:

  1. Sprint planning
  2. Daily scrum
  3. Sprint review
  4. Sprint retrospective
Agile sprint plan

Sprint planning involves a meeting in which the team is expected to answer two fundamental questions: what kind of work needs to be done within this sprint and how particularly this work should be done. The product developers` team, its owner (customer), and Scrum master are involved in this process. Together they bring out the definition of the sprint goal as well as the sprint tasks from the product backlog that needs to be done until the sprint is ended. When this is done, the developers sketch out the sprint plan. Thus, the sprint backlog is formed.

Daily scrums are daily discussions that are necessary for the timely analysis of the results of the work done and the quick identification of possible difficulties during the sprint.

A sprint review is needed to summarize the work done. At such meetings, team members show what was done and how, clarify the details, test the functionality of the product (or some parts of it), and share their opinion about the already implemented software features. That is, it is assumed that the team already has some demos by the sprint review.

For such a meeting to be fruitful, it is necessary to clearly formulate the criteria for product readiness. Most often, this is done during sprint planning, but in rare cases, the team may determine the readiness criteria as the work progresses.

Do not confuse the sprint retrospective with the sprint review. During the retro, no one analyzes the results of the sprint. Instead, the team discusses which areas need to be refined and improved in the next iteration. To some extent, the retrospective definition in Scrum is a preparatory stage for planning the next sprint.

As you can see, the sprint methodology in Scrum is not as difficult to understand as it might seem at first glance. Of course, by introducing the Scrum approach or any other direction of Agile into the workflow of your enterprise, you are unlikely to be able to immediately avoid all the difficulties. But this game is worth the candle. The main thing when implementing Agile is the correct selection of a team, and everything else will work out quickly enough.

FAQ

What is sprint backlog in Agile?

In Scrum model the sprint backlog presented as a list of tasks that the development team must complete during this sprint. It also includes a pre-designed plan according to which the performers will do the work.

What`s the difference between sprint backlog and product backlog?

Unlike a sprint backlog, a product backlog contains a list of all the tasks in a project. In the product backlog, tasks are described in order of importance, but Agile principles do not require strict adherence to this order (of course, this may vary depending on the specifics of the project). In the process of work, the team itself determines which task is more appropriate to perform at one time or another.

The basis for the formation of the product backlog is the so-called roadmaps (a document that describes the strategy for the development of your product in the long term), as well as the requirements for the product, which we have already written about here. The product backlog usually serves as the basis for the sprint backlog when it is planned.

How long is a sprint in Agile?

The Manifesto for Agile does not specify the duration of the sprint. However, typically Scrum development teams set a sprint timeframe of one to four weeks. Most often, an agile sprint lasts two weeks.

Python Return Statement Explained in Details and Practical Examples

Python Return Statement Explained in Details and Practical Examples

Python return statement

Python return statement in examples


The Python return statement is associated with functions and methods. In the body of the function to determine the value that is the result of the function, the return in Python3 is usually used (it can not be used outside a function). Execution of this instruction leads to the completion of the execution of the program code of the function. Also the value that is specified after the return statement is returned by the function as a Python result. Keep in mind that the return statement indicates the end of a function, so the statements after are not executed.

Return function Python

A function is a piece of code, that has a name, and which we can call in any place of a programm. It returns value back to a caller.

To define function in Python, you need:

  • set the name of the function;
  • describe function arguments;
  • describe the program code of the function.

The definition of a function starts with the def keyword followed by the name and arguments of a function. Arguments are listed after the function name in parentheses. Even if a function has no arguments, it needs parentheses.

Syntax of a function:

def function_name(arguments):
    a block of statements

You can use a function by calling it

function_name(arguments)

Python return example

Python function return value without arguments

def your_name():
    # The text entered by the user is remembered
    name = input("What is your name?")
    # Return variable name
    return name

Python function with return value with two arguments

def subtract_numbers(a, b):
    result = a - b
    # Return variable result
    return result

A function may or may not return a result (in the latter case it would make sense to talk about a procedure, but in Python everything is called function). If a function return in Python doesn’t have any return statements, it returns NONE. Return 0 Python is not equal to None. However, in boolean context, it means False.

Python function without return statement example:

def say_hello(name): 
    print ('Hello', name) 

You can have an expression in the return statement.

Python return command with expression example:

def subtract_numbers(a, b): 
# return result Python 
    return a - b 

Python return True or False

In functions you can return different types of data, as boolean values.

def positive_or_negative_number(number): 
    if number > 0: 
        return True 
    else: 
        return False 

Or simply use a bool() function.

def bool_value(value): 
    return bool(value) 
a = bool_value(0) 
b = bool_value(12) 
print(a, b) 
# output: False True 

Python return string

To return a string you need to use str() function. And also except words you could return numbers that convert to string type.

def str_value(s): 
    return str(s) 
a = str_value('hello') 
b = str_value(12) 
print(a, b) 
# output: hello 12 

Python function return multiple values in a single return Statement

In Python, you can use the return statement to return multiple values from a function.

There are different ways to do it.

1. Using Tuple

Tuple is used to store multiple values in a single variable. Still you can use it without creating a separate variable, simply writing several comma-separated values in the return statement.

def fun(x):  
    y1 = x * 4 
    y2 = x + 2 
# Return tuple 
    return (y1, y2) 
t = fun(3) 
print(t) 
# output: (12, 5) 

2. Using Dictionary

Dictionary is a collection, which is used to store data values in key:value pairs. In Python to create a dictionary you need to place values in curly brackets.The dictionary is an unordered set of elements. However, unlike a set, each element of a dictionary is “identified” in a special way.

def first_dict(): 
    d = second_dict(); 
    d['str'] = "string" 
    d['i']   = 1 
    return d 
d = first_dict() 
print(d) 
# output: {'i': 1, 'str': 'string'} 

3. Using List

For this, you need to write an array of items using square brackets. Arrays can store different types of items that are ordered and can be changeable. The last is the difference from tuples, because tuples can not be changeable.

def first_list(): 
    second_list = [] 
    for i in range(3): 
        second_list.append(i) 
    return second_list 
print(first_list()) 
# output: [0, 1, 2, 3] 

4. Using Data Class

A technique of adding methods to a class that was defined by a user is called Data class. In this method, you use data classes to return multiple values. Also it can return a class with automatically added specific methods.

from dataclasses import dataclass 
@dataclass 
class Food: 
    Name: str 
    Cost: int 
    Amount: int = 0    
    # Python class returns total cost     
    def total_cost(self) -> int: 
        return self.Cost * self.Amount  
food = Food("Apple", 30, 4) 
x = food.total_cost() 
print(food) 
print("Total cost:", x) 
# output: Food(Name='Apple', Cost=30, Amount=4) 
# Total cost: 120 

Python function return another function

In Python a function is an object, so you can also return another function from the return statement. To do that, you can define a function inside another function.

def fun1(a): 
    def fun2(b): 
        return a + b 
    return fun2 
x = fun1(20) 
print ("The value is", x(80)) 
# output: The value is 100 

A function that is defined outside the function also can be returned with the Python method return statement.

def fun1(a): 
    return a - 20 
def fun2(): 
    return fun1 
y = fun2() 
print ("The value is" y(100)) 
# output: The value is 80 

Python print return and difference between them

Print() function is used to display messages onto the screen.

Python return function is used to return a result of a function back to the caller. Also when the return statement is used in a function the output can be used again, but with print function it can not. Also the return function can not return print, because it only returns a value, not a function.

Example of a function that includes print():

def say_hello(name): 
print("Hello", name) 
say_hello("World") 

Here is output:

Hello World 

Example when Python return value from function:

def say_hello(name): 
    return "Hello " + name 
greeting = say_hello("World") 
print(greeting) 

An output is same as before:

Hello World 

In order to display the value of the function on the screen, you need to store it into a variable and then use print().

Printing and returning are completely different, because printing is used to display value on the screen for you to see and the second giving back a value that you can continue to use.

Summary

Today you learned the Python return statement. It is one of the important parts of any Python function or method. This statement allows you to return any object you want from functions. Also it is possible to return one function from another and return multiple values by tuple, dictionary, lists and data class. Definition and using functions is a central component of Python programming in general.