What are Async and Await Methods in C# Asynchronous Programming

What are Async and Await Methods in C# Asynchronous Programming

C# Asynchronous programming

C# Asynchronous programming

What is Async?

Async is a C# reference, to indicate that a method, lambda expression, or anonymous method is asynchronous, use the async modifier. A method or expression is referred to as an async method if this modifier is applied to it. The async C# method ExampleMethodAsync is defined in the example that follows:

public async Task<int> ExampleMethodAsync()
{
    //...
}

Read the introduction in Asynchronous programming with async and await if you’re new to asynchronous programming or don’t know how an async method utilizes the await operator to perform potentially lengthy work without blocking the caller’s thread. The HttpClient is called by the code described below, which is contained inside an async method. Method called GetStringAsync:

string contents = await httpClient.GetStringAsync(requestUrl);

Until it encounters its first await statement, an async method executes synchronously. After that, the method is suspended until the task that is being anticipated has finished. Control then passes back to the method’s caller, as demonstrated by the example in the next section.

If an await expression or statement is absent from the method that the async keyword alters, the method operates synchronously. Any async methods without await statements trigger a compiler warning, alerting you to the possibility of an error. Refer to CS4014, Compiler Warning (level 1).

Async is a contextual keyword, meaning it can only be used to modify methods, lambda

C# async and C# await

The async and await keywords in C# help make asynchronous programming highly common these days. The entire application will have to wait to complete the operation when working with UI and using a long-running method that will take a long time, such as reading a huge file, on button click. In other words, if any process in a synchronous application becomes blocked, the entire application also becomes halted, and our application ceases to function until the entire task has been completed.

In this situation, asynchronous programming is highly useful. The application can carry on with tasks that don’t depend on the task’s completion by employing asynchronous programming.

With the aid of the async and await keywords, we will achieve all the advantages of conventional asynchronous programming with a great deal less work.


Let’s say we have two methods, Method1 and Method2, that are independent of one another and that Method1 takes a long time to perform its task. Synchronous programming starts with Method1 and waits for it to finish before moving on to Method2, which is then executed. Even if both procedures are independent of one another, the process will take a lot of time.


By utilizing simple thread programming, we can run all the functions concurrently, but this would block the user interface while we wait for the tasks to be finished. In traditional programming, we would need to write a lot of code to solve this issue, but if we utilize the async and await keywords, we can solve the issue with a lot less code.

We’ll see other examples as well, and in those cases when Method3 depends on Method1, it will use the await keyword to wait for Method1 to finish running.

In C#, async and await are code markers that indicate where control should return when a task has been completed.

Start by using real-world examples to help you grasp the concept of programming.

Await async: Await function is used to wait for the promise. It could be used within the async block only. It makes the code wait until the promise returns a result. It only makes the async block wait.

Code exemples on Async await C#:

We are going to use a console application for our demonstration in this case.

 Sample:

class Program
{
static void Main(string[] args)
{
Method1();
Method2();
Console.ReadKey();
}
public static async Task Method1()
{
await Task.Run(() =>
{
for (int i = 0; i < 100; i++)
{
Console.WriteLine(" Method 1");
// Do something
Task.Delay(100).Wait();
}
});
}
public static void Method2()
{
for (int i = 0; i < 25; i++)
{
Console.WriteLine(" Method 2");
// Do something
Task.Delay(100).Wait();
}
}
}

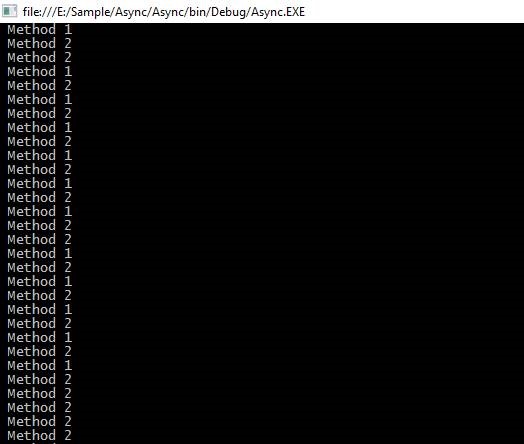
Method 1 and Method 2 in the code above are independent of one another, and we are calling from the Main method.

Here, it is obvious that Method 1 and Method 2 are not waiting on one another.

Result:
C# async

With regard to the second illustration, let’s say Method 3 is dependent on Method 1.

Example no.2

In this illustration, Method 1 returns the overall length as an integer value, and Method 3 receives a parameter named length that is passed from Method 1 as a value.

Before giving a parameter to Method 3, we must use the await keyword in this case, and to do so, we must use the async keyword from the calling method.

Async cannot be used in the Main method for the console application if C# 7 or below is being used because it will result in the error detailed below.

C# async error

A new method called callMethod will be created, and in this method, all of our methods will be called Method 1, Method 2, and Method 3, correspondingly.

Code Sample in C# no.3:

 callMethod();
Console.ReadKey();
}
public static async void callMethod()
{
Task<int> task = Method1();
Method2();
int count = await task;
Method3(count);
}
public static async Task<int> Method1()
{
int count = 0;
await Task.Run(() =>
{
for (int i = 0; i < 100; i++)
{
Console.WriteLine(" Method 1");
count += 1;
}
});
return count;
}
public static void Method2()
{
for (int i = 0; i < 25; i++)
{
Console.WriteLine(" Method 2");
}
}
public static void Method3(int count)
{
Console.WriteLine("Total count is " + count);
}
}

Code Sample in C# no.4:

class Program
{
static void Main(string[] args)
{
class Program
{
static async Task Main(string[] args)
{
await callMethod();
Console.ReadKey();
}
public static async Task callMethod()
{
Method2();
var count = await Method1();
Method3(count);
}
public static async Task<int> Method1()
{
int count = 0;
await Task.Run(() =>
{
for (int i = 0; i < 100; i++)
{
Console.WriteLine(" Method 1");
count += 1;
}
});
return count;
}
public static void Method2()
{
for (int i = 0; i < 25; i++)
{
Console.WriteLine(" Method 2");
}
}
public static void Method3(int count)
{
Console.WriteLine("Total count is " + count);
}
}

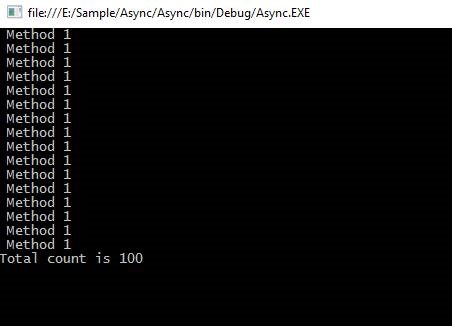
The return type of Method 1 is the only parameter Method3 in the code above needs. In this case, the await keyword is essential for waiting for Method 1 task completion.

Result:
Async programming sample

Actual instance:

There are a few.NET Framework 4.5 supporting APIs, and the Windows runtime has methods that support async programming.


With the aid of the async and await keywords, we can leverage all of these in real-time projects to speed up task completion.

HttpClient, SyndicationClient, StorageFile, StreamWriter, StreamReader, XmlReader, MediaCapture, BitmapEncoder, BitmapDecoder, etc. are a few APIs that include async functions.

In this example, we’ll asynchronously read every character from a sizable text file to determine how long each character is.

Code Sample:

class Program
{ ke
static void Main()
{
Task task = new Task(CallMethod);
task.Start();
task.Wait();
Console.ReadLine();
int length = await task;
Console.WriteLine(" Total length: " + length);
Console.WriteLine(" After work 1");
Console.WriteLine(" After work 2");
}
Console.WriteLine(" File reading is completed");
return length;
}
}static async Task<int> ReadFile(string file)
{
int length = 0;
Console.WriteLine(" File reading is stating");
using (StreamReader reader = new StreamReader(file))
{
// Reads all characters from the current position to the end of the stream asynchronously
// and returns them as one string.
string s = await reader.ReadToEndAsync();
length = s.Length;
}
}

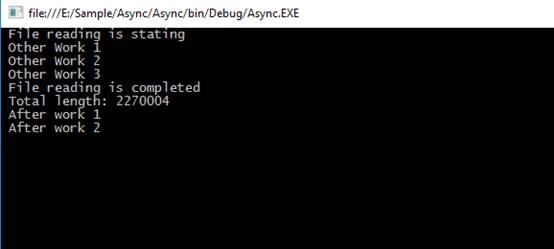
The code above calls the ReadFile function to read a text file’s contents and determine how many characters there altogether in the text file.

It will take a long time to read all the characters in our sampleText.txt file because there are too many of them.


Since we are utilizing async programming to read the entire contents of the file, the subsequent lines of code will be executed without waiting for the method’s return value. Because we are using the await keywords and we are going to use the return value for the line of code provided below, it must still wait for that line of code.

int length = await task;
Console.WriteLine(" Total length: " + length);

Then, more lines of code will be executed consecutively one after the other.

Console.WriteLine(" After work 1");
Console.WriteLine(" After work 2");

Result:
C# Async example

I/O-bound example: Download data from a web service

When a button is pressed, you might need to download some data from a web service, but you don’t want to obstruct the UI thread. It can be done in the following way:

private readonly HttpClient _httpClient = new HttpClient();
downloadButton.Clicked += async (o, e) =>
{
// This line will yield control to the UI as the request
// from the web service is happening.
//
// The UI thread is now free to perform other work.
var stringData = await _httpClient.GetStringAsync(URL);
DoSomethingWithData(stringData);
};

Without becoming mired down in interactions with Task objects, the code above states the intention (asynchronous data download).

CPU-bound example: Perform a calculation for a game

Imagine you’re creating a mobile game where hitting a button will deal harm to a lot of the enemies you see. The damage calculation can be expensive, and running it on the UI thread would appear to pause the game while it is being done.

Starting a background thread that uses Task to complete the task is the best method to manage this.

Run and use await to check the outcome. As the job is being done, this enables the user interface to feel fluid.

private DamageResult CalculateDamageDone()
{
// Code omitted:
//
// Does an expensive calculation and returns
// the result of that calculation.
}
calculateButton.Clicked += async (o, e) =>
{
// This line will yield control to the UI while CalculateDamageDone()
// performs its work. The UI thread is free to perform other work.
var damageResult = await Task.Run(() => CalculateDamageDone());
DisplayDamage(damageResult);
};

This code represents the button’s click event’s objective clearly, doesn’t call for manually managing a background thread, and does it in a non-blocking manner.

Key thing to keep in mind and understand:

  • I/O-bound and CPU-bound code can both employ async code, although in slightly different ways depending on the situation.
  • TaskT> and Task are constructs used in async programs to model work being done in the background.
  • The await keyword can be used in a method’s body since the async keyword converts it into an async method.
  • The await keyword suspends the calling method and returns control to the calling method until the task that is being awaited is finished.
  • Only async methods may utilize the await keyword.

How can you recognize CPU-bound and I/O-bound work

This guide’s first two examples demonstrated how to utilize async and await for CPU- and I/O-bound tasks, respectively. Knowing whether a task is I/O-bound or CPU-bound is essential since it can have a significant impact on your code’s performance and possibly result in the misuse of some constructs.

Before writing any code, you should consider the following two questions:

  • Is something going to be “waiting” for in your code, like data from a database?

Your job is I/O-bound if you replied “yes.”

  • Will your code need to run a pricey calculation?

Your task is CPU-bound if you indicated “yes” in your response.

If your work is task-bound by I/O, utilize async and await instead of Task. Run. Use of the Task Parallel Library is not advised.

If your workload is CPU-bound and responsiveness is important to you, utilize async and await, but use Task to spawn the work off into a different thread.

Run. Consider using the Task Parallel Library as well, if concurrency and parallelism are acceptable for the work.

Additionally, you should constantly monitor how your code is being executed. For instance, you might discover that the cost of your CPU-bound task is insufficiently high relative to the multithreading overhead associated with context shifts. Every decision has a trade-off, and you should make the best trade-off possible given your circumstances.

Important advices and information

  • Await must be a body keyword in async methods else they will never yield!

It’s crucial to remember this. The C# compiler generates a warning if await is not used in the body of an async method, but the code still compiles and executes as if it were a regular method. This is highly wasteful because the state machine the C# compiler created for the async method does nothing.

  • Every name you create for an async method should end with “Async.”

In.NET, this convention is used to more clearly distinguish between synchronous and asynchronous methods. It’s not always necessary to use methods that aren’t explicitly used by your code, such event handlers or web controller methods. Being specific in their nomenclature isn’t as crucial because they aren’t invoked directly by your code.

  • Only event handlers should utilize async void.

Because asynchronous event handlers cannot use Task and TaskT> because events lack return types, async void is the only way to enable them to function. Any other application of async void departs from the TAP paradigm and poses a challenge, such as:

  • An async void method cannot catch an exception that is thrown outside of it.
  • Testing async void methods is challenging.
  • If the caller does not anticipate them to be async, async void methods may have undesirable side effects.


  • When utilizing async lambdas in LINQ expressions, proceed with caution.

Deferred execution is used by lambda expressions in LINQ, which means that code execution could occur when you least expect it to. If not written properly, the addition of blocking jobs to this can quickly lead to a deadlock. Furthermore, the execution of the code may be harder to predict when asynchronous code is nested in this way. Although async and LINQ are strong together, they should be utilized with the utmost caution and clarity.

  • Anytime ValueTask is an option, use it.

Certain pathways may have performance bottlenecks as a result of async operations returning a Task object. Utilizing a task entails allocating an object because task is a reference type. The extra allocations can add up over time in performance-critical code sections if a method with the async modifier completes synchronously or returns a cached result. If those allocations take place in close loops, it can become expensive.

  • Think about use ConfigureAwait (false)

When should I utilize the Task.ConfigureAwait(Boolean) function is a frequently asked question. A Task object can configure its awaiter using this method. This is a crucial factor, and setting it improperly could have an impact on performance or possibly lead to deadlocks.

  • Make your code less stateful.

Don’t rely on the operation of specific methods or the state of global objects. Rather, just rely on the results of procedures. Why?

  • Code will be simpler to rationalize.
  • Testing code will be simpler.
  • It is much easier to mix synchronous and async code.
  • Usually, race-related situations can be completely avoided.
  • Coordination of async programming is made simple by relying on return values.
  • Dependency injection works pretty well with it.

expressions, or anonymous methods. It is treated as an identifier in all other situations.

Return Types

The subsequent return types are available for async methods:

  • Task
  • Task<TResult>
  • Since callers cannot await those methods and must design an alternative mechanism to indicate successful completion or error conditions, methods are generally avoided for programs other than event handlers.
  • Every type that has a reachable GetAwaiter function as of C# 7.0. The Program. Tasks. One example of this is the ValueTaskTResult> type. By including the NuGet package System, it is accessible. Threading.Tasks.Extensions.

The async method cannot declare any in, ref, or out parameters and cannot return a result that is a reference, but it can call methods that do.

If an operand of type TResult is specified in the method’s return statement, you must provide Task as the return type. If no useful value is returned when the method is finished, use Task. In other words, a method call returns a Task, but any await expression that was awaiting the Task evaluates to void once the Task has been finished.

The void return type is typically used to create event handlers, which need it. A void-returning async method’s caller is unable to anticipate it or catch any exceptions that it may throw.

Code Sample:

public static async Task DisplayCurrentInfoAsync()
{
await WaitAndApologizeAsync();
Console.WriteLine($"Today is {DateTime.Now:D}");
Console.WriteLine($"The current time is {DateTime.Now.TimeOfDay:t}");
Console.WriteLine("The current temperature is 76 degrees.");
}
static async Task WaitAndApologizeAsync()
{
await Task.Delay(2000);
Console.WriteLine("Sorry for the delay...\n");
}

Result:

Return async c#

Task<TResult> return type

For an async method with a return statement and TResult as the operand, the return type is TaskTResult>.

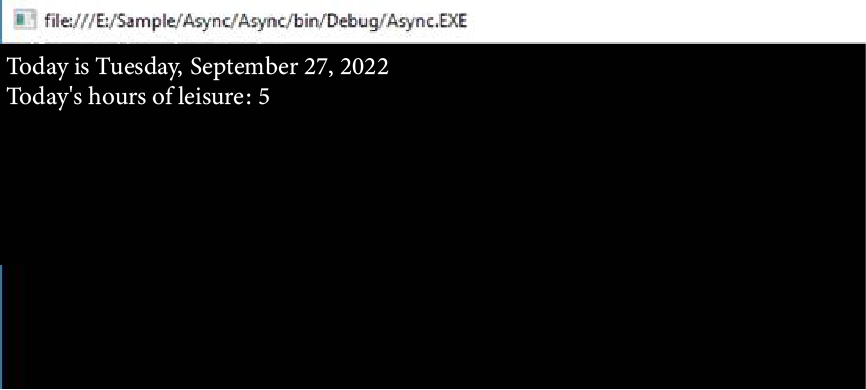
The return statement in the GetLeisureHoursAsync function in the example below returns an integer. Taskint> must be specified as the return type in the method declaration. The async function FromResult is a stand-in for an operation that returns a DayOfWeek.

public static async Task ShowTodaysInfoAsync()
{
string message =
$"Today is {DateTime.Today:D}\n" +
"Today's hours of leisure: " +
$"{await GetLeisureHoursAsync()}";
Console.WriteLine(message);
}
static async Task<int> GetLeisureHoursAsync()
{
DayOfWeek today = await Task.FromResult(DateTime.Now.DayOfWeek);
int leisureHours =
today is DayOfWeek.Saturday || today is DayOfWeek.Sunday
? 16 : 5;
return leisureHours;
}

Result:
tresult async

Void return type

Asynchronous event handlers, which need a void return type, employ the void return type. An async method that returns void cannot be anticipated, thus you should return a Task in place of it for methods other than event handlers that don’t return a value. Any caller of such a method must proceed all the way through without stopping to wait for the async method it called to finish. Any values or errors that the async method produces must not affect the caller.

Exceptions thrown by an async function that returns void cannot be caught by the method’s caller. Your program is likely to crash as a result of such unhandled exceptions. The exception is kept in the returned task if a method that returns a Task or TaskTResult> throws one. When the job is awaited, the exception is once again thrown. Ensure that calls to any async method that potentially throw an exception have an awaited return type of Task or TaskTResult>.

Code Sample:

public class NaiveButton
{
public event EventHandler? Clicked;
public void Click()
{
Console.WriteLine("Somebody has clicked a button. Let's raise the event...");
Clicked?.Invoke(this, EventArgs.Empty);
Console.WriteLine("All listeners are notified.");
}
}
public class AsyncVoidExample
{
static readonly TaskCompletionSource<bool> s_tcs = new TaskCompletionSource<bool>();
public static async Task MultipleEventHandlersAsync()
{
Task<bool> secondHandlerFinished = s_tcs.Task;
var button = new NaiveButton();
button.Clicked += OnButtonClicked1;
button.Clicked += OnButtonClicked2Async;
button.Clicked += OnButtonClicked3;
Console.WriteLine("Before button.Click() is called...");
button.Click();
Console.WriteLine("After button.Click() is called...");
await secondHandlerFinished;
}
private static void OnButtonClicked1(object? sender, EventArgs e)
{
Console.WriteLine(" Handler 1 is starting...");
Task.Delay(100).Wait();
Console.WriteLine(" Handler 1 is done.");
}
private static async void OnButtonClicked2Async(object? sender, EventArgs e)
{
Console.WriteLine(" Handler 2 is starting...");
Task.Delay(100).Wait();
Console.WriteLine(" Handler 2 is about to go async...");
await Task.Delay(500);
Console.WriteLine(" Handler 2 is done.");
s_tcs.SetResult(true);
}
private static void OnButtonClicked3(object? sender, EventArgs e)
{
Console.WriteLine(" Handler 3 is starting...");
Task.Delay(100).Wait();
Console.WriteLine(" Handler 3 is done.");
}
}

Result:
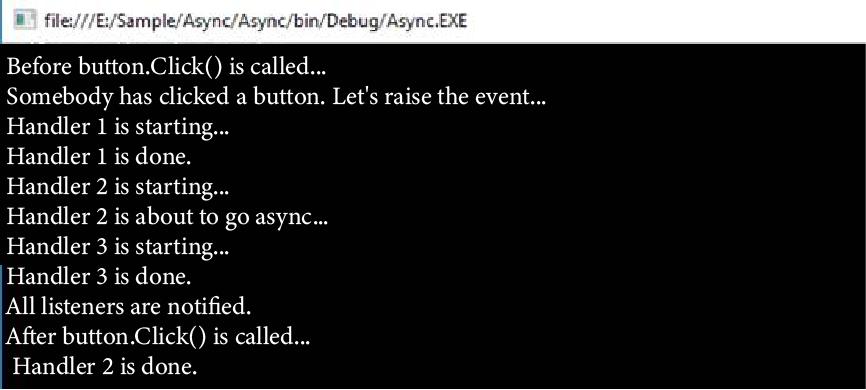
Void return type

Generalized async return types and ValueTask<TResult>

As a simple implementation of a task-returning value,.NET offers the System.Threading.Tasks.ValueTaskTResult> structure. You must include the System.Threading.Tasks.Extensions NuGet package in your project in order to use the System.Threading.Tasks.ValueTaskTResult> type. The value of two dice rolls is obtained using the ValueTaskTResult> structure in the example that follows.

class Program
{
static readonly Random s_rnd = new Random();
static async Task Main() =>
Console.WriteLine($"You rolled {await GetDiceRollAsync()}");
static async ValueTask<int> GetDiceRollAsync()
{
Console.WriteLine("Shaking dice...");
int roll1 = await RollAsync();
int roll2 = await RollAsync();
return roll1 + roll2;
}
static async ValueTask<int> RollAsync()
{
await Task.Delay(500);
int diceRoll = s_rnd.Next(1, 7);
return diceRoll;
}
}

Result:
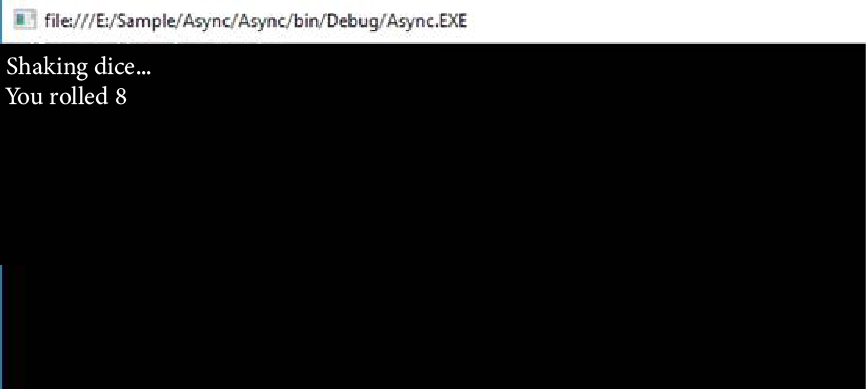
Async return types
IoT Testing – Today’s and Tomorrow’s Technologies and Strategies

IoT Testing – Today’s and Tomorrow’s Technologies and Strategies

IoT Testing

Internet Of Things (IoT) Testing: Tools And Testing Approach

The Internet of Things has emerged as a top-trending technology, with greater supply and demand than ever for IoT solutions. But it is only the beginning.

The most cautious projections predict that there will be 25,44 billion linked IoT devices by 2030, if there were over 7,74 billion in 2019. If we can solve the interoperability and security problems with IoT technologies, that number will rise even further.

The need of maintaining the effectiveness and security of the system increases as more devices connect to the Internet of Things. Traditional methods for providing quality assurance services, however, are insufficient today. Early testing is necessary for many devices, especially those that are undergoing continuous integration.

What is Internet of Things (IoT)?

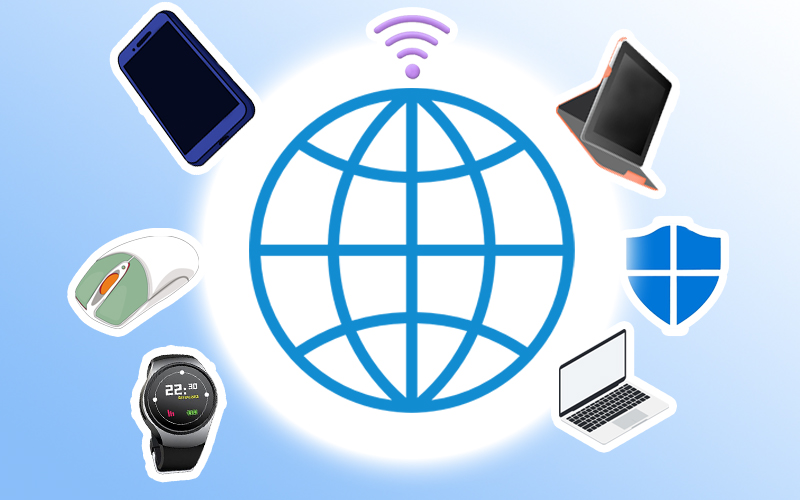
Three essential elements make up the Internet of Things: devices, communications, and computers. Devices are items or actual physical things that are linked to the Internet. The second part of the system is communication, which can be done using Wi-Fi, satellites, or cellular connections. Communication is crucial to keeping the system running.

The system can function effectively thanks to the third component, computation, which is carried out in a central location on the server. For intelligent decision-making, an IoT application helps combine all three components.

The implementation of common IoT solutions globally is hampered by the heterogeneity of underlying devices and communication technologies as well as the need for interoperability at various levels, from communication and seamless integration of devices to the interaction of data generated by IoT resources.

Because the IoT is a real-time network, performance and security issues in any one area can have an adverse effect on the operation of the entire network. A cyberattack on one node can impact neighboring nodes. As a result, you must find every weak area before the product is sold to customers.

IoT testing is a set of QA tests for validating functionality, performance, and security for any devices, independent of their size, location, or other characteristics.

There are several challenges with the testing process because the IoT is a fragmented system. By assembling sizable test teams to check every component’s dependability across various platforms and devices, these can be eliminated.

IoT Examples

Here are a few instances of IoT implementation in daily life:

1. Smart watch


IoT Example

Apple watches and Fitbit bands are two examples of wearable technology that sync effortlessly with mobile devices.

These aid in gathering important data, including that related to health, heart rate monitoring, sleeping patterns, etc. These aid in showing information and notifications from mobile devices.

2. Infrastructure and development:

It is simpler to obtain real-time outdoor lighting data with the aid of a program like CitySense, and the street lights are turned on or off as a result. In a complex metropolitan plan, there are also numerous applications to manage traffic signals and parking availability.

3. Healthcare

There are many programs available to track patients’ health issues.

The services regulate the medication dosage throughout the day based on benchmarked data. There are programs like UroSense that can track the patient’s body’s fluid levels and, if necessary, start a fluid transfer. The data can be remotely distributed to many stakeholders at the same time.

The technology behind IoT

The few most popular IoT technologies are as follows:

  • EPC [Electronic Product Code] and RFID [Radio Frequency Code] tags
  • To allow for two-way communication between the electronic gadgets, NFC [Near Field Communication] is utilised. Essentially, this is for cellphones and is primarily used for contactless payments.
  • When short-range communications are sufficient to solve the issue, Bluetooth is used. The majority of wearable technology uses this.
  • A low power RF communication technology is Z-Wave. This mostly serves the purposes of home automation, lamp control, etc.
  • IoT devices are most frequently connected via WiFi. This facilitates the smooth transport of files, data, and messages over a LAN.

What kinds of IoT testing are there?

Although testing IoT solutions has some unique quirks, in theory it is similar to evaluating other software products. There are two main categories of test types, each of which has its own subcategories.

Functional Testing

It entails examining the operation of numerous functional characteristics, as you might infer from the name. This group consists of, for instance:

  • Unit tests Each module or piece of an application is tested. Usually, the IoT development team handles this work.
  • Integrity test. It is crucial to understand how the modules function together once they have all been merged.
  • End-to-end testing. This method entails testing the complete piece of software.
  • Smoketesting: This kind of testing determines whether the software is sufficiently stable.
  • Regression analysis. Program changes result from each new module that is added. If the IoT device’s firmware needs to be updated, this could result in system modifications as well. After each update, it is critical to verify that all components are still operating properly.
  • Interface evaluation. The GUI is tested to ensure it complies with all standards and specifications.

Non-functional Testing

It emphasizes elements like effectiveness, dependability, and security. We can define the following types under this heading:

  • Performance testing. The goal of this approach is to find software performance issues.
  • Security testing. This kind of testing is extremely thorough because data security is essential to the majority of IoT systems.
  • Load testing. By doing so, you may figure out how much load the software can handle without suffering performance degradation.
  • Stress testing. When there are limited resources, these tests assist you in determining whether the system is operating as planned. Compatibility testing. It will assist you in determining whether the program can operate without errors or other issues across a variety of platforms and environments. When the software is 100 percent stable, these tests are appropriate.

Up to 40 different testing types are available overall. Let’s look more closely at the most popular solutions for the Internet of Things.

Compatibility testing

Compatibility tests should be done first since IoT systems are created using a variety of hardware and software configurations. This is because this is the most important stage of IoT testing. To ensure maximum compatibility, this process often entails testing multiple hardware, browsers, operating systems, and communication methods.

It establishes compatibility between a target product that implements a standard specification and other products that implement the specification exactly. Each piece of software must be able to recognize input from other programs, manage the workload necessary for it to play its part in the architecture, and produce outputs that are useful and accessible.

Tip: Verify that the data sent is valid and that the response time was within a certain window of time.

Performance testing

Starting with the performance-related implementation validation, the second stage of IoT software testing is carried out. The performance testing process often addresses a number of important elements, such as:

  • Performance when dealing with a lot of data.
  • Testing a system with multiple devices at once.
  • Device communication checks.
  • Usability of the system, including RAM load, battery life, and power utilization.
  • Putting the gadget through a variety of network and environmental tests.

It enables you to evaluate the performance of IoT applications in environments with lots of data. The application can be tested in difficult situations utilizing custom scripts and cloud platforms to mimic large loads.

Tip: As a general rule, performance testing for the Internet of Things (IoT) should be done at the network and gateway level (using protocols like MQTT, HTTP, and CoAP), system level (processing, analytics, and databases), and application level.

Connection testing

Even in the event that customers do not have access to all of the data, the third testing phase guarantees continuous connectivity. The connectivity between the hub and the devices affects how stable the IoT system is. After all, if the connection is lost for at least one second, it may result in inaccurate data and unstable systems. One of the two key components of connectivity testing, along with data recovery, is flawless connectivity.

Tip: Don’t forget to register with the network any devices used in the IoT test. Make sure the mistake continues by sending ping packets on a regular basis. To reestablish connectivity, the device must save the data to the database and sync it with the hub (device shadow in AWS).

Usability testing

IoT software interfaces must be user-friendly and instructive because users of IoT devices receive data in real-time. Usability testing makes ensuring that the software is simple, intuitive, and accurately reflects all the graphical aspects for the user.

Tip: Make that the IoT application has all of its features, complies with the requirements, and is tested for user experience (UX).

Security testing

IoT security testing approaches are crucial for creating a strong IoT testing strategy since IoT software needs a lot of data to operate properly. There are three testing levels in it.

  • Testing the network It defends against potential network layer assaults on the IoT application.
  • System evaluation. It will make sure that user data is secure and effectively guarded against hacks and leaks.
  • IoT device testing. This type of test guarantees that IoT application-related devices are shielded from issues with APIs, authentication, updates, configuration settings, etc.

Tip: On jailbroken devices, ensure sure you can remotely delete data or look for signs of unauthorized access to the device.

Beta testing

User testing of this nature Realistic IoT test scenarios must be modeled by testers. The likelihood of a successful release is increased and they are able to stop users from experiencing issues with the IoT application’s final version. As bugs and usability problems are found during the beta stage, it also aids business owners in lowering bug fixing expenses.

You can test IoT applications at every level of development by using IoT testing.

IoT Testing framework: What is it all about?

User testing of this nature Realistic IoT test scenarios must be modeled by testers. The likelihood of a successful release is increased and they are able to stop users from experiencing issues with the IoT application’s final version. As bugs and usability problems are found during the beta stage, it also aids business owners in lowering bug fixing expenses.

You can test IoT applications at every level of development by using IoT testing.

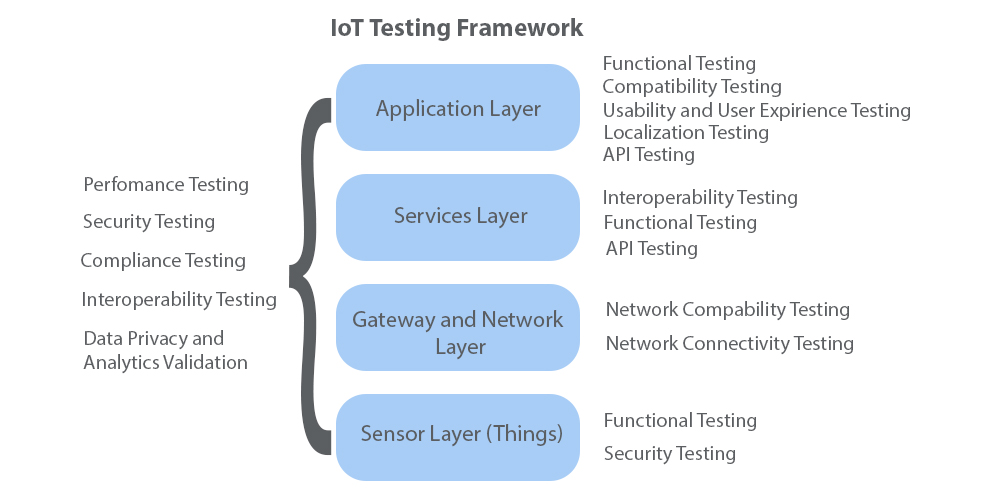
  • Application layer. At this stage, testing is done for APIs, functionalities, compatibilities, usability and user experiences, and localization.
  • Service level. Compatibility testing, functional testing, and API testing are carried out at this level.
  • Gateway and network layer. It has to do with verifying network connectivity and compatibility.
  • Sensory level. The tester will do functional and security testing at this stage.
IoT Testing Framework

What are some typical IoT testing obstacles, and how can they be overcome?

The finest Internet of things software testing solutions should anticipate any potential difficulties that could make the testing process more difficult for developers and QA professionals. Let’s examine the most significant ones first:

Lack of uniformity

To start, consider how the IoT environment needs to be standardized at several levels, including connectivity, communication protocols, platforms, and business models. But this doesn’t happen very often. Each link in an IoT network often includes its own hardware and software. This implies that test cases for each type of hardware and software must be included in IoT testing services.

Tip: It’s not always a good idea to run every script at once. The best possible integration combinations are tested using test cases that are available on the market.

Security vulnerabilities

IoT devices must consistently pass security testing since they can be subject to cybersecurity attacks if they produce a lot of data. Security flaws can then be found and fixed in this manner. Use of technologies that verify password prompts and behavior on an IoT device upon initial user access, for instance, is crucial.

Tip: Try to find flaws in firmware and device architectures from the standpoint of an attacker. See our IoT penetration testing guide for insights and tips.

Diverse communication protocols

Devices use a variety of real-time communication protocols in an IoT setting, including XMPP, AMPQ, MQTT, and CoAP. These protocols aid in establishing connections both between devices and with the server.
Additionally, several IoT system components have access to additional communication protocols. Latent failures will continue to pose functional or security issues up until the point at which we test these components over communication channels.
When loading requests go over a certain threshold, sensors built into the device may run out of memory. As a result, they employ an IoT gateway to distribute the load demands among the components rather than sending these requests directly to the sensors. IoT testing increases the lifespan of components and confirms the load distribution between them

Tip: To make sure they operate effectively, dependably, and securely, every IoT device needs to be tested using communication protocols..

The main advantages of IoT testing for your company
Check out the following main benefits of testing for IoT solution users in the corporate world:

  • New commercial opportunities Software testing for the Internet of Things will hasten efforts with lower risk and promote innovation.
  • Time-to-market is accelerated through IoT testing, which makes use of early automation.
  • Better interoperability is achieved by IoT QA testing, which guarantees that end users receive a high-quality user experience across all channels.
  • Higher ROI. IoT testing offers a thorough method for confirming the functional and non-functional needs of IoT systems. Delivering safer solutions will make you more appealing to your clients, and vice versa.

Examples and suggestions for testing IoT applications

IoT application testing is primarily distinguished from testing other types of software by the fact that the latter’s connection to external devices is fundamental. In this case, the testing team needs to be well knowledgeable about these devices and their functions.
The testing procedure is facilitated when programmers have physical access to the necessary hardware. To access the gadget, though, is frequently not possible under certain circumstances. As a result, in order to replicate a particular setting and interaction, testers must employ specialist software.

What equipment is used to evaluate IoT applications?

The instruments listed below can be used to run a wide range of IoT tests:

  • Instrument/protocol simulators. They enable you to imitate standard-compliant devices and then modify them to display the precise states you want, which is why testers utilize them when there are significant discrepancies between device endpoints and their interfaces.
  • Tools for API testing: Web services and REST APIs are being used more frequently to build solutions. Their connectivity, responsiveness, and performance are checked using tools like Postman, Progress®, and SoapUI.
  • Tools for playback and recording. To automate test execution, devices or applications, systems, and user data/actions can be recorded and replayed on simulators and applications.
  • Data loggers from many gadgets. The recorded data automatically plays on additional device endpoints, assisting in the testing of an application’s suitability for use across a range of hardware and communication layers.
  • Tools for mobile testing. These offer fully automated mobile testing that validates the app’s functionality and mimics the end-user experience.
  • Tools for virtualization. Real-time IoT app behavior monitoring is challenging and time-consuming. Additionally, virtualization solutions enable the rapid and cost-effective execution of compatibility testing without the need to purchase expensive hardware, databases, platform services, etc.
  • Tools for automatic deployment. They are used to configure and install specially created services and applications as well as swiftly deploy managed services, construct virtual machines programmatically on-premises or in the cloud. In continuous build, integration, and deployment environments, staging capabilities are provided by tools like Katello, Foreman, and Ansible Tower®.
  • Tools for testing security. These are subdivided into runtime threat production tools, static code analysis tools, and threat modeling tools. Threats can be identified, prioritized, and remedied using tools like OWASP ZAP, VGC, and Microsoft® Threat Modeling Tool. Two open-source security tools that can assist with vulnerability detection are Acunetix® and Netsparker®.
  • Supplementary tools You may test IoT systems using the following tools and equipment:
    JTAG Dongle and digital storage oscilloscope for IoT testing equipment and tracking its parameters. Wireshark® and Tcpdump for network traffic monitoring.

Testing timeframes

Traditional testing techniques take a lot of time and are typically used after product creation. This is unacceptable in the fast-paced, fiercely competitive climate of today.
The easiest method to identify and address any possible issues as soon as they arise is to test frequently and early. For IoT platforms, where continuous integration is the core of the technology, this is particularly crucial. It is intended to plan product testing phases in a manner that corresponds to active development.

Process plan for IoT Testing

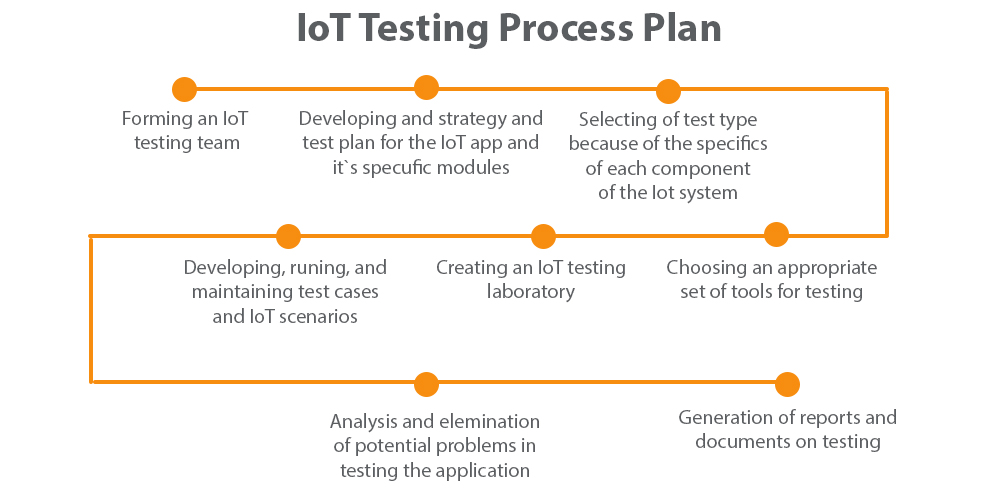
  • Assembling a team to test IoT applications;
  • Creating a strategy and test plan for the IoT application and its individual modules;
  • Choosing a test type based on the unique characteristics of each IoT system component;
  • Selecting a suitable selection of testing tools;
  • Establishing an IoT testing facility;
  • Creating, running, and maintaining IoT scenarios and test cases;
  • Analysis and eradication of potential issues during application testing;
  • Creation of test-related reports and documentation.
Iot Tetsing Process Plan

IoT system test protocol

The normal operation of the application may be hampered by the technical properties of IoT devices and issues with the devices’ firmware. When we come across such problems while testing, we inform clients of our findings and suggest adjustments.
The client sends us instructions for upgrading the software after making a change to his device. To guarantee that the entire system continues to operate as intended following updates, these modifications necessitate redoing the regression testing stage.
The following steps are involved in standard IoT testing:

Component inspection

We examine the following parts:

  • Connectivity to a network.
  • Software programs.
  • Internal sensors.
  • Hardware tools.
  • Security apparatus.
  • Cloud or server infrastructure

Check for functionality

Only when necessary should the IoT system react and perform. Each connected gadget also needs to communicate effectively. In doing so, we test:

  • Errors and exceptions.
  • Transferring data across devices.
  • System reaction.
  • Results of a calculation.

Check the conditions

Testing was done in the most extreme circumstances. The responses of the IoT system have also been saved by testers in the following formats:

  • Automated parameters.
  • Manual circumstances.

Performance review

We base our calculations of an IoT system’s performance on the following elements:

  • Failure of the system happens.
  • Frequency of data transmission.
  • Device functionality.

In the end, we offer in-depth reports on found vulnerabilities, tools and techniques for exploiting system faults, and suggestions for removing found hazards.

Best practices for testing IoT software

We’ll now provide you with some insightful advice on how to test mobile applications to steer clear of typical performance issues.

Automate established testing techniques
It makes sense to automate some repetitive activities due to the accelerated pace of R&D and the requirement to enter the market first. Automation, however, necessitates not just the appropriate tools and technologies, but also highly skilled specialists. The ideal course of action is to automate only established processes, especially those with a high return on investment.

Utilize the potential of cloud services.
You may test how IoT apps respond to heavy data loads by simulating high loads on them using the power of cloud computing. Additionally, the technique aids in determining how much data the IoT application sends to the hub, particularly when the IoT devices are operating at low power. Since it serves as a great gauge of the usability of IoT apps, this point needs extra consideration from the QA side.

Ensure safety and usability
If the device includes a payment option, it must to be quick and secure. The user should lock the smart device through their mobile devices or IVR in the case of a loss of a wearable gadget.

Conclusion

Testing IoT systems is a difficult undertaking, thus expertise is important. KoderShop, a provider of IoT software, possesses this knowledge and can test usability, security, performance, connectivity, and compatibility in:
Mobile software (supported on the platforms of Amazon, iOS, Android, and Windows); device firmware; equipment and mobile device integration (BLE, Wi-Fi sync);

API (allows mobile applications or hardware to sync and store data with the cloud);

Data security: Token-based, key-based, and OAuth authentication and authorisation protocols; role-based access; manual XSS/SQL injection; cache storage security (keyboard, browser, app).

String Methods Python and Their Options – Can List Of Symbols Be Practical?

String Methods Python and Their Options – Can List Of Symbols Be Practical?

String Methods Python and How to Manipulate a String

Python string method

Definition of String in Python

A string is a data type that is used to describe textual content in different programming languages.

In Python, a string is a sequence of Unicode characters, but there is no single character data type, so it’s also a string, which has a length of 1. Unicode was introduced to include every character. Also it brings uniformity in encoding.

To create strings you need to enclose characters inside a single quote, double-quotes or triple-quotes (in cases spanning strings over multiple lines). Also strings don’t have any limits in length or using upper-case letters. Actually, <str> represents the Python string class. In accordance, the str() function can convert a value into a string data type.

str_single_quotes = 'Welcome to KoderShop' 
print(str_single_quotes)
#output:
#Welcome to KoderShop

str_double_quotes = "Welcome to KoderShop" 
print(str_double_quotes)
#output:
#Welcome to KoderShop

str_triple_quotes = '''Welcome
to
KoderShop'''
print(str_triple_quotes)
#output:
#Welcome
#to
#KoderShop

String Manipulation in Python

String manipulation means that you can change something in the string. To do this you need built-in string Python methods.

You already know how to create a string so here are examples how to access string characters and how to know the length of it.


Example of accessing:

example = "Hello KoderShop"
character = example[6]
print(character)
#output
#K

Example of len():

example = "Hello KoderShop"
print(len(example))
#output
#15

There are 47 built-in string methods in Python.

Upper() and lower() Methods

Starting from the base there are a few functions that can make letters in the string uppercase and lowercase. They are upper() function and lower() function and also they are capitalize() method that makes only first letter uppercase.


Examples of these string operations in Python:

example = "python is a masterpiece!"
print(example.capitalize())
#output:
#Python is a masterpiece!

example = "Python is a masterpiece!"
print(example.upper())
#output:
#PYTHON IS A MASTERPIECE!

example = "PYTHON IS MASTERPIECE..."
print(example.lower())
#output:
#python is masterpiece...

Moreover if you want to capitalize every word in your sentence, there comes the title() function, obviously used for titles in your articles.

example = "String methods in Python"
print(example.title())
#output:
#String Methods In Python

Swapcase() Method

If you want to switch lowercase letters to uppercase and vice versa in a string, you can use swapcase() function.

example= "kODERsHOP"
print(example.swapcase())
#output:
#KoderShop

Isupper() and islower() Python String Operations

To check the previous functions we can use these methods. Isupper() is used to check letters for their uppercase. And the same thing is with islower(). They both return boolean types.

example = "PYTHON IS MASTERPIECE..."
print(example, "is uppercase:", str(example.isupper()))
#output:
#'PYTHON IS MASTERPIECE...' is uppercase: True

example = "PYTHON IS
MASTERPIECE..."
print(example, "is lowercase:", str(example.islower()))
#output:
#'PYTHON IS MASTERPIECE...' is lowercase: False

Isalnum(), isalpha(), isdecimal() String Functions Python

Isalnum() Method

This function we can use for checking if the string has numeric and alphabetical symbols. It can be useful, for example, for passwords.

example =
"ABCDEFJHIJKLMOPQRSTUVWXYZ"
print(example, "contains symbols from alphabet:", str(example.isalnum()))
#output
#ABCDEFJHIJKLMOPQRSTUVWXYZ is an alphabetical order: True

example = "123@34"
print(example, "contains only numbers:", str(example.isalnum()))
#output
#123@34 contains only numbers: False

Isalpha() Method

This function you can use for checking whether our string has only alphabetical symbols.

example = "ABCD_EFJHIJKLMOPQRSTUVWXYZ"
print(example, "contains symbols from alphabet:", str(example.isalnum()))
#output
#ABCD_EFJHIJKLMOPQRSTUVWXYZ is an alphabetical order: False

Isdecimal() Method

Obviously, the name of the method says its operation. It checks whether our string has only tenfold numbers:

example = '_54'
print(example.isdecimal())

example = '54'
print(example.isdecimal())
#output
#False
#True

Python String Functions center(), rjust(), ljust()

Center() Method

Actually, this function pads your string variable using default (“Space”) or specified characters. It tries to center your string text into the given length.

example = "Hello, world!"
new_example = example.center(30)
print('|' + new_example + '|')
#output:
#| Hello, world! 

As we can see, our “Hello world!” is centered between two vertical bars. Here is one more example to see how it works:

example = "Hello, world!"
new_example = example.center(30, '=')
print('|' + new_example + '|')
#output:
#|========Hello, world!=========|

We have used the equals sign as a filling symbol in this example.

Rjust() and Ljust() String Python Methods

It works the same as center() string function python but pads your string on the right side using default symbols(‘Space’) or symbols that are written in attribute.


Ljust() obviously is the same as rjust() function but pads on the left side.

example = "Hello, world!"
new_example = example.rjust(30)
print('|' + new_example + '|')
#output:
#| Hello, world!|

example = "Hello, world!"
new_example = example.ljust(30)
print('|' + new_example + '|')
#output:
#|Hello, world! 

Count() Method

This function is one of python string built in functions that can return how many times the given text has occurred. The name of the function says what it means.

example = "hello, my friends, hello..." 
print(example.count("hello"))
#output:
#2

but:

example = "Hello, my friends, hello..." 
print(example.count("Hello"))
#output:
#1

So, it is very strict about the case of given letters. 

Another thing about count() function in Python is that you can give the indexes between which it should count:

example = "hello, my friends, hello..." 
print(example.count("hello", 0, 5))
#output:
#1

0 and 5 are indexes of letters used for our interval.

example = "hello, my friends, hello..."
print(example.count("hello", 0, 27))
#output:
#2

Encode() Method

Factually, encoding is converting text that is written in one system language into another. Being a simple person you can use character UTF-8 encoding for your descriptions or texts. It is good in encoding a single character to any you want to use. This Unicode easily helps you in everything. That’s why creating HTML websites or PC systems need to have it written inside as it removes tracking for right conversion.

But anyway there can be situations where you need not UTF-8 but another. That’s where one of python strings methods, the encode() method comes in.

example = "python" 
print(example.encode('cp037'))
#output:
#b'\x97\xa8\xa3\x88\x96\x95'

Python String Function Endswith()

Endswith() method is used for checking if the string variable has the symbols we have given. Again the name of the function can say all what it means.


example = "hello, my friends, hello..." 
example = "helloworld"
print("Does our first string have this ending?", str(example.endswith("world")))

example = "helloworld."
print("Does our second string have this ending?", str(example.endswith("world")))
#output:
#Does our first string have this ending? True
#Does our second string have this ending? False

In output “this ending” means “world” so it helps us to see how the endswith() function works. It is strict to written symbols, so if there is at least one comma or dot, it counts.

Find() and index() String Functions in Python

Find() Method

One of the base functions used for string is find(). It is easy to use and is very powerful. Obviously you can use it for finding words in written strings.

example = 'Hello, KoderShop'
print(example.find('KoderShop'))
#output
#7

In this python string method example the start of ‘KoderShop’ is on the 7th symbol. But if the find() function can`t find anything it returns ‘-1’:

example = 'Hello, KoderShop'
index = example.find('hello')
print("'hello' word is found at:", index)

index = example.find('kodershop')
print("'kodershop' found at index:", index)

Another good example of find() usage in string is:

example = 'Hello, KoderShop'
word = 'Wikipedia'

if example.find(word) != -1:
print( word, "contains in string")
else:
print( word, "doesn't contain in string")
#output
#Wikipedia doesn't contain in string

Index() Method

index() method itself helps you to find the first index where the given string is located. Here is an example of this string command python:

example = 'python string functions examples'
print(example.index('but'))
#output:
#ValueError: substring not found

And obviously, here we can see the difference between find() and index() string functions in Python. When find() returns ‘-1’, the index() returns an exception. It is the only difference. In another it is the same as find().

Python String format Method

If you want to have a possibility to add and edit words anywhere in the string, you can use the format() string method.

example = "This article is written by
{}"
print(example.format("KoderShop"))
#output:
#This article is written by KoderShop

Additionally for using more than one pair of brackets it would be better to add placeholder values inside the brackets.

example = "This article is written by {company}. It is about {topic}."
print(example.format(company = "KoderShop", topic = "string methods"))
#output:
#This article is written by KoderShop. It is about string methods.

Format_map() Method

With this method you can have a dictionary with words and their keys and use these keys to have access to the words in the string. It has the same python string operation as the built-in dictionaries in Python 3.

dictionary = {'company':'KoderShop', 'topic':'string methods'}
print("This article is written by {company}. It is about {topic}.".format_map(dictionary))
#output:
#This article is written by KoderShop. It is about string methods.

Python String Methods split() and rsplit()

Split() Method

It allows you to split the words using space, semicolon or other symbols. For example, having one string you can have a list of words from it.

example = '2022 – the best year'.split() 
print(example)
#output:
#['2022', '–', 'the', 'best', 'year']

example = '2022 – the best year'.split('–') 
print(example)
#output:
#['2022 ', ' the best year']

You can see how we use ‘t’ as separator below:

example = '2022 - the best year'.split('t') 
print(example)
#output:
#['2022 - ', 'he bes', ' year']

Split() function and its own attributes split(separator, maxsplit) :

maxsplit()

maxsplit() is the attribute that makes the maximum number of splits that must be done. It is a very useful one.

example = '2022 - the best year'.split(' ', maxsplit=1) 
print(example)
#output:
#['2022', '- the best year']

Here we used the space as a separate symbol and made the maximum amount of splits 1.

separator()

separator() obviously is our separate symbol that we used before. It can be as ‘ ‘, as ‘t’ and even as  ‘#’ !

example = '2022#-#the#best#year'.split('#') 
print(example)
#output:
#['2022', '-', 'the', 'best', 'year']

Rsplit() Method

It allows you to split the words the same as the split() method that was mentioned before, but it does it starting from the right side. The clear example of it is using the maxsplit().

For instance, it can be used when we have a maxsplit() attribute that equals ‘1’ and we want to split only one word at the end.

example = '2+2+2+3'.rsplit('+', maxsplit=1) 
print(example)
#output:
#['2+2+2', '3']

In Details About C# Unit Testing In Practice

In Details About C# Unit Testing In Practice

Introduction to C# Unit Test

C Unit test

What do you mean by a Unit test?

In the process of developing software, unit tests basically check that discrete pieces of code, often known as units, function as intended by the author. A unit test is a piece of code created by any programmer to test discrete functionalities of larger programs. A “UNIT” in this sense is the smallest component of the vast code part that makes sense to test, typically a method out of numerous methods of some class. Unit testing is always intended to be basic. The test cases are typically expressed as functions that evaluate and assess whether the result returned after running a unit test is equal to the value you anticipated when you wrote the function. Unit testing’s primary goal is to isolate a single piece of code and ensure that it is dependable and correct.

What Unit Testing Is?

Let’s think about what genuinely qualifies now that that is out of the way. Specific pieces of your code are isolated and tested via unit tests. Okay. I’ll admit that I just punted by defining a term with a word already included in the phrase. But in order to span linguistic barriers, the term’s designers purposefully left the designation unclear.

A unit is similar to a method in C#. So, by creating something that tests a method, you create a unit test, and it isolates testing a single aspect of that approach. You shouldn’t make a program called TestAllTheThings and then call each method in a namespace.

That’s all there is to it, basically. You’ll see that I’ve left off certain items that may have come to mind, including test-driven development (TDD), unit test frameworks, test runners, mocks, or other unit testing tools. Let’s avoid jumping the gun. TDD and mocks are independent topics, so put them off till later. For now, disregard test runners and frameworks. Although we’ll discuss them, a unit test isn’t technically speaking required to have them.

Unit Testing in C#: The Simplest Example

Let’s assume that my sales pitch was successful. At the very least, it convinced you to keep reading. Most instructors would begin by giving you a formal description of unit testing at this point. I won’t employ that strategy because I want to demonstrate to you how simple the notion can be. For the time being, disregard test projects, unit test runners, and everything else that makes you think, “Maybe tomorrow.” Here is the unit testing in the familiar and beloved plain old C#.

Consider the following killer implementation that you created.

public class Calculator
{
public int Add(int x, int y)
{
return x + y;
}
}

How would you put it to the test? If this device operated some sort of GUI, you could open it, enter two numbers, and examine the output. “I entered 15 and 20 and get 35, which appears correct.”

However, it takes a lot of manual labor to do that. Additionally, it doesn’t endure after your manual testing attempt. What if you created an automatic verification program? What if you carried out such an action?

static void Main(string[] args)
{
var calculator = new Calculator();

if (calculator.Add(15, 20) != 35)
throw new InvalidOperationException();
}

This could be done fairly easily. You create a new console project with a reference to your code and place it in the same solution as your Calculator class. You may now execute this code whenever you want by writing it in Main. All appears well if it leaves without incident. If you attempt to execute this and receive an exception, someone has modified the Add() method and broken it in some way.

Unit Testing in C# done in the right way

This idea of automated unit testing is actually quite straightforward. And this demonstrates where the custom originated. The ability to automate code checking became clear to developers. Developers that they were, they quickly began creating several frameworks for this. Now that you know how and why they achieved that, you can understand how unit tests function when they are used in a conventional manner.

Consider the Main code from earlier. What occurs if you want to include more test cases? That method becomes disorderly as you continue to pack more and more code into it.

Even if you separate the checks into their own methods, running them still makes it difficult to figure out what went wrong and why. And how are you going to execute all the elaborate tasks that people perform, such as integrating this into your build?

This could be done fairly easily. You create a new console project with a reference to your code and place it in the same solution as your Calculator class. You may now execute this code whenever you want by writing it in Main. All appears well if it leaves without incident. If you attempt to execute this and receive an exception, someone has modified the Add() method and broken it in some way.

Tutorial on implementing Unit Testing


Let’s stay entirely within Visual Studio to keep things as straightforward as possible. Although you have a Calculator class, you want to put it to the test. And you want to fully test it without including your own custom test-running methodology.

Unit test example

You create a class:

public class Calculator 
{ 
public int Add(int x, int y)
{ 
return x + y;
} 
}

You have a single class, Calculator as seen above. You still need to test it, if only to prove your rightness to others.

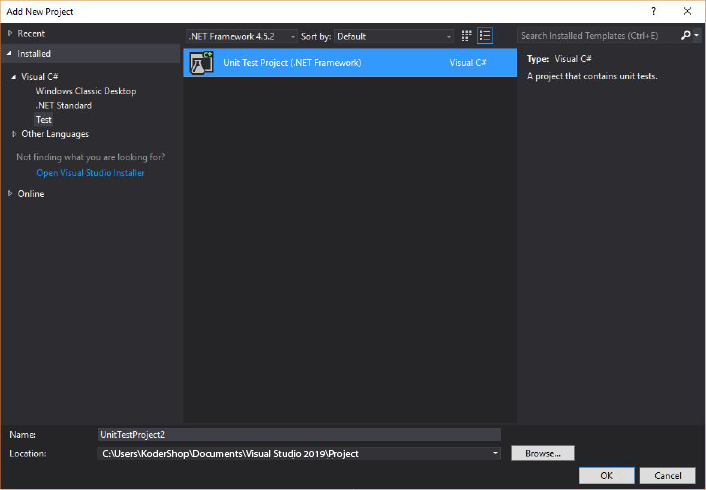
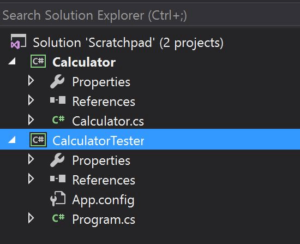
To accomplish this, let’s add a new console project and reference the project that contains calculator in the manner shown.

Software unit testing

Now, let’s do the following in the main of the Calculator Tester.

class Program
{
static void Main(string[] args) 
{ 
var calculator = new Calculator(); 
int result = calculator.Add(5, 6); 
if (result != 11) 
throw new InvalidOperationException();
} 
}

Congratulations!  You’ve just written your very own unit test!

Unit testing best practices

Unit Testing Best Practices

Arrange, Act, Assert

Now let’s think about a different kind of unit test anatomy. Here, I’m referring to the logical elements of an effective unit test. They are in their most fundamental form on the test I wrote. Given the title of this section, it may not come as a surprise that those elements are “organize, act, and affirm.”

To grasp the true meaning of this, make extensive use of the scientific method. Think of your test as an experiment and your test run as a hypothesis. With inputs of 4 and 3, we predict that the add method will return 7.

We first set up all of the equipment we will need to conduct this experiment. Very nothing needs to happen in this situation. We only create an object called a calculator. In other, more complicated situations, you might need to execute a specific constructor or seed an object with some variable values.

After the preparation, we take action. In this instance, we use the add method and record the outcome. The unit testing show’s main attraction is represented by the “act.” Everything before it is preparation, and everything after it is reflection.

And finally, we claim. That one was probably disclosed by the Assert class’s invocation. However, you cannot omit a broad category of action and still have a unit test because the assert idea in the unit test represents it. It backs up the hypothesis directly. The essence of testing is asserting something.

One Assert Per Test Method

Veterans of a particular testing methodology who have experience with unit testing may criticize me for this, but so be it. Although not everyone will necessarily concur, I think you should aim for one assert per test method. Each test formulates and states a hypothesis. (The contrary position would contend that several claims can serve to indicate a single hypothesis.)

I won’t go so far as to claim that a test should never have more than one assertion. However, I will note that the test-to-assert ratio in your unit test suite needs to be pretty darn close to 1.

Unit tests Beginners frequently commit the error of using one test method to evaluate everything. After all, it makes sense to do further tests. This motivates them to assert a lot of things in order to maximize their return on investment with each test.

But keep in mind: experiment, hypothesis. Consider examining the test’s output from the test runner. Even if you claim 20 things, there is still only one failure. How will you be able to tell which of your 20 assumptions failed and what went wrong at a glance?

Avoid Test Interdependence

There should be a setup and teardown procedure for each test. The test runner will carry out your instructions in any order it sees fit, and depending on the particular runner you employ (advanced topic), it may even carry out the instructions simultaneously.

As a result, you can’t rely on the test suite or the class you’re evaluating to keep its state consistent across tests. However, it won’t always be evident to you.

For instance, the test runner can choose to run your tests in the same order each time if you have two tests. You could become dependent on this after being given a false sense of security.

A few weeks later, adding a third test disrupts the balance, causing one of your tests to start failing intermittently due to the ordering.

You’ll be frustrated and perplexed by this. At all costs, avoid this reliance.

Keep it short

I’ve been down this road before and experienced the pain. The urge to abstract test setup (also known as “the arrange”) into other classes should be resisted, especially the urge to abstract it into a base class. Although I would argue that base classes are never acceptable in this context, I won’t say that you’ll never find this abstraction appropriate. Instead, look to avoid it.

It makes sense in this case. You want to know what went wrong when a test fails. Therefore, you want a test where all of the setup logic is immediately apparent. You’ll have a big treasure hunt on your hands if your logic is dispersed throughout the class or spread out throughout different classrooms.

Add to the build

The post will be concluded with what is likely the most significant best practice. When your codebase contains only one test, get started on this one right away because you are just beginning your unit testing journey.

Add the execution of your new unit test suite to the build if your team uses a continuous integration process. The build fails if any tests are unsuccessful. No ifs, ands, or buts, and no exclusions. On this one, believe me. If your team’s development isn’t halted by unit test failures, ultimately, as the pressure to deliver increases, your team will begin to ignore the failures. It is a matter of when, not if. Learning unit testing and perfecting it take time. At first, achieving that mastery will seem exceedingly difficult, but if you don’t put everything on the line, you’ll never succeed. Make your writing count if you’re going to do it.

This Is Only the Beginning

Hopefully, you now have a fundamental grasp of unit testing in C#. The core idea is really straightforward and effective. Don’t let the experiences and technologies that have been added on top of it divert your attention from it.

However, keep in mind that in the decades since its introduction and automation, the world has learnt a lot about unit testing. Although you now grasp the basics, there is still a lot of learning and practicing that needs to be done. There is no better time to begin than right now.

Grasp The Software Dev Lifecycle: SDLC Overview

Grasp The Software Dev Lifecycle: SDLC Overview

Software Development Life Cycle

The SDLC: Never-ending fun – the philosophy of software development life cycle

Greetings, dear readers! Earlier in the articles of this blog, we have already touched on various aspects of the methodology and principles of software development. For example, in one of the recent articles, we discussed in detail the definition of a sprint in Agile methodology. We recommend you to read this one if you have not done it yet – It is really very interesting and useful information.

However, the more we write, the more questions arise, since software development is indeed very multifaceted and complex. Therefore, in this article we would like to pay attention to a fairly global thing, the understanding of which will help our regular readers to better navigate the subsequent narrower topics. This one is Software development life cycle – SDLC.

What is SDLC and why to use it?

Okay, first of all, let’s define the meaning of SDLC. Most often, when it comes to software development lifecycle, they mean the process of creating software from A to Z. But such a definition of SDLC is appropriate only when it comes to a specific project. In a broader sense, the software development life cycle is a standardized framework, based on which a team can release a product faster, make it better, minimize risks and avoid situations when you have to rush to finalize already finished software.

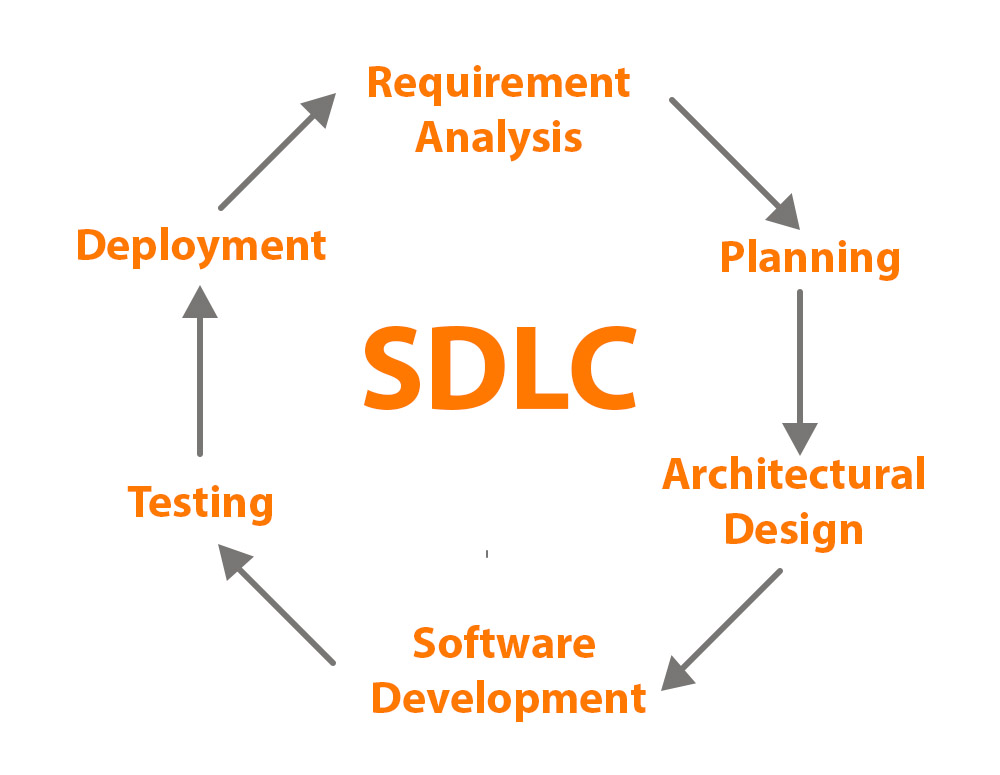
Here it is appropriate to pay attention to the word “cycle” in the wording itself. You may have seen this picture before:

SDLC methodology phases Подпись: Software life cycle never stops

Note that deployment (the last phase of the cycle) invariably leads us to the very first one: requirements analysis. This means that the software life cycle never ends. Indeed, there are no products that would be forgotten by the development team immediately after the release. Any software solution periodically needs to be updated, refined, and scaled. That is, after deploying your product, you will invariably have to return to requirements analysis, having already received real feedback from end users in one form or another.

If we are talking specifically about the creation of new software, the SDLC methodology ensures the coherence of the actions of the entire team, since each of the stages consistently and effectively influences the next one. This avoids many mistakes that could later lead to serious difficulties or even failure of the project. In other words, the software dev lifecycle is a kind of development plan template.

Software development life cycle methodology step by step

Well, let`s back to our picture. Here you can see the standard SDLC model with six main software development life cycle phases, which are:

  1. requirement analysis;
  2. planning;
  3. architectural design;
  4. software development;
  5. testing;

Requirement analysis

The first step is quite simple but no less important! Answer the fundamental question: “What are the requirements our product needs to meet?”. At this stage, it is very important to achieve maximum mutual understanding with the customer. Typically, the customer, business analyst, project manager, and members of the project team are involved in this process.

When all the requirements and expectations of the customer are specified, a document called the Software Requirement Specification is drawn up. It contains everything that has been said before. Subsequently, the developers will be guided by the SRS, so that all requirements must be clearly stated, and the document itself must be pre-approved by the customer.

An interesting fact is that during the development process of Instagram, it was the requirements analysis that took the most time. Social networks were not yet so popular, and the developers had almost no reference points, but today it is difficult to find a person who would not have an Instagram account. Isn’t this a great example of how important requirements analysis is and how effective SDLC in software engineering can be? We think it is!

Planning

An integral part of software development life cycle models is the planning process. Often it is combined with requirements analysis, but we believe that these stages should be separated. The fact is that requirements analysis involves communication between the customer and the client in order to understand what the software should be like. And the result of planning is the estimated cost of the project, risks and plans to reduce them, etc.

Simply put, at the planning stage, the team finds out whether what the customer wants is feasible, how much time and resources it will take, and how to implement it with the least loss.

Architectural design

Architectural design in software life cycle usually raises the most questions for those who are just starting to delve into the SDLC. As you surf the web, you can find a lot of different statements like “at this stage you convert your SRS into a project specification” (which is also a kind of plan, so it’s not clear how this stage differs from planning) or “this is the process of creating a software architecture, on the basis of which you will develop your system”, etc.

Many of them do not give a complete understanding of the essence of architectural design. Here we need to correctly pose the question, the answer to which we give at this stage (yes, this is still a process of preparation for real work). So, the question is: “How are we going to achieve our goals?”.

In this phase, we recommend considering several key design elements to make final design decisions: operational excellence, safety, reliability, performance efficiency, and cost optimization.

Software development

Finally, we no longer answer any questions, but get down to business! So, your main task is to do an amazing job, justify the trust of the customer and be satisfied with the result. Fill up with hot coffee, roll up your sleeves and do it! There’s nothing more to say.

Testing

Developers vs testers is a never ending story. However, the systems development life cycle methodology does not prioritize one over the other. You must understand that there will be no release of the product until your product meets the specifications. Everyone makes mistakes, even developers (and here one tester smiled).

Deployment

Each development cycle ends with software deployment. And then it starts all over again.

You see, in theory, deployment is all that makes a program usable in a production environment, from installing it on a computer to releasing updates. But we have already understood that the cycle inevitably moves to a new round. Therefore, by deployment we mean the processes accompanying the release of programs, but not their support in the future – for this we have to start again with a requirements analysis.

By the way, congratulations on the release!

Step 7?

For the sake of completeness, another phase of the software development life cycle should also be mentioned. This is maintenance, which is not always distinguished as a separate stage. DevOps engineers are working in this direction. In fact, they are engaged in the maintenance of the system after its deployment. But in a broader sense, they have a more significant mission – to be a bridge between the OPS and development teams. When both use common tools for error detection or performance checks, this fundamentally changes the SDLC experience.

SDLC models to implement: benefits and peculiarities

Now let’s take a look at the most popular examples of SDLC models

SDLC models

Waterfall

Of all the known software development lifecycle models, the waterfall is the oldest and, to some extent, the most primitive. According to this concept, the entire development process is divided into several stages, and each next cannot be started until the previous one is completed. The waterfall has one significant drawback: if small tasks were not completed during any stage, they can create a big problem in the future, because the plan for subsequent stages does not involve patching these “holes”.

Agile

Based on the name of the agile methodology, it is clear that this approach is designed for the flexibility of the development team. The project is broken down into continuous cycles, which are also divided into smaller iterations. At the end of each iteration, the product (or some part of it) is tested, which prevents small unsolved problems from becoming a serious problem in the next stages.

Today, more and more teams are abandoning the waterfall in favor of an agile methodology. It should be noted that among the newer SDLC approaches, agile is the most developed. It is also divided into several different sub-methodologies: Scrum, Kanban, etc.

Iterative model

The project is divided into several iterations, and at the end of each we have a version of the product ready for deployment/ The version already meets some functional and non-functional requirements (not all). The final iteration leads to the release of a product that meets the full list of requirements.

V-Shaped SDLC

A more flexible version of the waterfall. The development stages also strictly follow each other, but testing is carried out at each stage, which allows you to respond to shortcomings in time.

Spiral model

This model is also based on iterations, but the spiral approach can also include methods that are characteristic of other models.

The development process is managed by the project risk assessment system, which will be unique in each case. Thus, the spiral is the most flexible of the SDLC models.

The Big Bang

A very simple SDLC model that does not require careful planning, but is associated with the greatest risks. In view of this, the Big Bang model is only applied to small projects where the developer has more opportunities to show their creativity.

It’s also a very fast development, even spontaneous in a way. On the other hand, we all know how much beauty the Big Bang created, right?

On a final note

The SDLC framework helps development teams reduce production time, increase productivity and potential profit, save budget and minimize project risks. In general, this is a plan for conducting technical work, but if you look more broadly, you can think of it as a guide to life. You can apply SDLC to a variety of topics. Think of the SDLC as a blueprint for expected success and it won’t take long.

Review of the Best CD CI Tools in 2023 – Choose The Most Related

Review of the Best CD CI Tools in 2023 – Choose The Most Related

CI CD tools

What is CI/CD and the Best Tools You Must Know


Overview

By adding automation to the various stages of app development, CI/CD is a technique for regularly delivering apps to clients. Continuous integration, continuous delivery, and continuous deployment are the three core CI/CD concepts. The challenges integrating new code can provide for development and operations teams are addressed by CI/CD (AKA “integration hell”).

In particular, CI/CD brings continuous monitoring and continual automation throughout the whole lifespan of an app, from the integration and testing stages to the delivery and deployment stages. Development and operations teams collaborate in an agile manner using either a DevOps or site reliability engineering (SRE) methodology, and these interconnected processes are collectively referred to as a “CI/CD pipeline tools.”

Differences Between CI and CD?

There are numerous definitions for the abbreviation CI/CD. Continuous integration is always referred to as “CI” in CI/CD, and it is a method that automates development. A successful CI involves routinely building, testing, and merging new code changes to an app into a shared repository. It offers a solution to the issue of having too many potentially incompatible branches of an app in development at once.

Continuous delivery and/or continuous deployment are similar ideas that are occasionally used interchangeably and are denoted by the “CD” in “CI/CD.” Both are concerned with automating pipeline steps after the initial stages, however they are occasionally used independently to highlight the extent of automation.

Continuous delivery typically entails that an operations team can deploy a developer’s changes to a live production environment after they have been automatically checked for bugs and submitted to a repository (such as GitHub or a container registry). It provides a solution to the issue of the development and business teams’ limited visibility and communication. In order to ensure that deploying new code requires the least amount of work possible, continuous delivery was created.

The alternative meaning of “CD” is continuous deployment, which is the process of automatically pushing changes made by developers from the repository to a live environment where users can access them. It deals with the issue of operations teams being overburdened with manual tasks that impede app delivery. By automating the following pipeline stage, it expands on the advantages of continuous delivery.

CI CD differences

Both the connected practices of continuous integration and continuous delivery, as well as all three connected practices of continuous integration, continuous delivery, and continuous deployment, may be referred to as CI/CD. It gets even more difficult because “continuous delivery” is occasionally used to refer to continuous deployment procedures as well.

In the end, it’s probably not worth your time to get mired in these semantics; instead, just keep in mind that CI/CD is truly a process that adds a high level of ongoing automation and continuous monitoring to app development. This process is frequently represented as a pipeline.

Depending on how much automation has been incorporated into the CI/CD pipeline, each situation will determine what the terms mean. Many businesses begin by using CI, and as time goes on, they go toward automating delivery and deployment, for example as part of cloud-native apps.

Our specialists can assist your company in creating the cultures, tools, and practices required to create new apps and upgrade old ones in a more effective manner.

Continuous Integration

The objective of contemporary application development is to have numerous developers working on various aspects of the same app concurrently. The effort that results, however, can be laborious, manual, and time-consuming if an organization is set up to combine all branching source code together on one day (known as “merge day”). This is so that modifications made to an application by a developer working alone won’t necessarily conflict with other changes being made to the same application at the same time. Instead of the team deciding on a single cloud-based IDE, this issue may be made worse if each developer has customized their own local integrated development environment (IDE).

Continuous Delivery

Continuous delivery automates the deployment of that validated code to a repository after the automation of builds and unit and integration testing in CI. Therefore, it’s critical that CI be already included in your development pipeline in order to have a successful continuous delivery process. A codebase that is constantly prepared for deployment to a production environment is the aim of continuous delivery.

Every step in continuous delivery—from merging code changes to delivering builds fit for production—involves test automation and code release automation. The operations team can then swiftly and easily deploy an app to production after that procedure is complete.

Continuous Deployment

Continuous deployment is the last phase of an advanced CI/CD process. Continuous deployment automates the release of an app to production as an extension of continuous delivery, which automates the release of a production-ready build to a code repository. Continuous deployment largely relies on well-designed test automation since there is no manual gate at the pipeline level prior to production.

Continuous deployment actually allows a developer’s modification to a cloud application to go live minutes after it is written (assuming it passes automated testing). It is now much simpler to regularly gather and take into account customer feedback. When all of these related CI/CD techniques are used, deployment of an application becomes less hazardous, making it simpler to release app modifications incrementally rather than all at once. A significant upfront investment is also required because a number of testing and release phases in the CI/CD pipeline need the creation of automated tests.

CI/CD Tools List

What are Ci/CD tools?

A team can automate development, deployment, and testing with the aid of CI/CD systems. Some technologies specialize in continuous testing or related tasks, while others manage development and deployment (CD) and the integration (CI) side.

Lets start and present the 14 best and most used CI/CD tools.
Without separating CD tools from CI tools the below list includes 7 of each of the categories.

Jenkins, an open source automation server, is one of the most well-known CI/CD systems. Jenkins can manage everything from a straightforward CI server to a full-fledged CD hub.

1. Jenkins

Jenkins

The central build and continuous integration process is carried out by Jenkins, an open-source automation server. It is a standalone Java program providing packages for Windows, macOS, and other operating systems that resemble Unix. Jenkins allows creating, delivering, and automating for software development projects and has hundreds of plugins available.

Jenkins key features:

  • Straightforward OS installation and upgrading
  • A straightforward and user-friendly interface
  • Large community-contributed plugin resource makes it extensible
  • Simple environment setup through the user interface
  • Supports master-slave architecture and distributed builds
  • Create schedules using expressions
  • Supports pre-build steps that use shells and Windows command execution.
  • Offers support for notifications about build status.

License: Free.

2. CircleCI

A CI/CD technology called CircleCI promotes quick software development and publication. The user’s pipeline can be automated with CircleCI, from code development to testing and deployment.

To make builds when new code lines are committed, CircleCI may be integrated with GitHub, GitHub Enterprise, and Bitbucket. CircleCI also offers cloud-managed continuous integration hosting or use local infrastructure that is protected          by a firewall.

CircleCI key features:

  • Integrates with GitHub Enterprise, Bitbucket, and GitHub
  • utilizes a virtual machine or container to run builds
  • Simple bug fixing
  • Automatically parallelizing
  • Rapid tests
  • Individual emails and IM notices
  • Branch-specific deployment that is ongoing
  • highly adaptable
  • Custom commands and automated merging for package uploading
  • Quick setup and limitless creations

License: Starting with Linux plans, one job can be executed without parallel processing with no additional cost. You can choose the plan(s) you require after viewing the cost throughout the signup process.

3. TeamCity

TeamCity

JetBrains’ build management and continuous integration server is called TeamCity.

A continuous integration solution called TeamCity aids in developing and deploying various project kinds. TeamCity interacts with Visual Studio and IDEs and operates in a Java context. The program supports.NET and open-stack applications and may be installed on both Windows and Linux systems.

New UI and direct connection with GitLab are features of TeamCity 2021.1 . Additionally, GitLab and Bitbucket server pull requests are supported. The release contains requests for AWS Spot Fleet, detection of Go tests, and token-based authentication.

TeamCity key features:

  • Provide many options for reusing the settings and configurations of the parent project in the child project
  • Simultaneously does parallel builds in various contexts.
  • Makes it possible to run previous builds, see test history reports, pin, tag, and favorite builds.
  • Simple to interact with, alter, and expand the server
  • ensures the CI server is operational and reliable
  • Flexible user administration, user roles assignment, grouping of users, several user authentication methods, and a log of all user activity for full transparency of all server activities

License: A commercial tool with both open-source and exclusive licensing is TeamCity.

4. Bamboo

Bamboo

A continuous delivery pipeline is created by Bamboo, a continuous integration server, which automates the management of software application releases. Assigning versions, categorizing releases, delivering, and activating new versions on production are all covered by Bamboo.

Bamboo key features:

  • Up to 100 remote build agents are supported
  • Parallelize test runs and receive fast feedback.
  • Generating photos and submitting them to a repository
  • Per-environment rights that let developers and testers deploy to individual environments as needed while the production environment is kept secure
  • Detects new branches in repositories for Git, Mercurial, and SVN and automatically applies the main line’s CI scheme to them.
  • Builds are triggered based on changes found in the repository. Notifications are pushed from Bitbucket, according to a predetermined schedule, when a build is finished, or any combination of these.

License: Instead of using users, Bamboo bases its pricing levels on agents or “build slaves.” More processes can run simultaneously, either in the same build or in multiple builds, the more agents there are.

5. GitLab

GitLab

GitLab is a collection of instruments for controlling various phases of the software development lifecycle. The main offering is a Git repository manager for the web with tools for issue tracking, analytics, and a wiki.

With each commit or push in GitLab, you have the option to start builds, launch tests, and deploy code. Jobs can be created on another server, in a virtual machine, or using Docker containers.

GitLab key features:

  • Branching tools are used to see, produce, and manage codes and project data.
  • Using a single distributed version control system, create, develop, and manage code and project data to enable quick iteration and the delivery of business values.
  • Offers scalability and a single source of truth for working together on projects and code
  • Automates builds, integration, and source code verification to assist delivery teams in embracing CI.
  • Delivers safe applications and licensing compliance with container scanning, static application security testing (SAST), dynamic application security testing (DAST), and dependency scanning.
  • Aids in automating and accelerating application delivery and releases.

License: GitLab is a for-profit product and free download. It provides hosting for SaaS on GitLab, your own instance on-premises, in the public cloud, or both.

6. Buddy

Buddy

Buddy is a CI/CD tool that uses code from GitHub, Bitbucket, and GitLab to build, test, and deploy websites and applications. It uses DevOps, monitoring, and notification processes along with Docker containers that come pre-installed with the languages and frameworks that may be built upon.

Buddy key features:

  • Easy to modify Images created using Docker as a test environment
  • Intelligent change detection, cutting-edge caching, parallelism, and general optimizations
  • Create, alter, and utilize test and build environments
  • Workspace, project, pipeline, and action scopes are fixed and programmable, plain and encrypted.
  • Elastic, MariaDB, Memcached, Mongo, PostgreSQL, RabbitMQ, Redis, Selenium Chrome, and Firefox are examples of attachable services.
  • Monitor with infinite history, real-time progress, and logs
  • Workflow management using templates for pipeline cloning, exporting, and importing
  • Superior Git integrations and support

License: Buddy is a freely available.

7. Travis CI

Travis CI

A CI service used to build and test projects is called Travis CI. New commits are automatically found by Travis CI and pushed to a GitHub repository. Additionally, Travis CI will build the project and run tests after each new code commit.

Numerous build configurations and languages, including Node, PHP, Python, Java, and Perl, are supported by the tool.

Travis CI key features:

  • Rapid setup
  • Views of live builds for GitHub projects
  • Pull request assistance
  • Multiple cloud services deployment
  • Built-in database services
  • Auto-deploys when builds pass
  • Pristine VMs for each build
  • Complies with iOS, Linux, and macOS
  • Supports a variety of languages, including R, C, Python, Ruby, Java, C, C#, C++, Perl, PHP, and JavaScript (with Node.js).

License: A hosted CI/CD service is Travis CI. On Travis-CI.com, test runs for personal projects are available for a charge. On Travis-ci.org, open-source projects can be applied for free.

8. Codeship

Codeship

A hosted platform called Codeship allows for many early and automatic software releases. By streamlining the testing and release procedures, it aids software firms in producing better products more quickly.

Codeship key features:

  • Integrates with a variety of tools, services, and cloud computing environments.
  • Simple to use gives developers prompt, detailed help.
  • With CodeShip’s turnkey infrastructure and straightforward UI, builds and deploys are completed more quickly.
  • Option to choose the size, CPU, and memory of an AWS instance
  • creates teams and assigns access to team members and organizations using the notification center
  • Project dashboards, intelligent notification management, and seamless third-party interfaces all work together to give you a high-level picture of your projects’ status.

License: Utilize 100 builds each month for no cost; unlimited builds are available for $49 per month. With bigger instance sizes, you can pay for additional parallel pipelines or concurrent builds.

9. GoCD

GoCD

GoCD is an open-source development and software release solution from ThoughtWorks that supports contemporary infrastructure on CI/CD.

GoCD key features:

  • Dependencies are simple to configure for quick feedback and on-demand deployments.
  • Favors reliable artifacts: A specific changeset serves as the anchor for each pipeline instance.
  • Controls your whole workflow, allowing you to trace changes from committing to deployment at a look.
  • The upstream and downstream are clearly visible.
  • Any version may be used at any time.
  • allows you to distribute any known-good version of your application to any location you want.
  • Utilizes the Compare Builds functionality to obtain a straightforward bill of materials for any deployment.
  • Keeps configuration organized by leveraging the GoCD template system to reuse pipeline setups.
  • There are already many plugins available

License: Free and open-source.

10. Wercker

Wercker

Developers that are working with or considering beginning a new project based on Docker may find Wercker to be a good fit. Wercker assists businesses in using CI/CD, microservices, and Docker with their development teams.

Oracle disclosed that it had finalized a deal to acquire Wercker on April 17, 2017.

Wercker key features:

  • Version control and integrations with Git, including GitHub, Bitbucket, and GitLab
  • Make a local copy of the SaaS environment using Wercker CLI to test and troubleshoot pipelines before deploying.
  • Supports Wercker’s Docker integration helps create small containers with manageable sizes.
  • You can interact with notifications through Walterbot, a chatbot in Wercker, to find out the status of the development.
  • Environment variables aid in preventing the repository from storing sensitive data.
  • Wercker makes advantage of essential security features, such as source code protection to disable test logs, protected environment variables, and user and project permissions that are customisable.

License: Following its acquisition, Oracle did not disclose Wercker’s pricing.

11. Semaphore

Semaphore

A hosted CI/CD solution for testing and deploying software projects is called Semaphore. Through a development process based on pull requests, Semaphore sets CI/CD standards.

Semaphore key features:

  • Connected to GitHub
  • Automates any pipeline for continuous delivery
  • Use the quickest CI/CD platform
  • Scales your project automatically so that you only pay for what you really need Native Docker support. Applications built with Docker are tested and released.
  • Offers Boosters, a feature for Ruby projects that automatically parallelizes builds to cut down on the time it takes to execute the test suite.

License: Flexible. The capacity of your package determines your options for typical CI services. Semaphore 2.0 will scale in the interim based on your team’s actual requirements, so you won’t be charged if you don’t use the product.

12. Nevercode

Nevercode

For mobile apps, Nevercode offers CI/CD. Faster native and cross-platform app development, testing, and publication are all benefits.

Nevercode key features:

  • Automatic setup and configuration
  • Test automation includes code analysis, real-world testing on devices, unit and UI testing, and parallel testing.
  • Automatic publishing: Crashlytics, TestFairy, Google Play, and HockeyApp
  • A thorough summary of your build and test status

License: Flexible. Different continuous integration plans for various needs. Standard plans are available, or you can ask for a plan that is specially created for your needs.

13. Spinnaker

Spinnaker

AWS EC2, Kubernetes, Google Compute Engine, Google Kubernetes Engine, Google App Engine, etc. are just a few of the cloud providers that Spinnaker supports for releasing and deploying software changes across.

Spinnaker key features:

  • Creates deployment pipelines that launch and stop server groups, conduct integration and system tests, and keep track of rollouts. Git events, Jenkins, Travis CI, Docker, cron, or other Spinnaker pipelines can all be used to start pipelines.
  • Create and deploy immutable images to accelerate rollouts, make rollbacks simpler, and get rid of configuration drift problems that are difficult to troubleshoot.
  • Use the metrics provided by monitoring services like Datadog, Prometheus, Stackdriver, or SignalFx to connect your releases and use canary analysis.
  • With Halyard, Spinnaker’s CLI administration tool, you can install, configure, and upgrade your instances.
  • Set up SMS, Slack, HipChat, or email event notifications (via Twilio)

License: Open source.

14. BuildBot

BuildBot

Buildbot is a “Python-based CI framework” that automatically rebuilds and tests the source tree after each change while automating the compile and test cycles to validate code changes. As a result, construction issues are rapidly identified.

BuildBot key features:

  • Automate build processes, application deployment, and the control of complex software-release procedures.
  • Supports rich status reporting, flexible connection with version-control systems, distributed, parallel execution across different platforms, and
  • Executes builds on several slave platforms.
  • Arbitrary build process and handles C and Python programs
  • Python and Twisted are the minimum host requirements.

 License: Open source.

Conclusion

The top 14 CI/CD tools on this list are the ones that are currently selling the best. We hope this list has given you enough information to make an informed decision about the program that best meets your needs. The CI/CD tools listed below are the most developed ones with the crucial features for your projects. Your final decision will be influenced by your needs, the infrastructure that is in place, as well as opportunity for improvement in the future.

The CI/CD and DevOps trends will keep changing, giving the market room to expand and advance. This list will be updated to guarantee that the information is accurate for you as the environment changes. Additionally, Katalon Academy is offering you a free course to assist you learn more about the CI/CD pipeline.

You can also use this free self-assessment to find out where your team stands in the continuous testing maturity roadmap and to receive professional advice on how to enhance your CI/CD.