Instructions for Setting Up HTTPS and SSL Using Azure

Instructions for Setting Up HTTPS and SSL Using Azure

HTTPS Azure

How to use HTTPS with Azure and install SSL

HTTPS (Hypertext Transfer Protocol Secure) is a secure version of the HTTP protocol used for transmitting data over the internet. It encrypts communication between a website and its visitors to protect sensitive data from being intercepted. In today’s internet landscape, it is becoming increasingly important for website owners to use HTTPS to secure their websites and protect their visitors’ data.

HTTPS connection with Azure

One way to implement HTTPS on a website is through Azure, a cloud computing platform and infrastructure created by Microsoft. Azure offers a range of tools and services that can be used to secure and manage a website, including options for implementing HTTPS.

There are several ways to enable HTTPS on a website hosted on Azure. One option is to use Azure App Service, which is a platform-as-a-service (PaaS) offering that allows developers to build and host web applications. With Azure App Service, website owners can enable HTTPS by simply turning on the “HTTPS Only” option in the App Service configuration.

Instructions for setting up HTTPS with Azure App Service

To enable HTTPS with Azure App Service, follow these steps:

  1. Navigate to the App Service page in the Azure portal.
  2. Select the app for which you want to enable HTTPS.
  3. In the left-hand menu, click on “SSL certificates.”
  4. Click on the “HTTPS Only” option.
  5. Click on the “Save” button to apply the changes.

Once HTTPS is enabled for an app, Azure App Service will automatically provision and bind a certificate to the app. This certificate will be valid for one year and will be renewed automatically by Azure App Service.

HTTPS with Azure CDN and SSL certificate

Another option for enabling HTTPS on a website hosted on Azure is to use Azure CDN (Content Delivery Network), which is a global network of edge nodes that helps to deliver content faster and more reliably to users. With Azure CDN, website owners can enable HTTPS by creating a custom domain and purchasing a SSL/TLS certificate. The certificate can then be configured to work with Azure CDN by following the steps in the Azure documentation.

Instructions for setting up HTTPS with Azure CDN

To enable HTTPS with Azure CDN, follow these steps:

  1. Navigate to the Azure CDN page in the Azure portal.
  2. Select the CDN profile for which you want to enable HTTPS.
  3. In the left-hand menu, click on “Custom domains.”
  4. Click on the “Add custom domain” button.
  5. Enter your custom domain name and select the desired protocol (HTTP or HTTPS).
  6. Click on the “Validate” button to verify that you own the domain.
  7. Once the domain is validated, click on the “Add” button to add the custom domain to your CDN profile.
  8. Click on the “Add binding” button to bind the custom domain to your CDN endpoint.
  9. In the “Add binding” window, select the custom domain and the desired protocol (HTTP or HTTPS).
  10. Click on the “Add” button to add the binding.

After the custom domain is added and bound to the CDN endpoint, website owners can purchase a SSL/TLS certificate and configure it to work with their custom domain. This can be done through Azure or through a third-party provider. Once the certificate is configured, website owners can enable HTTPS by turning on the “HTTPS Only” option in the CDN endpoint configuration.

In addition to these options, Azure also offers other tools and services that can be used to secure a website and enable HTTPS, such as Azure Traffic Manager and Azure Key Vault. These tools can be used to manage and secure traffic to a website.

Installing SSL and Azure

After the custom domain is added and bound to the CDN endpoint, website owners can purchase a SSL/TLS certificate and configure it to work with their custom domain. This can be done through Azure or through a third-party provider. Once the certificate is configured, website owners can enable HTTPS by turning on the “HTTPS Only” option in the CDN endpoint configuration.

In addition to these options, Azure also offers other tools and services that can be used to secure a website and enable HTTPS, such as Azure Traffic Manager and Azure Key Vault. These tools can be used to manage and secure traffic to a website.

Conclusion

This article will show you how to enable HTTPS in Azure web applications using Azure App Service. We also discussed some best practices and its up to you to choose which one should you use.

What is System.Threading.Channels – Concept and Usage

What is System.Threading.Channels – Concept and Usage

Introduction to System.Threading.Channels

Problems of producer/consumer are all around us, in every sphere of our lives. A fast food line cook cuts tomatoes and then passes them to another cook to make a hamburger. The register worker will fulfill your order. You happily eat the burger. You may see postal drivers delivering mail along their routes. If you’re home at night, you might check your mailbox later to make sure. A flight attendant unloads suitcases from a plane’s cargo hold and places them on a conveyor belt. Then another employee transfers them to a van, which then drives them to another conveyor that will transport them to you. A happy couple is getting ready to send their invites. One partner addresses an envelope, and the other hand it to the other.

Software developers often see everyday happenings in our software. “Producer/consumer” problems are no exception. Anyone who has piped together commands from a command line has used producer/consumer. The stdout of one program is fed as the stdin. Anybody who has launched multiple workers to calculate discrete values, or download data from multiple sources has used producer/consumer. A consumer aggregates the results and displays them for further processing. Anybody who has tried to parallelize an entire pipeline has explicitly used producer/consumer. So on.

These scenarios, in real life or in software, all have one thing in common: they all use a vehicle to transfer the results from the producer back to the consumer. Fast food worker places the burgers on a stand, which the register worker pulls out to fill the customer’s bag. The postal worker puts mail in a mailbox. To transfer the materials between the engaged couple, the postal worker places mail into a mailbox. A hand-off in software requires some data structure to facilitate the transaction. This can be used by the producer to transfer results and possibly buffer more. It also allows the consumer to be notified when one or more results have been made available. Enter System.Threading.Channels.

What is a Channel?

Sometimes, it is easier to grasp technology when I implement it myself. This allows me to learn about the problems that implementers of the technology might have to face, the trade-offs they had to make, as well as the best way to use the functionality. To that end, let’s start learning about System.Threading.Channels by implementing a “channel” from scratch.

A channel is simply a data format that stores data that consumers can retrieve. It also allows for safe synchronization and appropriate notifications in both directions. There are many design options available. Is it possible for a channel to store an unlimited number of items? What should you do if it is full? Performance is critical. Is it possible to reduce synchronization? Are there any assumptions that allow us to make about the number of consumers and producers allowed simultaneously? To quickly create a channel, we will assume that there is no need to set any specific limit and that overheads are not an issue. A simple API will also be created.

We need to know our type first. To that we will add some simple methods

Public sealed class Channel
{ 
  public Void Write(T value); 
  public ValuTask ReadAsync(CancellationToken cancellationToken = default); 
}

Our Write Method gives us a way to create data into the channel using a method that we can use. ReadAsync Method gives us a way to consume it. Because our channel is unlimited, data will be produced into it successfully and synchronously. This is just like calling. Add On a Liste We have made it non-asynchronous, void-returning and therefore, Our method of consuming is, however, ReadAsyncThis is because data may not be available at the moment we need it. We’ll have to wait until it arrives if there is no data available. While we don’t care about performance in the initial design, we do not want excessive overheads. Our expectations are that we will be reading often, and to read data when it is available, so our overheads won’t be excessive. ReadAsync Method returns a ValueTask Instead of a Task So that it can be made allocation-free once it is completed synchronously.

We now need to implement the two methods. We’ll start by adding two fields to our type. One to store the product and one to coordinate between producers and consumers.

Private readonly ConcurrentQueue _queue = new ConcurrentQueue(); 
Private Read Only SemaphoreSlim = New SemaphoreSlim(0)

We use a ConcurrentQueue The data can be stored, which eliminates the need to lock the buffering data structure. ConcurrentQueue It is thread-safe enough for all producers to have simultaneous access as well as any number of consumers. We use a SempahoreSlim To coordinate between consumers and producers, and to notify consumers who might be waiting for additional information to arrive.

The Write procedure is very simple. It simply needs to “release” the SemaphoreSlim data and store it in the queue.

public void Write(T value) _queue.Enqueue(value); 
// store the data _semaphore.Release(); 
// notify any consumers that more data is available

Our ReadAsync process is nearly as easy. It will wait for the data to become available, then it will take it out.

ValueTask public async ReadAsync(CancellationToken cancellationToken = default) await _semaphore.WaitAsync(cancellationToken).ConfigureAwait(false); 
// wait bool gotOne = _queue.TryDequeue(out T item); 
// retrieve the data Debug.Assert(gotOne); return item;

We note that no code can manipulate the queue or the semaphore. Once we have successfully waited on it, we know that the queue will have data. This is why we can simply assert that the TryDequeue method returned one. These assumptions could change, so this implementation would have to be more complex.

That’s all. We now have our basic channel. This implementation works well if you only need the core features described here. However, there are more important requirements, in terms of performance as well as APIs that enable more scenarios.

Now that we understand the basics of what a channel provides, we can switch to looking at the actual System.Threading.Channel APIs.

Introducing System.Threading.Channels

The core abstractions exposed from the System.Threading.Channels library are a writer:

ChannelWriter public abstract class
{
  public abstract valueTask: WriteAsync (T item, CancellationToken cancellationToken = default) 
  WaitToWriteAsync(CancellationToken cancellationToken = default); 
  public void Complete(Exception error); 
  public virtual bool TryComplete(Exception error); 
}

A reader

ChannelReader public abstract class
{ 
  public abstract Bool TryRead(outT item); 
  public virtual ValueTask ReadAsync(CancellationToken cancellationToken = default) 
  public abstract ValueTask WaitToReadAsync(CancellationToken cancellationToken = default); 
  public virtual IAsyncEnumerable ReadAllAsync([EnumeratorCancellation] CancellationToken cancellationToken = default); 
  public virtual Task Completion get; 
}

We are familiar with most of the API surface area, having just completed our channel design and implementation. ChannelWriter Provides a TryWrite This method is very similar to the Write method, but it’s abstracted and a Try method that returns an answer. Boolean To account for the possibility that some implementations might be limited in the number of items they can store and if there was a channel full enough that writing could not occur simultaneously, TryWrite Would need to return False To indicate that writing was unsuccessful. However, ChannelWriter Also, the WriteAsync Method; In such cases where the channel is full, writing would be required to wait (often called “back pressure”). WriteAsync Can be used with the producer waiting for the result WriteAsync You will only be allowed to continue if there is enough room.

There are times when code might not want to immediately produce a result. For example, if the value is too expensive or if it represents a costly resource (e.g. a large object that takes up much of the memory or has many open files), the producer may delay producing the value until it is certain it will succeed immediately. WaitToWriteAsync is available for this and other situations. Producers can wait for WaitToWriteAsync to return true and then decide to produce a value that TryWrites, or WriteAsyncs for the channel.

WriteAsync can be virtual. While some implementations might choose to offer a more optimized implementation than others, with abstract TryWrite or WaitToWriteAsync the base type can offer a reasonable implementation that is slightly less complex than these:

public async ValueTask WriteAsync(T item, CancellationToken cancellationToken) while (await WaitToWriteAsync(cancellationToken).ConfigureAwait(false)) if (TryWrite(item)) return; 
throw new ChannelCompletedException();

It also shows how WaitToWriteAsync And TryWrite This highlights some additional interesting facts. The while loop is used because channels can be used simultaneously by both producers and consumers. Two threads can be told via the while loop “yes, there is space”, if a channel has a limit on the number of items it can store. WaitToWriteAsync However, it is possible for one of them to lose the race condition and to have TryWrite Return False This is why it is necessary to keep trying again and again. This is another example of why WaitToWriteAsync Returns a ValueTask Instead of only ValueTask These include situations that exceed a buffer. TryWrite Could be back False. The notion of completion is supported by channels. A producer can signal to consumers that no more items will be produced. This allows them to gracefully end their attempts to consume. This is accomplished via the Complete Or TryComplete Methods that were previously demonstrated ChannelWriter ( Complete It is only implemented to call TryComplete Throw it if it comes back False ). However, if one producer considers the channel complete, all producers should be aware that they are not welcome to post into the channel. TryWrite Returns False, WaitToWriteAsync Also, returns False And WriteAsync throws a ChannelCompletedException.

The majority of members are ChannelReader They are also likely to be self-explanatory. TryRead It will attempt to extract the next element from each channel synchronously, and return whether it succeeded or not. ReadAsync It will also extract the next element in the channel. However, if the element is not synchronized, it will return a task. And WaitToReadAsync Returns a ValueTask This serves as an indicator that the element is available for consumption. Similar to ChannelWriter ‘s WriteAsync, ReadAsync Virtual, the base implementation is possible in terms of the abstract TryRead And WaitToReadAsync This is not the exact implementation of the base class, but it is close.

ValueTask public async ReadAsync(CancellationToken cancellationToken) 
while (true) if (!await WaitToReadAsync(cancellationToken).ConfigureAwait(false)) throw new ChannelClosedException(); 
if (TryRead(out T item)) return item;

There are many ways to consume food from one source. ChannelReader. One way to view a channel as an endless stream of value is to simply consume via infinity. ReadAsync :

while (true) T item = await channelReader.ReadAsync(); Use(item); 

However, the stream of values may not be infinite, and the channel will be marked complete at some point. After consumers have cleared the channel of all data, subsequent attempts to ReadAsync will throw. TryRead and WaitToReadAsync will return false. A nested loop is a common way to consume alcohol.

while (await channelReader.WaitToReadAsync()) 
while (channelReader.TryRead(out T item)) Use(item);

Although the inner “while” could be a simple “if”, the tight inner loop allows a cost-conscious developer avoid small overheads. WaitToReadAsync If an item is available, TryRead will consume it. This is actually the exact method used by the ReadAllAsync method. ReadAllAsync .NET Core 3.0 introduced this feature, and it returns an IAsyncEnumerable. It allows all data to be read via a channel that uses familiar language constructs.

await foreach (T item in channelReader.ReadAllAsync()) Use(item);

The base implementation of the virtual method uses the same pattern nested loop pattern as the WaitToReadAsync or TryRead.

IAsyncEnumerable public virtual async ReadAllAsync( [EnumeratorCancellation] CancellationToken cancellationToken = default) 
while (await WaitToReadAsync(cancellationToken).ConfigureAwait(false)) 
while (TryRead(out T item)) yield return item;

The last member of ChannelReader Is Completion. This just returns a Task This will make the channel complete once the channel reader has been completed.

Built-In Channel Implementations

Okay, we’re able to read from readers and write to them… but where can we find those readers and writers?

The Channel Type exposes a Writer property, and a Reader property which returns a ChannelWriter And a ChannelReader, respectively:

public abstract class Channel
{ 
  public ChannelReaderReader get; 
  public ChannelWriter Writer get; 
}

This base abstract class can be used for niche use cases, where a channel may transform written data into another type for consumption. However, the vast majority of use cases have TWrite as well as TRead being identical. That is why most use occurs via the derived Channel type which is basically:

public abstract class ChannelChannel{ }

This non-generic channel type allows for factories to be used in multiple implementations. Channel:

{
  public static class Channel Public static Class Channel public Static ChannelCreateUnbounded(); 
  public static ChannelCreateUnbounded(UnboundedChannelOptions options); 
  public static Channel CreateBounded(int capacity); 
  public stat Channel CreateBounded(BoundedChannelOptions options); 
}

The CreateUnbounded Method creates a channel that allows for unlimited storage. However, it is possible to store more than one item at a time. Liste It is very similar to the Channel-like type we used at the beginning. It’s TryWrite Will always return True Both it’s WriteAsync Its. WaitToWriteAsync Will always be completed synchronously.

The CreateBounded method, on the other hand, creates a channel with a limit that is explicitly maintained by the implementation. Just like CreateUnbounded before reaching this limit, TryWrite will return true, and WriteAsync or WaitToWriteAsync both will finish synchronously. However, TryWrite won’t return falseWriteAsync or WaitToWriteAsync both will finish asynchronously.

They will only complete their tasks when there is enough space, or if another producer signals that the channel has finished. It should be noted that these APIs accept a CancellationToken and can be interrupted by cancellation.

Both CreateUnbounded and CreateBounded have overloads that accept a ChannelOptions-derived type. The base channelOptions allows for options to control the behavior of any channel. It exposes SingleWriter, SingleReader, and other properties that allow creators to specify constraints they are willing to accept. A creator can set SingleWriter to true so that only one producer has access to the writer, and SingleReader to true so that only one consumer has access to the reader at any given time. Factory methods can then specialize the implementation created by the creator, optimizing it according to the provided options.

For example, CreateUnbounded sets SingleWriter to true to indicate that only one producer will be accessing the writer at a time, and singleReader to true to indicate that only one consumer will have access to the reader at a time. This implementation not only avoids locks while reading but also avoids interlocked operations during reading, greatly reducing overheads The base ChannelOptions also exposes an AllowSynchronousContinuations property. This property is similar to SingleReader or SingleWriter.

A creator can set it to true to get some optimizations. These optimizations have significant implications on how code is produced and consumed. Specifically, AllowSynchronousContinuations in a sense allows a producer to temporarily become a consumer.

Let’s suppose there is no data in a channel. A consumer calls ReadAsync. The consumer hooks up a callback that will be invoked when data has been written to the channel by waiting for the task to be returned from . This callback will by default be invoked asynchronously. The producer writes the data to the channel, then queues the invocation of the callback. This allows the producer and consumer to simultaneously go about their business while the consumer is being processed by another thread. In some cases, however, it might be beneficial for performance for the producer writing the data and then processing the callback itself, e.g.

It invokes the callback by itself, rather than TryWrite waiting for the invocation. This can significantly cut down on overheads, but also requires great understanding of the environment, as, for example, if you were holdling a lock while calling TryWrite, with AllowSynchronousContinuations set to true, you might end up invoking the callback while holding your lock, which (depending on what the callback tried to do) could end up observing some broken invariants your lock was trying to maintain.

The BoundedChannelOptions passed to CreateBounded layers on additional options specific to bounding. In addition to the maximum capacity supported by the channel, it also exposes a BoundedChannelFullMode enum that indicates the behavior writes should experience when the channel is full:

public enum BoundedChannelFullMode  Wait, DropNewest, DropOldest, DropWrite

Wait is the default mode. This has the semantics discussed above: TryWrite on full channels returns false. WriteAsync returns a task that can only be completed when there is enough space available. WaitToWriteAsync also returns a task that can only be completed when space becomes available. Instead, the other three modes allow writes to complete synchronously and drop an element if there is not enough space. DropOldest will remove an “oldest” item from the queue (wall-clock time), meaning that the next element to be dequeued would be removed by a consumer. DropNewest on the other hand will remove the newest item. This is the element that was written most recently to the channel. DropWrite drops any item that is currently being written. TryWrite will return true, but the item will be immediately removed.

Performance

This is the API perspective. The library’s abstractions are very simple which is a big part of its power. A few simple implementations and abstracts should be sufficient to meet 99.9% of developers’ use cases. Although the library’s surface might seem simple, it is actually quite complex in its implementation. The implementation is complex, with a lot of focus on high throughput and simple consumption patterns. For example, the implementation takes great care to minimize allocations. Many of the surface area methods have a return. ValueTask And ValueTask Instead of Task And Task. We can use, as we have seen in the trivial example at the beginning of this article. ValueTask to avoid allocations when methods complete synchronously, but the System.Threading.Channels implementation also takes advantage of the advanced IValueTaskSource And IValueTaskSource Interfaces can be used to prevent allocations, even if the different methods are completed synchronously and return tasks.

This is a benchmark:

using BenchmarkDotNet.Attributes; 
using BenchmarkDotNet.Running; 
using System.Threading.Channels; 
using System.Threading.Tasks; [MemoryDiagnoser] 
public class Program 
{ 
  static void Main() => BenchmarkRunner.Run(); 
  private readonly Channel s_channel = Channel.CreateUnbounded
  {(); 
    [Benchmark] public async Task WriteThenRead() (); 
    [Benchmark] public Async Task WriteThenRead() ChannelWriterwriter = s_channel.Writer reader = s_channel.Reader; 
    for (int i = 0; i < 10_000_000; i++) writer.TryWrite(i); 
    await reader.ReadAsync(); 
   } 
}

This is a test of the throughput and memory allocation for an unbounded channel. When writing an element, and then reading it out 10 million times, this means that an element will always have the ability to be read. The following results were obtained on my machine. (The 72 bytes in the Allocated column are for WriteThenRead’s single Task).

System.Threading.Task

Let’s make it a little more simple: first issue the read, then write the element that will fulfill it. This will ensure that reads are completed asynchronously, since the data required to complete them is not available.

Using BenchmarkDotNet.Attributes; 
using BenchmarkDotNet.Running; 
using System.Threading.Channels; 
using System.Threading.Tasks; [MemoryDiagnoser] p
ublic class Program 
{ 
  static void Main() => BenchmarkRunner.Run(); 
  private readonly Channel s_channel = Channel.CreateUnbounded
  {(); [Benchmark] 
    public async Task ReadThenWrite() (); [Benchmark] 
    public Async Task ReadThenWrite() ChannelWriterwriter = s_channel.Writer reader = s_channel.Reader; 
    for (int I = 0; I < 10_000_000; i++) 
    { 
      ValueTask vt = reader.ReadAsync(); 
      writer.TryWrite(i); await vt; 
    }
  } 
}

This is what I got after running it for 10,000,000 writes and readings.

ReadThenWrite

So, there’s some more overhead when every read completes asynchronously, but even here we see zero allocations for the 10 million asynchronously-completing reads (again, the 72 bytes shown in the Allocated column is for the Task returned from ReadThenWrite)!

Combinators

The majority of channels can be consumed using one of these methods. However, it is possible to execute different types of operations across channels in order to achieve a specific goal. Let’s take, for example, that I want to wait until the first element arrives from one of two readers. I could write this:

Public static async ValueTask> WhenAnyChannelReaderChannelReader reader1 reader2) 
{
  var cts = new CancellationTokenSource(); 
  Task t1 = reader1.WaitToReadAsync(cts.Token).AsTask(); 
  Task t2 = reader2.WaitToReadAsync(cts.Token).AsTask(); 
  TaskCompleted = Await Task.WhenAny(t1,t2); cts.Cancel(). Return Complete == t1 reader1 : reader2; 
}

We’re only calling here WaitToReadAsync Both channels and return the reader for the one that is completed first. This example has one interesting thing to notice. ChannelReader Many similarities exist between them. IEnumerator This example is not a good idea. IEnumerator (or IAsyncEnumerator ). IAsyncEnumerator Exposes a MoveNextAsync Method, which moves your cursor to the next item. This is where you can see it. Current. We could implement this if we tried. WhenAny On top of IAsyncEnumerator Invoke the following: MoveNextAsync Each. We could move each item ahead by doing this. We could end up with missing items if we used the looped method, as we might have advanced an enumerator we didn’t return to.

Relationship to the rest.NET Core

System.Threading.Channels is part of the .NET Core shared framework, meaning a .NET Core app can start using it without installing anything additional. You can also download it as a NuGet package. However, the separate implementation does not have the same optimizations as the built-in one. This is due to the fact that the built-in implementation can take advantage of additional library and runtime support in.NET Core.

It is also used in a number of other systems within.NET. ASP.NET, for example, uses channels in SignalR and its Libuv-based Kestrel transportation. The upcoming QUIC implementation for.NET 5 will also use channels.

If you squint, the System.Threading.Channels library also looks a bit similar to the System.Threading.Tasks.Dataflow library that’s been available with .NET for years. The dataflow library can be thought of as a superset or the channels library. In particular, it includes the BufferBlock The dataflow library provides much of the same functionality as type. The dataflow library is focused on a different programming paradigm. It links blocks together so that data flows from one to another. Advanced functionality is also included, such as a two-phase commit that allows multiple blocks to be linked to the same consumer and consumers to be able to atomically withdraw from multiple blocks without deadlocking. These mechanisms are more complex and more costly, but they are more powerful. You can see this by simply writing the same benchmark. BufferBlock As we did for Channels.

using BenchmarkDotNet.Attributes; 
using BenchmarkDotNet.Running; 
using System.Threading.Channels; 
using System.Threading.Tasks; 
using System.Threading.Tasks.Dataflow; [MemoryDiagnoser] 
public class Program 
{ 
  static void Main() => BenchmarkRunner.Run(); 
  private readonly Channel _channel = Channel.CreateUnbounded(); 
  private, readonly BufferBlock _bufferBlock = new BufferBlock(); [Benchmark] 
  public async Task Channel_ReadThenWrite() 
  { 
    ChannelWriterWriter = _channel.Writer. ChannelReader reader = _channel.Reader; 
    for (int i = 0; i < 10_000_000; i++) 
    { 
      ValueTask vt = reader.ReadAsync(); 
      writer.TryWrite(i); await vt; 
    } 
  } [Benchmark] public async Task BufferBlock_ReadThenWrite() 
    { 
      for (int i = 0; i < 10_000_000; i++) 
      { 
        Task t = _bufferBlock.ReceiveAsync(); 
        _bufferBlock.Post(i); await t; 
      } 
   }
}

System.Threading.Tasks.Dataflow

This is in no way meant to suggest that the System.Threading.Tasks.Dataflow library shouldn’t be used. It allows developers to communicate succinctly large numbers of concepts and can show very high performance when used to solve the best problems. However, when all one needs is a hand-off data structure between one or more producers and one or more consumers you’ve manually implemented, System.Threading.Channels is a much simpler, leaner bet.

At this point, hopefully, you have a better grasp of the System.Threading.Channels enough channels in the library to see how they might fit in and enhance your applications.

Dealing with Python CSV File is a Piece of Cake. Do you Know that You Can Get All Info from It Using 3 Lines?

Dealing with Python CSV File is a Piece of Cake. Do you Know that You Can Get All Info from It Using 3 Lines?

Read write parse CSV

How to Read, Write and Parse CSV in Python

A popular format that exchanges details through text files is the CSV format. It is easy to use CSV because you don’t have to build your own CSV parser. Python contains several suitable libraries you can use. One of them is a Python csv module that will work on many occasions. Also, there is a pandas library that has CSV parsing capabilities. This library will be useful if you need numerical analysis or your work requires lots of data.

What is CSV

Comma Separated Values file is a type of text file that allows data to be saved in a tabular format. In a CSV file in Python information is separated by commas, which is given away by his name. CSV file is used to move information between the programs that aren’t able to exchange data. Two programs can exchange data only if they both can open a CSV file. A sample CSV file for Python:

name of col 1, name of col 2, name of col 3 name
data of row 1, data of row 1, data of row 1
data of row 2, data of row 2, data of row 2
...

A typical CSV file in python example:

Clothes, Size, Price
T-shirt, Medium, $20
Pants, Medium, $25

The divider symbol is named a “delimiter”. In a Python CSV file, there can be anything as the separator. Here are other delimiters that are less popular: colon (:), semi-colon (;) and the tab (\t).

Parsing CSV Files by Using Python csv Library

To parse CSV Python means read the data from CSV. The csv library allows you to read from and write to CSV Python. This csv package Python you can describe the CSV formats understood by other applications or even define your own CSV format. The csv module contains reader and Python writer objects that help you manipulate CSV Python. Also, you can use Python DictReader and DictWriter classes to read and write data in dictionary form. Let’s see Python working with csv library.

How to Read CSV Files by Using the Python csv Package

As already mentioned, the CSV reader Python object is used for reading from a CSV file. Python open() CSV function opens the CSV program as a text. Here is an example:

name,birthday day,birthday month,birthday year
Lochana Cleitus,16,April,1995
Aberash Juliya,8,March,1999
Yunuen Walenty,3,January,1996

Here is a code to read this file:

import csv
with open('data.txt') as csv_file:
read_csv = csv.reader(csv_file, delimiter=',')
line_counter = 0
for text in read_csv:
if line_counter == 0:
print(f'Columns: {", ".join(text)}')
line_counter += 1
else:
print(f'\t{text[0]} was born on {text[2]} {text[1]}, {text[3]}.')
line_counter += 1
print(f'There are {line_counter} lines.')
#Output:
#Columns: name, birthday day, birthday month, birthday year
# Lochana Cleitus was born on April 16, 1995.
# Aberash Juliya was born on March 8, 1999.
# Yunuen Walenty was born on January 3, 1996.
#There are 4 lines.

Python Read CSV Files Into a Dictionary

Each string returned by the reader is a list of string elements containing the data that is found by removing the delimiters. The first row returned contains the column names that are treated in a special way.

Instead of creating a list of string elements, you can read the CSV data into a dictionary. Our input file is the same as last time:

name,birthday day,birthday month,birthday year
Lochana Cleitus,16,April,1995
Aberash Juliya,8,March,1999
Yunuen Walenty,3,January,1996

Here is Python csv DictReader example:

import csv
with open('data.txt', mode='r') as csv_file:
read_csv = csv.DictReader(csv_file)
line_counter = 0
for text in read_csv:
if line_counter == 0:
print(f'Columns: {", ".join(text)}')
line_counter += 1
print(f'\t{text["name"]} was born on {text["birthday month"]} {text["birthday day"]}, {text["birthday year"]}.')
line_counter += 1
print(f'There are {line_counter} lines.')
#Output:
#Columns: name, birthday day, birthday month, birthday year
# Lochana Cleitus was born on April 16, 1995.
# Aberash Juliya was born on March 8, 1999.
# Yunuen Walenty was born on January 3, 1996.
#There are 4 lines.

In the code above we used python csv open function. Keys for the dictionary are contained in the first line of the CSV file Python. If you don’t have them, you should determine your own keys by setting the fieldnames (optional parameter).

Python CSV Reader Parameters

In the csv library, the reader object can deal with different types of CSV files in Python by defining additional parameters. For example:


  • delimiter identifies the character that is used to separate each field. The comma is a default separator.
  • quotechar identifies the character that is used to surround areas that contain a delimiter character. A double quote is a default quotechar.
  • escapechar identifies the character that is used to escape the delimiter character, when there are no quotes. The default escapechar is no escape character. The following examples will help to better understand these parameters.
name,birthday
Lochana Cleitus,April 16,1995
Aberash Juliya,March 8,1999
Yunuen Walenty,January 3,1996

There are two fields name and birthday in this Python 3 CSV file, which are separated by commas. The data in the birthday field also contains a comma to signify the year. So we can’t use the default separator (comma).


  • Write the data in quotes

In quoted strings, the nature of your chosen delimiter is ignored. If you want to use different characters for quoting the quotechar optional parameter will help you with this.

  • Use a different delimiter

You can use the delimiter optional parameter to identify the new delimiter. In this case, the comma can be used in the data.

  • Escape the delimiter characters

To use escape characters, you must identify them using the escapechar optional parameter.

How to Write CSV Files by Using the CSV Module Python

Python CSV writer object and the .write_row() method can help you to write data to a CSV file. Here we also unfold the file with open csv python function.

import csv
with open('data.csv', mode='w') as data:
birthday_data = csv.writer(data, delimiter=',', quotechar='"', quoting=csv.QUOTE_MINIMAL)
birthday_data.writerow(['Andrus Mile', '26', 'September', '1999'])
birthday_data.writerow(['Sofia Rangi', '11', 'July', '1997'])

The quotechar optional parameter defines which symbol to use in quote fields. No difference in using quoting or not, however, it is decided by the quoting parameter:


  • csv.QUOTE_MINIMAL

On this occasion .writerow() will quote fields which contain the delimiter or the quotechar. This quoting is a default case.

  • csv.QUOTE_NONE

On this occasion .writerow() won’t quote fields. Instead of this .writerow() function will escape delimiters. There you also must provide a value for the escapechar optional parameter.

  • csv.QUOTE_NONNUMERIC

On this occasion .writerow() will quote fields which contain text data and convert numeric fields to the float data type.

  • csv.QUOTE_ALL

On this occasion .writerow() will quote all fields.


So Python save to CSV file following data:

Andrus Mile,26,September
Sofia Rangi,11,July

Python write CSV File Into a Dictionary

You should be able to write data out from a dictionary. For this you need to use  csv.DictWriter and the following two methods .writeheader() (is used to write a row of column field names to the CSV program) and .writerow() (is used to write a single row of data into the file).

Here is Python csv DictWriter example:

import csv
with open('data.csv', mode='w') as csv_file:
fieldnames = ['name', 'birthday_day', 'birthday_month', 'birthday_year']
writer = csv.DictWriter(csv_file, fieldnames=fields)
writer.writeheader()
writer.writerow({'name': 'Lochana Cleitus', 'birthday_day': '16', 'birthday_month': 'April', 'birthday_year': '1995'})
writer.writerow({'name': 'Aberash Juliya', 'birthday_day': '8', 'birthday_month': 'March', 'birthday_year': '1999'})
writer.writerow({'name': 'Yunuen Walenty', 'birthday_day': '3', 'birthday_month': 'January', 'birthday_year': '1996'})

This code makes a file save as CSV Python:

name,birthday_day,birthday_month,birthday_year
Lochana Cleitus,16,April,1995
Aberash Juliya,8,March,1999
Yunuen Walenty,3,January,1996

CSV pandas

One more open-source Python library that can read and write CSV files is pandas. People often use pandas if their CSV files are huge to analyze.

pandas provides a lot of high-performance tools that can analyze data and also pandas provides easy-to-use data structures.

You can implement the pandas library in PyCharm as all other libraries, but the best option to work with it is using Anaconda’s Jupyter notebooks.

What is Anaconda? The in-built Python library has a lot of methods but there are a lot of other methods that are more useful and not included in it. That is where Anaconda distribution is useful. It is a free, open-source platform that allows you to execute code.

We need to talk about Jupyter notebook more. This application is web based so it allows you to use all the libraries that are included in Anaconda in your default web browser. Also there are useful features like: titles, comments and another text that you can write beyond the code.


So why do we need a Jupyter notebook? Because pandas is available in it as an in-built library and it works extremely well in Jupyter Notebook. You can share code, analyze results, and see graphs made in it by CSV. And also it is very easy to use it here.

Read CSV Files by pandas

Firstly, to try working with pandas we need to create a CSV file to work with. So let’s create one:

Name,Fire date,Salary,Sick Days remaining
Gioia Kellan,20/1/2004,500,10
Mieszko Ailis,10/1/2005,650,8
Tamara Prasad,10/2/2010,450,10
Terry Jones,2/10/2021,700,3
Dorotheos Caelestis,30/12/2022,480,7

The example of code will look like that:

import pandas as pd
example_data = pd.read_csv('data.csv')
print(example_data)
#Output:
# Name Fire date Salary Sick Days remaining
#0 Gioia Kellan 20/1/2004 500 10
#1 Mieszko Ailis 10/1/2005 650 8
#2 Tamara Prasad 10/2/2010 450 10
#3 Terry Jones 2/10/2021 700 3
#4 Dorotheos Caelestis 30/12/2022 480 7

We have operated with ‘import’ to show that we use the panda’s library and also we used ‘as’ for making it shorter in code. Anyway, that means that only 3 lines of code are needed to make our CSV file readable for us. ‘read_csv()’ operation reads. So here pandas have read the first line of our CSV file and used them in the output correctly.

The only note is that our ‘Fire date’ is the string type. We can check all our types by using this code:

import pandas as pd
example_data = pd.read_csv('data.csv')
print(type(example_data['Fire date'][0]))
#Output:
#<class 'str'>

parse_dates=[]

So we need to fix this. Let’s try to fix this issue. The best way is to use ‘parse_dates’ the optional parameter that convinces pandas to turn things into datetime types. This parameter receives only a list of columns(or multiple columns).

import pandas as pd
example_data = pd.read_csv('data.csv', parse_dates=['Fire date'])
print(example_data)
#Output:
# Name Fire date Salary Sick Days remaining
#0 Gioia Kellan 2004-01-20 500 10
#1 Mieszko Ailis 2005-10-01 650 8
#2 Tamara Prasad 2010-10-02 450 10
#3 Terry Jones 2021-02-10 700 3
#4 Dorotheos Caelestis 2022-12-30 480 7

Also if you use Jupyter notebook you can see this message after using ‘parse_dates’:

UserWarning: Parsing ’30/12/2022′ in DD/MM/YYYY format. Provide format or specify infer_datetime_format=True for consistent parsing.

  return tools.to_datetime(

So here Anaconda helps us that we can use different formats for editing our dataframe.

After our example let`s check the data type of our ‘Fire date’:

import pandas as pd
example_data = pd.read_csv('data.csv')
print(type(example_data['Fire date'][0]))
#Output:
#<class 'pandas._libs.tslibs.timestamps.Timestamp'>

And here we see that our column is formatted properly. Hooray!

index_col=””

Also, we see here that we have numbers on the left. But if we don’t need them, we can remove them.

The only way to do that is using an optional parameter called ‘index_col’. Index_col allows us to set which cols will be used as the index in our dataframe. Index_col receives the column name or its index that will be used as index column. 

import pandas as pd
example_data = pd.read_csv('data.csv', index_col='Name', parse_dates=['Fire date'])
print(example_data)
#Output:
# Fire date Salary Sick Days remaining
#Name 
#Gioia Kellan 2004-01-20 500 10
#Mieszko Ailis 2005-10-01 650 8
#Tamara Prasad 2010-10-02 450 10
#Terry Jones 2021-02-10 700 3
#Dorotheos Caelestis 2022-12-30 480 7

If your CSV files do not contain column names on the first line, there is a way to provide it by the ‘names’ optional parameter. It is also used when you want to replace the column names specified in the first line. In this case, you must also use ‘pandas.read_csv()’ to ignore existing column names with the optional ‘header=0’ parameter.
Let’s take this CSV file:

Hello, my, name, is
Gioia Kellan,20/1/2004,500,10
Mieszko Ailis,10/1/2005,650,8
Tamara Prasad,10/2/2010,450,10
Terry Jones,2/10/2021,700,3
Dorotheos Caelestis,30/12/2022,480,7

Here we have seen, we have the wrong first line. We can change it as in next example:

import pandas as pd
example_data = pd.read_csv('data.csv', 
index_col='Name', 
parse_dates=['Fire date'], 
header=0, 
names=['Name', 'Fire date','Salary', 'Sick Days remaining'])
print(example_data)
#Output:
# Fire date Salary Sick Days remaining
#Name 
#Gioia Kellan 2004-01-20 500 10
#Mieszko Ailis 2005-10-01 650 8
#Tamara Prasad 2010-10-02 450 10
#Terry Jones 2021-02-10 700 3
#Dorotheos Caelestis 2022-12-30 480 7

But take note that if we change our first line, we must take care of our ‘index_col’ and ‘parse_dates’ too!

How to Write CSV Python by pandas

So after getting knowed how to read CSV files by pandas, here you can Python write to CSV. It is much easier now. Let’s see the example:

import pandas as pd
example_data = pd.read_csv('data.csv', 
index_col='Name', 
parse_dates=['Fire date'], 
header=0, 
names=['Name', 'Fire date','Salary', 'Sick Days remaining'])
example_data.to_csv('data2.csv')

 Here we got a new function ‘to_csv’. All it does is that it creates the new file called as you named in quotes and saves the data to CSV python. And the data2.csv will be:

Hello, my, name, is
Gioia Kellan,20/1/2004,500,10
Mieszko Ailis,10/1/2005,650,8
Tamara Prasad,10/2/2010,450,10
Terry Jones,2/10/2021,700,3
Dorotheos Caelestis,30/12/2022,480,7

We got a copy of the file ‘data.csv’. So if you need to use ‘print’ as the writer for the new file you can use ‘to_csv’ for this.

How to Save CSV Python by pandas

To save CSV file Python to a folder you need to import one more package os.path.

import pandas as pd
import os.path
example_data.to_csv(os.path.join('folder',data.csv'))

How to Convert Python CSV to List by pandas

To convert a CSV file into a list you need to read the file using read_csv and convert it into a dataframe. Then you should convert each row into a list. Here is an example:

name,job
Sutekh Piritta, doctor
Bradley Tamari, teacher
Artur Jocasta, vet
import pandas as pd
example_data = pd.read_csv('data.csv', delimiter=',')
csv_list = [list(row) for row in example_data.values]
print(csv_list)
#Output:
#[['Sutekh Piritta', ' doctor'], ['Bradley Tamari', ' teacher'], ['Artur Jocasta', ' vet']]
MVP Software (Minimum Viable Product) – Flaw or Required Thing

MVP Software (Minimum Viable Product) – Flaw or Required Thing

MVP software
MVP software

What is MVP in Software Development?

A core set of features or capabilities are tested with a restricted number of consumers using MVP software, also known as minimum viable product software. The purpose of MVP software is to collect feedback and information that can be utilized to refine the product and assess its marketability.

Since it enables businesses to test their product concepts with a lower commitment of time and resources, MVP software is a strategy that is becoming more and more popular among startups and small enterprises. Companies can determine whether or not their product will be successful before devoting to a full development cycle by launching an MVP. This can assist businesses avoid designing goods that waste time and money.

Benefits of Developing MVP Software

The advantages of MVP software include cost savings, risk reduction, and the ability to solicit client input. Companies can learn more about how their product is being received and what functions or features users would like to see changed or added by releasing an MVP. For startups or small firms that might not have the resources to conduct significant market research or user testing, this might be especially helpful.

The ability to evaluate product concepts with a smaller time and resource commitment is one of the main advantages of MVP software for businesses. This can assist companies avoid designing products that might not sell well and can save them time and money. Companies can gauge the viability of their idea before engaging in a whole development cycle by introducing an MVP. Research can be especially helpful for new companies or small enterprises that do not have the funding for in-depth user research or market research.

A further benefit of MVP software is that it enables businesses to obtain insightful client feedback. Companies can learn more about how their product is being received and what functions or features users would like to see changed or added by releasing an MVP. This can assist businesses in enhancing their product and raising the likelihood of market success. Additionally, before a product is fully produced, MVP software can assist businesses in identifying potential flaws or problems with it, allowing them to address these issues before releasing the finished product.

What are Some Examples of Software Made with MVP:

Dropbox: The initial MVP for Dropbox was a simple website that allowed users to sign up and upload files to the cloud. This allowed the founders to quickly test the concept and gather feedback from early users.


Airbnb: The MVP for Airbnb was a website that allowed users to list their spare rooms or properties for short-term rentals. The initial MVP did not have many features, but it allowed the founders to test the concept and gather feedback from early adopters.

Groupon: The MVP for Groupon was a simple email newsletter that featured daily deals on local goods and services. This allowed the founders to test the concept and gather feedback from early subscribers.

Spotify: The MVP for Spotify was a simple music streaming service that allowed users to search for and listen to songs for free. This allowed the founders to test the concept and gather feedback from early users.

Zappos: The MVP for Zappos was a simple website that allowed users to browse and purchase shoes online. This allowed the founders to test the concept and gather feedback from early customers.

When considering whether or not to employ MVP software, there are several things to take into account. The product’s stage of development is one consideration.

To evaluate the product’s viability and gain feedback, an MVP launch may be more appropriate if indeed the project is still in the early stages of its creation. It might be better to launch a completely developed product, however, if the product is further along in the development process.


The product’s target market should be taken into account as well. It might be more acceptable to launch an MVP to assess the product’s viability if it’s aimed at a niche market with a small number of consumers. It can be more acceptable to launch a fully developed product, however, if the product is aimed at a wider, more market overall.

Competencies Required for Software-Based MVP Development:

Certain skills are necessary to construct a software-based MVP successfully. These include the capacity to build an interface that is both practical and user-friendly, as well as a solid grasp of front-end development and graphical user interface design. It’s also critical to have expertise in back-end development, particularly server-side programming, to make sure the program can efficiently carry out user commands. These skills are necessary for developing an effective MVP, whether they are used individually or in a team setting.

Conclusion

Overall, MVP software is an important tool for startups and businesses that want to quickly test and validate product ideas. It enables faster development, lower costs and increased flexibility in pivoting and adapting to changing market conditions. However, the scope and focus of an MVP must be carefully considered, as it must provide a meaningful experience for users while also leaving room for future growth and development.

What is Let`s Encrypt Certificate, It`s Benefits and Features

What is Let`s Encrypt Certificate, It`s Benefits and Features

Let`s Encrypt
Let`s Encrypt

What’s Let’s Encrypt?

Let’s Encrypt, a non-profit, open and automated certificate authority (CA), provides domain-validated SSL/TLS certificates that help websites secure. Let’s Encrypt was launched in 2015. It makes it easy for website owners and administrators to secure their websites using SSL/TLS certificates. These certificates encrypt communications between a website’s visitors to prevent sensitive data being intercepted. Let’s Encrypt’s goal is to promote widespread adoption of HTTPS.

What are the Key Benefits of Let’s Encrypt?

Let’sEncrypt makes it simple for website owners and administrators to install TLS certificates on servers. Website owners are increasingly requiring a TLS certificate. TLS certificates not only help protect sensitive information sent over the internet but also play a crucial role in ranking websites on search engines.

It is easy to obtain a Let’sEncrypt TLS certificate. Website owners first need to install Let’sEncrypt on their web server. Certbot is a tool that allows you to request and install TLS certificate.

After the Let’sEncrypt software has been installed, website owners may use Certbot in order to request a TLS certification for their domain. This involves verifying the owner of the domain as well as providing additional information about both the website’s owner and the domain.

Certbot will install the TLS certificate automatically on the web server after the certificate request has been approved.

Website owners don’t need to manually configure or install the certificate as this process is automated.

Let’sEncrypt offers many other benefits, including an easy way for you to get TLS certificates. It is a non-profit organization funded by donations and sponsors, so there is no cost to obtain a TLS certificate. Let’sEncrypt certificates can be issued for a shorter period of time, usually 90 days. This means they must be renewed more often than traditional TLS certificates.

Although this may sound like a disadvantage, it can increase security by allowing more frequent certificate rotations. It also makes it easier to revoke compromised certificate.

Let’sEncrypt also believes in protecting online privacy and security. It has taken strict security measures to ensure that TLS certificates are only issued to the right recipients. It includes measures like Domain Validation (DV), and Certificate Transparency(CT).

What is DV?

DV is a method to confirm that the requester of a TLS certification is the owner or authorized representative for the domain. CT allows for the public logging of all TLS certificates issued. This helps improve security. This makes it easy for anyone to verify the authenticity of TLS certificates and helps prevent fraudulent certificates being issued.

Thought

Website owners who want to secure their websites with SSL/TLS certificates will find Let’s Encrypt a useful resource. Let’s Encrypt is a great option for website owners who want to protect their site and visitors’ data. It offers an automated renewal and issuance process. Let’s Encrypt is a great way to protect your website and visitors’ data if you don’t have it yet.

CAP Theorem As a Key Component in System Design

CAP Theorem As a Key Component in System Design

CAP Theorem

Fundamentals of system design: What is the CAP theorem?

As your career as a developer progresses, you’ll be expected to think more about software architecture and system design. It is critical to be able to design efficient systems and make tradeoffs on a large scale. System design is a broad field that encompasses many critical concepts. The CAP theorem is a fundamental concept in system design. Understanding the CAP theorem is essential for designing robust distributed systems. Today, we’ll delve deeper into the CAP theorem, explaining what it means and how it works.

But what exactly is the CAP theorem?

The CAP theorem, also known as Brewer’s theorem, is a fundamental theorem in system design. Eric Brewer, a computer science professor at U.C. Berkeley, first presented it in 2000 during a talk on the principles of distributed computing. Nancy Lynch and Seth Gilbert of MIT published a proof of Brewer’s Conjecture in 2002. According to the CAP theorem, a distributed system can only provide two of three properties at the same time: consistency, availability, and partition tolerance. When there is a partition, the theorem formalizes the tradeoff between consistency and availability.

A distributed system is a group of computers that collaborate to create a single computer for end users. All distributed machines share the same state and run concurrently. Users must be able to communicate with any of the distributed machines without realizing it is only one machine in a distributed system. The distributed system network stores data on multiple nodes at the same time, using multiple physical or virtual machines.

Is there proof about CAP theorem?

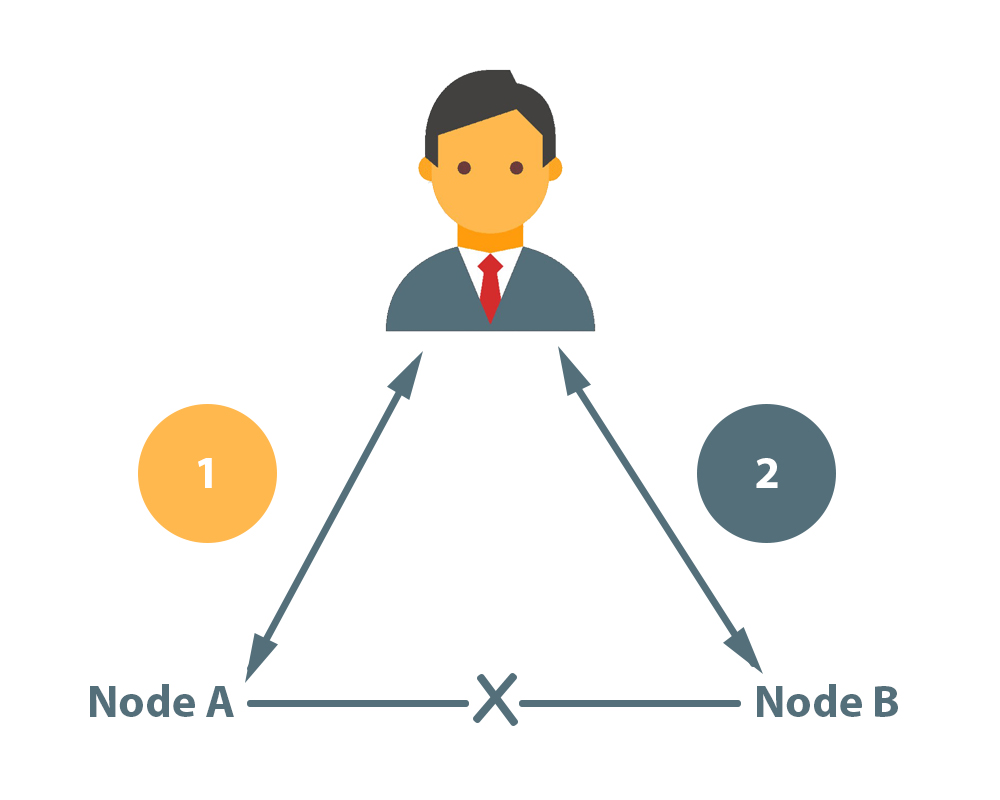
Consider a distributed system with two nodes:

CAP theorem principles

With the value of variable X, the distributed system acts as a plain register. A network failure occurs, resulting in a network partition between the two system nodes. An end-user performs a write request, and then a read request. Consider the case where each request is handled by a different system node. Our system has two options in this case:

  • It may fail at one of the requests, causing the system to become unavailable.
  • It can execute both requests, returning a stale value from the read request and causing the system’s consistency to be broken.

The system is unable to process both requests while also ensuring that the read returns the most recent value written by the write. Because of the network partition, the results of the write operation cannot be propagated from node A to node B.

 Now that we’ve covered the basics of the CAP theorem, let’s break down the acronym and go over the definitions of consistency, availability, and partition tolerance.

Consistency

In a consistent system, all nodes see the same data at the same time. When we perform a read operation on a consistent system, the value of the most recent write operation should be returned. All nodes should return the same data as a result of the read. Regardless of which node they connect to, all users see the same data at the same time. When data is written to a single node, it is replicated across the system’s nodes.

Availability

When availability exists in a distributed system, it means that the system is always operational. Regardless of the individual state of the nodes, every request will receive a response. This means that the system will continue to function even if multiple nodes fail. There is no guarantee that the response will be the most recent write operation, unlike in a consistent system.

Tolerance for partitions

When a distributed system encounters a partition, it means that communication between nodes has been disrupted. If a system is partition-tolerant, it will not fail even if messages are dropped or delayed between nodes within the system. To achieve partition tolerance, the system must replicate records across node and network combinations.

NoSQL databases and the CAP theorem

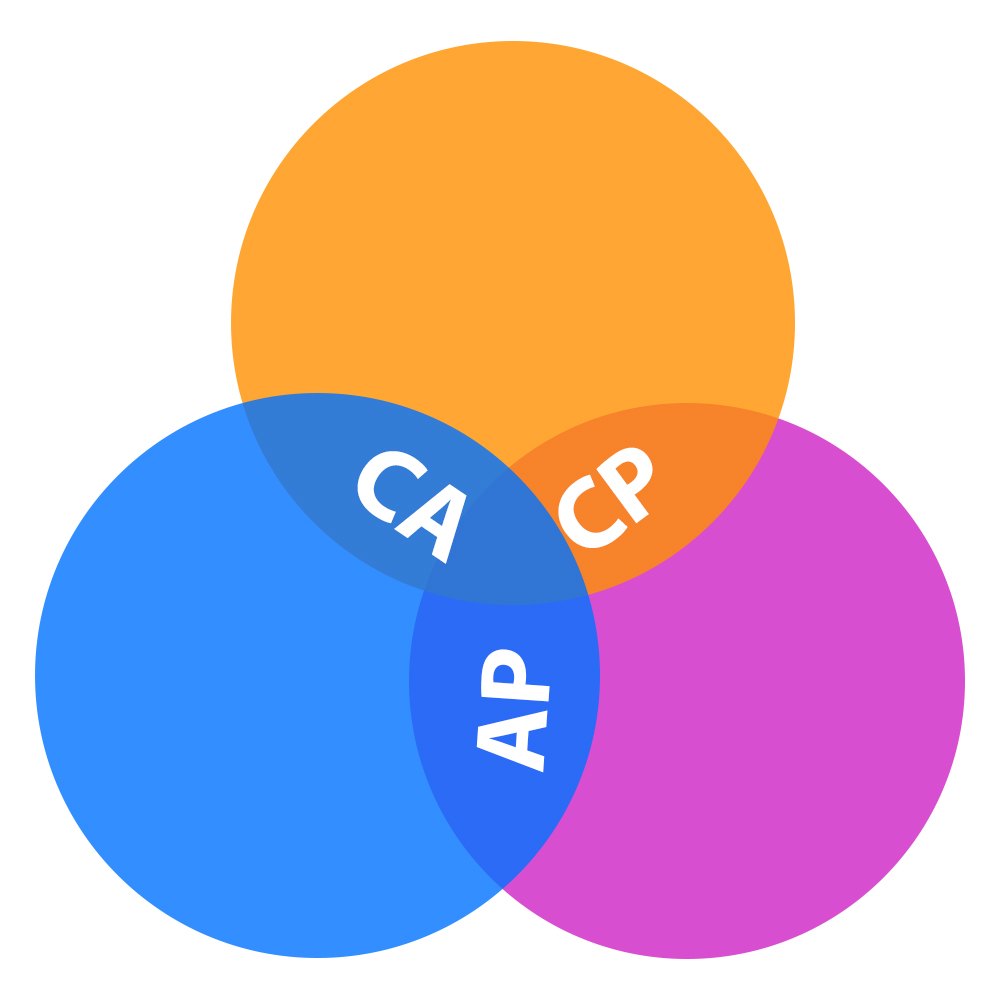
CAP theorem visualization

For distributed networks, NoSQL databases are ideal. They support horizontal scaling and can rapidly scale across multiple nodes. It’s critical to remember the CAP theorem when deciding which NoSQL database to use. NoSQL databases are classified according to the two CAP features that they support:

CA’s database

CA databases ensure consistency and uptime across all nodes. Unfortunately, CA databases are incapable of providing fault tolerance. Partitions are unavoidable in any distributed system, so this type of database isn’t a viable option. Having said that, if you require a CA database, you can still find one. PostgreSQL and other relational databases support consistency and availability. Replication can be used to deploy them to nodes.

Databases for AP

Partition tolerance and availability are enabled by AP databases, but not consistency. In the event of a partition, all nodes are accessible, but not all are updated. For example, if a user attempts to access data from an invalid node, they will not receive the most recent version of the data. When the partition is resolved, most AP databases will sync the nodes to ensure consistency between them. An example of an AP database is Apache Cassandra. It is a NoSQL database with no primary node, which means that all nodes are available. Cassandra supports eventual consistency by allowing users to resync their data immediately after a partition is resolved.

Microservices

Microservices are loosely coupled services that can be developed, deployed, and maintained independently. They each have their own stack, database, and database model, and they communicate with one another via a network. Microservices have grown in popularity in hybrid cloud and multi-cloud environments, as well as in on-premises data centers. If you want to build a microservices application, you can use the CAP theorem to help you choose the best database for your needs.