C# Database Connection and Interaction Between C# and SQL Server DB | KoderShop

C# Database Connection and Interaction Between C# and SQL Server DB | KoderShop

C# Database connection – how to set it up correctly

Before explaining the connection let’s explain what C# and a database are.

C_databese_connection_sql

What is C#?

C# (pronounced “See Sharp”) is a modern, object-oriented, and type-safe programming language. C# enables developers to build numerous types of safe and robust apps that run in .NET. C# has its roots in the C family of languages and will be immediately familiar to C, C++, Java, and JavaScript programmers. This tour provides an overview of the major components of the language in C# 8 and earlier. If you wish to explore the language through interactive examples, consider the introduction to C# tutorials.

Programming language C# is component- and object-oriented. C# has language structures that explicitly support these principles, making C# a natural language in which to develop and use software components. Since its origin, C# has added features to support new workloads and emerging software design practices. At its core, C# is an object-oriented language. You define types and their behavior.

What is SQL Server?

SQL Server is a relational database management system, or RDBMS, created and marketed by Microsoft.

Similar to other RDBMS software, SQL Server is built on top of SQL, a standard programming language for interfacing with relational databases. SQL Server is tied to Transact-SQL, or T-SQL, Microsoft’s implementation of SQL that adds a set of proprietary programming constructs.

SQL Server works exclusively on the Windows environment for more than 20 years. Microsoft made it available on Linux in 2016. In October 2016, the Windows and Linux-compatible SQL Server 2017 versions became generally available.

Database connectivity basics

C# and. Most databases, including Oracle and Microsoft SQL Server, can be used with Net. However, the reasoning behind using each database is largely the same.

We’ll examine using Microsoft SQL Server as our database in our examples. Download and use Microsoft SQL Server Express Edition, a free database program offered by Microsoft, for educational purposes.


The concepts that apply to all databases while working with them are listed below.

  1. Connection: The connection is the first and most evident step in working with database data. The following parameters are typically included in a database connection.
  • The first crucial argument is the name of the database to which a connection needs to be made, also known as the data source. Only one database can be used by each connection at once.
  • Credentials – The username and password that must be used to login into the database are the following crucial factor. It makes sure the credentials for the login and password are valid for connecting to the database.
  • Extra parameters – You can enter optional parameters for each type of database to give.net more details about how to manage the connection to the database. For instance, one can give a parameter for the duration of the connection’s active state. If no action is taken after a predetermined amount of time, the parameter would
  1. Choosing data from the database – After the connection has been made, fetching the data from the database is a crucial next step. The ‘SQL’ select command can be used to access the database in C#. You can retrieve information from a particular database table by using the “SQL” query.
  2. Database record insertion – C# can also be used to add records to the database. For each record that needs to be inserted into the database, values can be given in C#.
  3. Database data updating – C# can be used to update already-existing records in the database. Each row that needs to be modified in the database can have new values supplied in C#.
  4. Database record deletion – C# can also be used to remove records from databases. In C#, select instructions can be used to define which rows should be erased.


Let’s move on to the following sections to examine how to carry out database operations in C# now that we have examined the logic behind each action.

SQL Command in C#

The user can query and send commands to the database using sqlCommand in C#. The SQL connection object specifies the SQL command. ExecuteReader method is used for query results, and ExecuteNonQuery is used for insert, update, and delete instructions. It is the approach that works the best for the various commands.

How to connect C# to Database

Let’s now take a look at the code that must be maintained in order to establish a connection to a database. In our example, we’ll establish a connection to Demodb, a database. Below are the credentials used to connect to the database.

Username: sa

Password: demo123

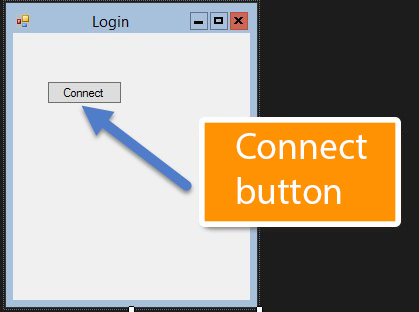
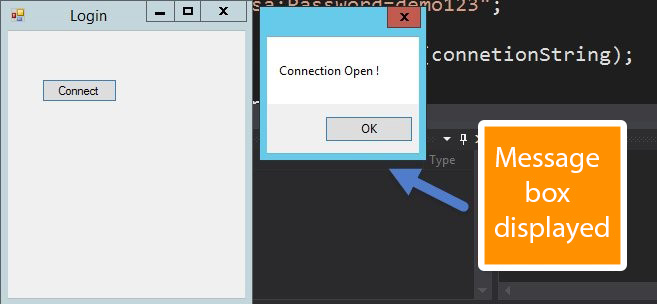
We’ll see a straightforward Windows forms database application. The database connection will be made using a straightforward “Connect” button.

So let’s take the following actions to accomplish this.

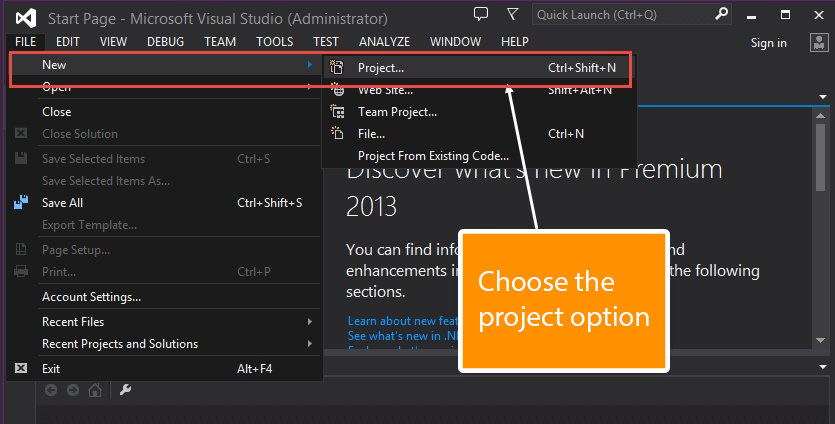
Step 1) Creating a new project in Visual Studio is the first step. After starting Visual Studio, you must select New->Project from the menu.
c_math

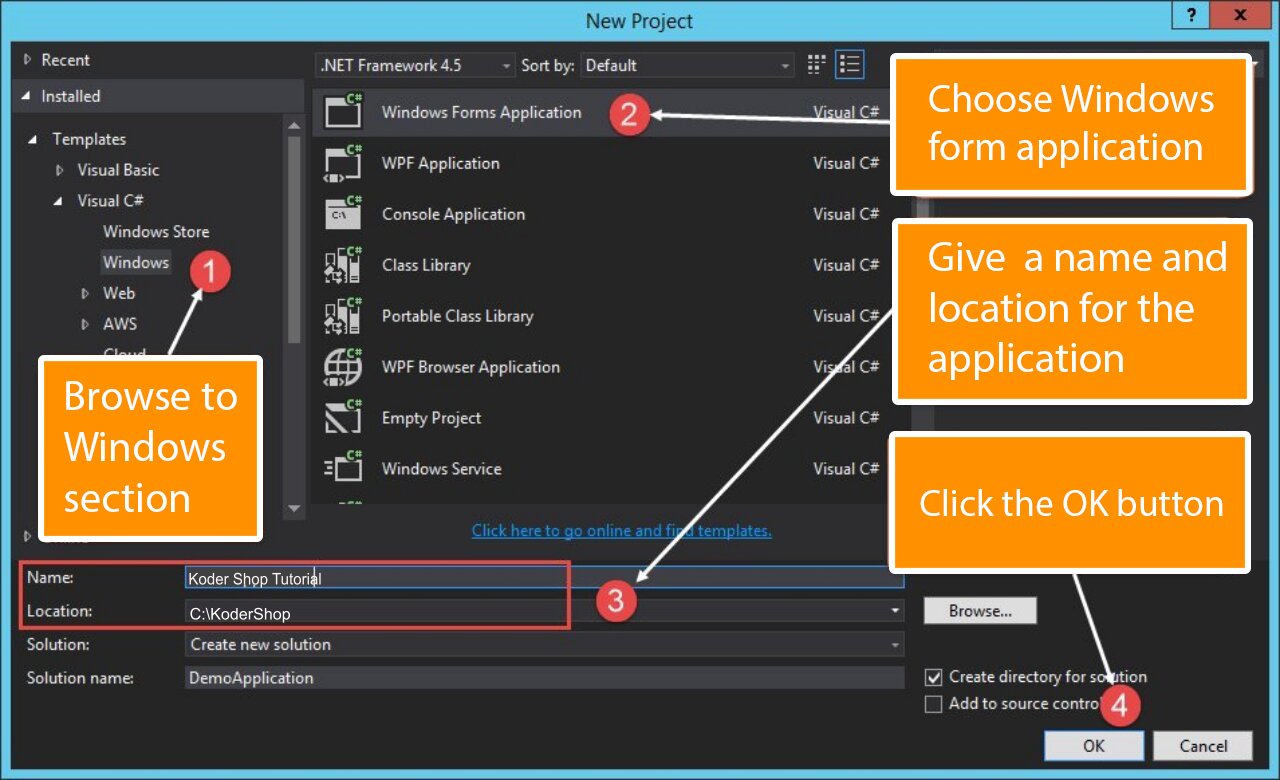
Step 2) The next step is to select a Windows Forms application as the project type. Additionally, we must state the project’s name and location here.
sql_database_connection
  • There are numerous options for creating various types of projects in the project dialog box in Visual Studio. Click the Windows option on the left-hand side.
  • We will be able to see an option for when we click the Windows choices in the previous stage.
  • Then we give the application a name, in this example “DemoApplication.” Additionally, we must give a place where our application can be kept.
  • We then press the “OK” button to instruct Visual Studio to start building our project.
connect_c_sql_server
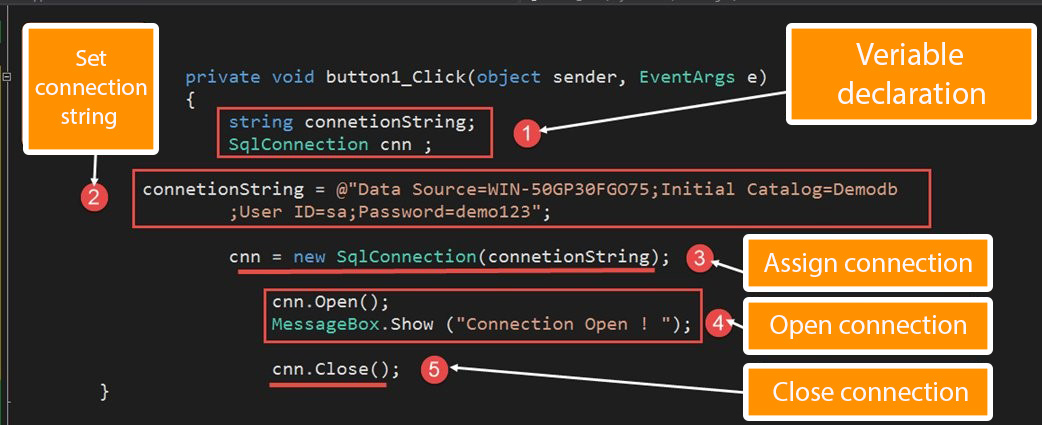
  • Step 4) Double-click the form now to add an event handler to the button and click the event’s code. Add the following code to the event handler.
sql_connection_string

using System;
using System.Collections.Generic;
using System.ComponentModel;
using System. Data;
using System.Data.SqlClient;
using System. Drawing;
using System. Linq;
using System. Text;
using System.Threading.Tasks;
using System.Windows.Forms;

namespace DemoApplication1
{
 public partial class Form1: Form
 {
  public Form1()
  {
   InitializeComponent();
  }

  private void button1_Click(object sender, EventArgs e)
  {
   string connetionString;
   SqlConnection cnn;
   connetionString = @"Data Source=WIN-50GP30FGO75;Initial Catalog=Demodb;User ID=sa;Password=demol23";
   cnn = new SqlConnection(connetionString);
   cnn.Open();
   MessageBox.Show("Connection Open  !");
   cnn.Close();
  }
 }
}

Code Explication

  1. Making variables is the first step in setting up the connection string and the connection to the SQL Server database.
  2. The connection string must be created next. In order for C# to understand the connection string, it must be properly defined. The following components make up the connection string:
  • The database’s server is identified by its name as the data source. In our situation, it is found on a computer known as WIN- 50GP30FGO75.
  • The database’s name is specified in the Initial Catalog.
  • The UserID and Password are required to connect to the database.
  1.  3. The connecting string is then assigned to the cnn variable. The connection to the database is made using the SqlConnection-type variable cnn.

    4. Then, we open a connection to the database by using the Open method of the cnn variable. The user will then only see a notification indicating that the connection has been made.

    5. We then shut down the connection to the database once the process has been properly completed. If no more action has to be taken on the database, it is always a good idea to disconnect from it.
connect_database_c
“Cook” Your Software Impressively Using Agile Sprints! | KoderShop

“Cook” Your Software Impressively Using Agile Sprints! | KoderShop

Agile sprint

Sprints in Agile project management: what are they and how to plan them

Any more or less complex topic is always better to analyze on a simple and understandable example. The field of software development operates with a lot of terms and concepts that will not always be obvious to the average user of the same software, even if they are very easy to understand if you delve a little into the topic. In this article, we will explain in simple terms what is a sprint in Agile software development, and tell what the Scrum approach has to do with it.

Agile in a nutshell

To begin with, let’s imagine that you came to a restaurant and ordered five different dishes at once for a large company. In this analogy, you are the customer of the project, and the restaurant kitchen is its performer. If you ordered only one dish, the best solution for the contractor would be to apply the classic cascade project management method (waterfall): prepare the necessary set of products → cook the dish → put it on a plate beautifully → serve.

However, we are talking about five menu items at once. This formulation of the task requires a slightly different approach, since with the cascade method each time you have to wait until one dish is cooked before starting to cook another. This is where the Agile project management method comes into play. It involves dividing a project not into phases, but into smaller projects that are executed in parallel. The iterations of these subprojects are what we call sprints. At the same time, upon completion of each sprint, all plans and requirements are tested for relevance and expediency given the results already obtained.

Put your finger on the pulse and trust: the benefits of Agile

The main advantage of Agile is that the team releases the product in batches, which allows them to respond in time to end-user feedback, market trends, etc., without violating plans for months ahead.

Agile principles focus not on indicators, but on people and their natural interaction in solving certain problems. This allows agile-team members to decide for themselves which way to accomplish the task will be most effective. As practice shows, by placing such responsibility on the project executors, companies achieve greater success, because, understanding the level of trust shown, employees make every effort to justify it.

The mistake

So, we have already said what is sprint in Agile methodology: a kind of iteration of a subproject. More specifically, this is a fixed time period in which the team completes a certain piece of a global task (whereas iteration is understood not as a period, but as a piece of work itself). But we did not specify that in the Manifesto for Agile software development, which gave the name to the whole concept, sprints are not even mentioned.

For ease of understanding, project management methods such as Scrum or Kanban are often identified with Agile. However, this is a mistake. In its essence, Agile is not a method, but a set of principles that became the basis for the formation of the aforementioned Scrum and Kanban methods.

Moreover, sprints are inherent just in Scrum, while in Kanban the process is not interrupted (we will talk about this some other time). So, the correct wording of the question is not “what are sprints in agile?”, but “what are sprints in scrum?”

How to plan and implement a sprint cycle in software engineering?

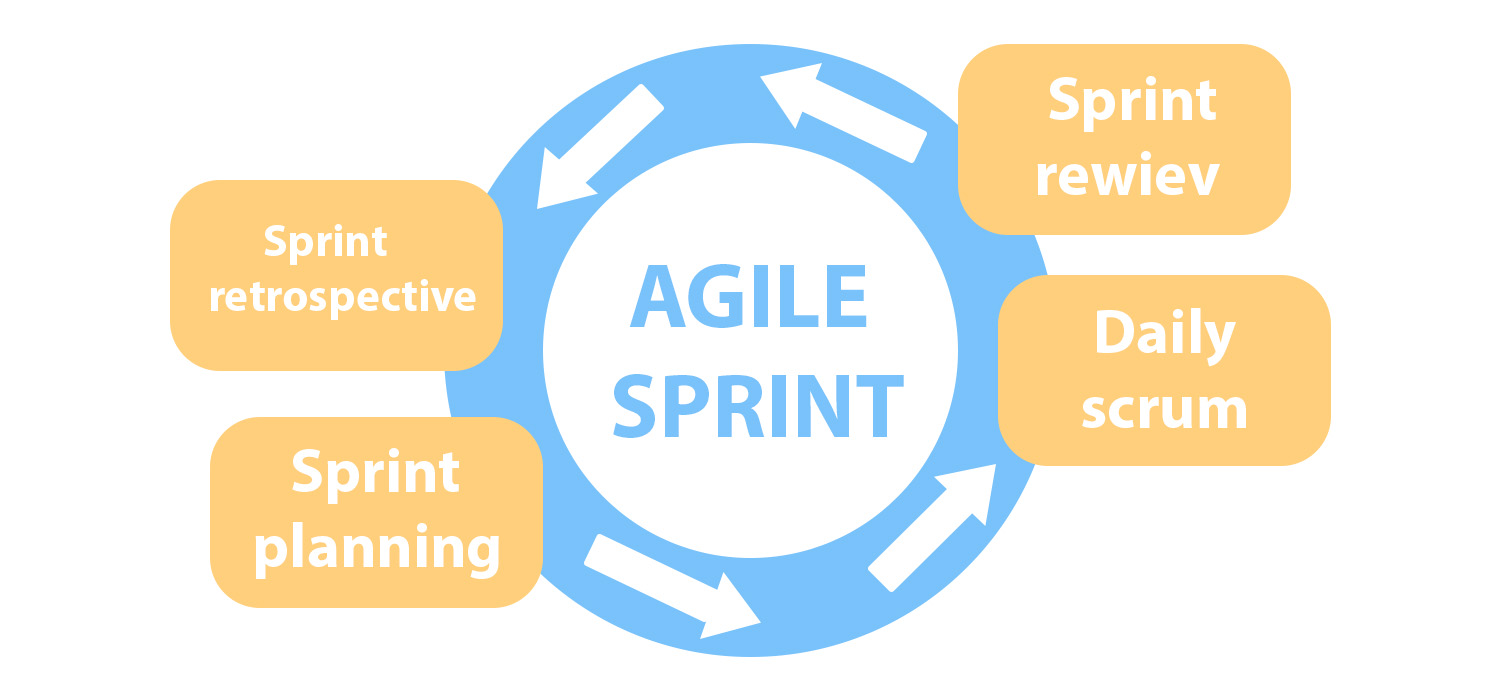
Well, we have another term here – the sprint cycle. And that’s one more thing you need to know. A sprint cycle is usually understood as the sequence of such sprint stages in Scrum:

  1. Sprint planning
  2. Daily scrum
  3. Sprint review
  4. Sprint retrospective
Agile sprint plan

Sprint planning involves a meeting in which the team is expected to answer two fundamental questions: what kind of work needs to be done within this sprint and how particularly this work should be done. The product developers` team, its owner (customer), and Scrum master are involved in this process. Together they bring out the definition of the sprint goal as well as the sprint tasks from the product backlog that needs to be done until the sprint is ended. When this is done, the developers sketch out the sprint plan. Thus, the sprint backlog is formed.

Daily scrums are daily discussions that are necessary for the timely analysis of the results of the work done and the quick identification of possible difficulties during the sprint.

A sprint review is needed to summarize the work done. At such meetings, team members show what was done and how, clarify the details, test the functionality of the product (or some parts of it), and share their opinion about the already implemented software features. That is, it is assumed that the team already has some demos by the sprint review.

For such a meeting to be fruitful, it is necessary to clearly formulate the criteria for product readiness. Most often, this is done during sprint planning, but in rare cases, the team may determine the readiness criteria as the work progresses.

Do not confuse the sprint retrospective with the sprint review. During the retro, no one analyzes the results of the sprint. Instead, the team discusses which areas need to be refined and improved in the next iteration. To some extent, the retrospective definition in Scrum is a preparatory stage for planning the next sprint.

As you can see, the sprint methodology in Scrum is not as difficult to understand as it might seem at first glance. Of course, by introducing the Scrum approach or any other direction of Agile into the workflow of your enterprise, you are unlikely to be able to immediately avoid all the difficulties. But this game is worth the candle. The main thing when implementing Agile is the correct selection of a team, and everything else will work out quickly enough.

FAQ

What is sprint backlog in Agile?

In Scrum model the sprint backlog presented as a list of tasks that the development team must complete during this sprint. It also includes a pre-designed plan according to which the performers will do the work.

What`s the difference between sprint backlog and product backlog?

Unlike a sprint backlog, a product backlog contains a list of all the tasks in a project. In the product backlog, tasks are described in order of importance, but Agile principles do not require strict adherence to this order (of course, this may vary depending on the specifics of the project). In the process of work, the team itself determines which task is more appropriate to perform at one time or another.

The basis for the formation of the product backlog is the so-called roadmaps (a document that describes the strategy for the development of your product in the long term), as well as the requirements for the product, which we have already written about here. The product backlog usually serves as the basis for the sprint backlog when it is planned.

How long is a sprint in Agile?

The Manifesto for Agile does not specify the duration of the sprint. However, typically Scrum development teams set a sprint timeframe of one to four weeks. Most often, an agile sprint lasts two weeks.

Python Return Statement Explained in Details and Practical Examples

Python Return Statement Explained in Details and Practical Examples

Python return statement

Python return statement in examples


The Python return statement is associated with functions and methods. In the body of the function to determine the value that is the result of the function, the return in Python3 is usually used (it can not be used outside a function). Execution of this instruction leads to the completion of the execution of the program code of the function. Also the value that is specified after the return statement is returned by the function as a Python result. Keep in mind that the return statement indicates the end of a function, so the statements after are not executed.

Return function Python

A function is a piece of code, that has a name, and which we can call in any place of a programm. It returns value back to a caller.

To define function in Python, you need:

  • set the name of the function;
  • describe function arguments;
  • describe the program code of the function.

The definition of a function starts with the def keyword followed by the name and arguments of a function. Arguments are listed after the function name in parentheses. Even if a function has no arguments, it needs parentheses.

Syntax of a function:

def function_name(arguments):
    a block of statements

You can use a function by calling it

function_name(arguments)

Python return example

Python function return value without arguments

def your_name():
    # The text entered by the user is remembered
    name = input("What is your name?")
    # Return variable name
    return name

Python function with return value with two arguments

def subtract_numbers(a, b):
    result = a - b
    # Return variable result
    return result

A function may or may not return a result (in the latter case it would make sense to talk about a procedure, but in Python everything is called function). If a function return in Python doesn’t have any return statements, it returns NONE. Return 0 Python is not equal to None. However, in boolean context, it means False.

Python function without return statement example:

def say_hello(name): 
    print ('Hello', name) 

You can have an expression in the return statement.

Python return command with expression example:

def subtract_numbers(a, b): 
# return result Python 
    return a - b 

Python return True or False

In functions you can return different types of data, as boolean values.

def positive_or_negative_number(number): 
    if number > 0: 
        return True 
    else: 
        return False 

Or simply use a bool() function.

def bool_value(value): 
    return bool(value) 
a = bool_value(0) 
b = bool_value(12) 
print(a, b) 
# output: False True 

Python return string

To return a string you need to use str() function. And also except words you could return numbers that convert to string type.

def str_value(s): 
    return str(s) 
a = str_value('hello') 
b = str_value(12) 
print(a, b) 
# output: hello 12 

Python function return multiple values in a single return Statement

In Python, you can use the return statement to return multiple values from a function.

There are different ways to do it.

1. Using Tuple

Tuple is used to store multiple values in a single variable. Still you can use it without creating a separate variable, simply writing several comma-separated values in the return statement.

def fun(x):  
    y1 = x * 4 
    y2 = x + 2 
# Return tuple 
    return (y1, y2) 
t = fun(3) 
print(t) 
# output: (12, 5) 

2. Using Dictionary

Dictionary is a collection, which is used to store data values in key:value pairs. In Python to create a dictionary you need to place values in curly brackets.The dictionary is an unordered set of elements. However, unlike a set, each element of a dictionary is “identified” in a special way.

def first_dict(): 
    d = second_dict(); 
    d['str'] = "string" 
    d['i']   = 1 
    return d 
d = first_dict() 
print(d) 
# output: {'i': 1, 'str': 'string'} 

3. Using List

For this, you need to write an array of items using square brackets. Arrays can store different types of items that are ordered and can be changeable. The last is the difference from tuples, because tuples can not be changeable.

def first_list(): 
    second_list = [] 
    for i in range(3): 
        second_list.append(i) 
    return second_list 
print(first_list()) 
# output: [0, 1, 2, 3] 

4. Using Data Class

A technique of adding methods to a class that was defined by a user is called Data class. In this method, you use data classes to return multiple values. Also it can return a class with automatically added specific methods.

from dataclasses import dataclass 
@dataclass 
class Food: 
    Name: str 
    Cost: int 
    Amount: int = 0    
    # Python class returns total cost     
    def total_cost(self) -> int: 
        return self.Cost * self.Amount  
food = Food("Apple", 30, 4) 
x = food.total_cost() 
print(food) 
print("Total cost:", x) 
# output: Food(Name='Apple', Cost=30, Amount=4) 
# Total cost: 120 

Python function return another function

In Python a function is an object, so you can also return another function from the return statement. To do that, you can define a function inside another function.

def fun1(a): 
    def fun2(b): 
        return a + b 
    return fun2 
x = fun1(20) 
print ("The value is", x(80)) 
# output: The value is 100 

A function that is defined outside the function also can be returned with the Python method return statement.

def fun1(a): 
    return a - 20 
def fun2(): 
    return fun1 
y = fun2() 
print ("The value is" y(100)) 
# output: The value is 80 

Python print return and difference between them

Print() function is used to display messages onto the screen.

Python return function is used to return a result of a function back to the caller. Also when the return statement is used in a function the output can be used again, but with print function it can not. Also the return function can not return print, because it only returns a value, not a function.

Example of a function that includes print():

def say_hello(name): 
print("Hello", name) 
say_hello("World") 

Here is output:

Hello World 

Example when Python return value from function:

def say_hello(name): 
    return "Hello " + name 
greeting = say_hello("World") 
print(greeting) 

An output is same as before:

Hello World 

In order to display the value of the function on the screen, you need to store it into a variable and then use print().

Printing and returning are completely different, because printing is used to display value on the screen for you to see and the second giving back a value that you can continue to use.

Summary

Today you learned the Python return statement. It is one of the important parts of any Python function or method. This statement allows you to return any object you want from functions. Also it is possible to return one function from another and return multiple values by tuple, dictionary, lists and data class. Definition and using functions is a central component of Python programming in general.


Negative Testing As a Necessity in Software Testing | KoderShop

Negative Testing As a Necessity in Software Testing | KoderShop

Negative testing

Negative Testing definition and using


Software testing focuses on determining whether or not an application complies with the requirements. To finish the process, we might need to utilize a variety of software testing techniques, including functional testing, unit testing, integration system testing, system testing, smoke testing, regression testing, and sanity testing.

Writing lengthy and sophisticated programs, then testing them to ensure flawless and consistent operation, is what makes software development a difficult task to complete. Software testing is a crucial component of writing effective code, as we all know.

But each of these fell into one of the following two categories:

  • Positive Testing
  • Negative Testing

The following subject pertaining to the specific testing method known as negative testing.

What is Negative Testing?

Negative testing definition: It is a special kind of software testing method intended to assess the system for unexpected events. In the creation of high-performance software, it is crucial.

By providing the system with the incorrect data during this test, it is permitted. A negative test looked at how well an application performed given its unfavorable inputs.


Testing Results

Negative vs positive testing

Negative testing is mostly used to determine whether the performance of the software will be affected by such unforeseen circumstances.

Negative testing, in other words, is used to ensure that the software product being tested DOES NOT fail when an unexpected input is presented. It is often referred to as error path testing or failure testing.

Towards What Is Negative Testing Designed

  • Negative testing is carried out with the main goal of interrupting the system and verifying the application’s response to unexpected inputs.
  • Negative testing is carried out to ensure that software functions appropriately and optimally, even when the user behaves inconsistently by entering inaccurate data.
  • We will use negative testing to ensure the application’s resistance to the effects of many versions of an incorrect validation data set.
  • It aids in bug discovery and improves the functionality of the software program under test. However, the negative testing is carried out after the positive testing has been put into practice.

Attributes of Negative Testing

Here, we’ll talk about some of the crucial traits of negative testing, which include the following:


  • Negative testing can be used to assess potential security breaches and unique handling techniques.
  • Negative testing is performed to analysis the application against the failed circumstances.
  • By supplying malicious data, it is intended to undermine the system and cause a software product to malfunction.
  • It is done to find the flaws that could lead to crucial breakdowns.
  • Negative testing is carried out to reveal data loss or security breaches.
  • A test engineer typically has the task of achieving the negative testing.
  • We will do negative testing to identify the software vulnerability and potential for exploitation.
  • Negative testing is used to ensure the stability of an application or software product after being exposed to input values that are outside of the acceptable range or that contain erroneous data.
  • It is used to identify the major flaws, defects, and weak points that led to its failure.

Why is it necessary for us to conduct negative testing?

Negative testing software is used to carry out any kind of testing activity is an expensive and time-consuming task. Therefore, we must decide wisely whether to incorporate negative testing into our system or not.

Here, we discuss why negative testing is necessary for the specific application by taking into account the following customer and organizational safeguards:

Negative testing needs

Customer’s point of view

In order to satisfy the customer’s expectations, implementation of negation testing makes sure to produce a solution that is bug-free and vulnerable in no way.

  • When an application is essential, like e-commerce or online stock, negative testing is required.
  • The client’s sole focus during the negative testing is on the expense. However, it is up to the customer to decide whether to do negative testing or not when the effect is assessed.

Company’s point of view

  • The firm is accountable for providing its customers with high-quality products. Negative testing is necessary in order to achieve this.
  • The negative testing is necessary from a business’s perspective in order to validate against a failure.
  • Because we can’t always promise to create a bug-free system, negative testing is necessary to make sure that everything is being done to prevent a failure.
  • Due to the fact that there are several hackers out there waiting for an opportunity to compromise the system, by carrying out the negative testing, we can also cover the crucial cases of hacking.

Negative testing cases:

1. Enter characters into an input field that are not permitted.

Unacceptable characters being entered into an input area is likely the most popular negative test. When a user types in an unsupported character, an error message ought to appear. A username field, for instance, might not support the @ symbol.

A warning message appears when a user attempts to submit a registration with an incorrect character, alerting them of the need. Testing this case enables us to confirm:

  • The field requirements message is displayed.
  • No processing of the registration is done.
  • No other errors are shown.
  • There is no app crash.

2. Submiting without adding text in a required field.

Another straightforward example is the lack of any text input in a mandatory field. You can do a negative test by leaving a necessary field blank and attempting to submit the form. In this scenario, we check the same three things:

  • The notice about field requirements appears.
  • The registration was not completed.
  • Other unanticipated errors are not displayed.


3. Make a button link with an incorrect URL.

Assume you’re testing a new feature that contains a button that redirects the visitor to another site or page. When you provide a valid URL for the selected button in the CMS (Content Management System), the user clicks the button, which opens the desired page. What if the URL contains an error? This is a textbook case of a negative test case. To test, enter an incorrect URL for that button in the CMS and save it. We can then learn a variety of things:


  •  Does the CMS save the update with the incorrect URL?
  • What happens when you click the button if the CMS saves the incorrect URL?

  • Is the app crashing?

  • There are a few places where we might find an error in this situation. When we click the button, we may notice an error in the CMS or a 404 error message.

4. Make an attempt to leave a remark without first logging in.

We’ll test a number of positive situations after logging in to validate the functionality of a comment area. One negative test would be to try to leave a remark before logging in. If a user posts a remark and then clicks submit before authenticating, an error notice should appear advising them of the issue. While testing, we must ensure that the comment was not lost by validating the following:


  • An appropriate authentication error message appears.
  • The comment wording stays.
  • Any other unusual error is not displayed.
  • The application does not crash.

5. Check for the presence of a 404 message after removing a page.

When a user attempts to view a web page that has been purposely removed, a specific behavior should occur. In some circumstances, a redirect manages the expectations that the missing page has established. Alternatively, the anticipated behavior may be the display of a 404 error message beneath the website’s navigation bar. We must inform the user that the page has been removed on purpose, and we also want them to use the navbar to reach other pages on the site. The user may have attempted to reach this lost page by following an old link posted on social media or by bookmarking the URL. In any scenario, the expected behavior must be validated:


  • There are no unexpected errors displayed.
  • The expected 404 error message with the regular page layout, including the site menu, must be present.

The Benefits of Negative Testing

The following are some of the key advantages of negative testing:


  • It will boost the client’s confidence before going live.
  • It increases the likelihood of covering all bases and detecting all types of errors that can occur as a result of inconsistent human behavior.
  • As we all know, negative testing is highly important for ensuring a product’s quality because a good quality product or application is termed a zero-vulnerability product.
  • It also assures that all conceivable situations are covered during the execution of negative testing because, intentionally or unintentionally, negative test cases are possible. To guarantee that all test cases are covered, we must run one round of negative testing followed by positive testing.

Negative Testing’s Drawbacks

However, while negative testing is beneficial for application enhancement, there are some drawbacks to negative testing, which are discussed below:


  • Negative testing necessitates a waste of time, money, and effort.
  • It creates significant delays in the launching of a software product or an application for the customer.
  • Negative testing requires the development of negative test cases by a professional and experienced test engineer.
  • Negative testing can be a time-consuming process in software testing. Furthermore, there is no need to perform unnecessary negative testing in a variety of conditions.
  • If the software is just designed for single-person use, we don’t have to consider the possibility of 50-100 end users using the application at the same time. As a result, in critical circumstances, negative test cases are extremely important. There will be situations when we do not need to conduct negative testing on a certain software product.

All in all

After reviewing all of the relevant negative testing issues, we can conclude that negative testing ensures that the provided product is free of flaws and that the customer may use it responsibly.

A creative, skilled, perceptive, and clever test engineer is required to build extensive and powerful negative test scenarios.

As we all know, every software development firm wants to have capable and durable software that can withstand harsh negative testing.

People frequently believe that negative testing is just another way to increase costs without providing any benefits. This is an important consideration because it may jeopardize the quality of the final software product.

Finally, we can say that by utilizing Negative Testing, we can improve quality of the software and make it stronger.

AWS Lambda – Serverless Approach Framework overview | KoderShop

AWS Lambda – Serverless Approach Framework overview | KoderShop

What is AWS Lambda?

AWS Lambda services
AWS Lambda

Introduction to AWS Lambda Service

Amazon Web Services (AWS) is one of the world’s most prevalent cloud platforms, providing over 200 full-featured services to data centers around the planet.

AWS Lambda is a serverless technology that allows you to run code without the need to administer servers. The code can be written in the AWS Management console, downloaded as a ZIP file, or as a container. The Lambda code can be executed after you manually run it, or automatically after some event. 

Lamba Triggers:

The trigger for running AWS Lambda can be:

  • lifecycle events, such as with Amazon Simple Storage Service;
  • events like S3 bucket data change, DynamoDB update;
  • response to input HTTP requests, for example, using Lambda with API Gateway;
  • scheduled Lambda function AWS using Amazon EventBridge (CloudWatch);
  • trigger an event from an Amazon SQS queue. (can be used to process orders in online stores;
  • and etc.

Benefits of Amazon Lambda:

  1. Everything is recorded in logs that you can review at any time.
  2. Lambda languages ​​are almost the complete modern technology stack. At the time of writing, the following languages ​​were supported (.NET 6 (C#/PowerShell), .NET Core 3.1 (C#/PowerShell), Go 1.x; Java 11 (Corretto), Java 8 on Amazon Linux; Node.js 16 .x, 12.x, 14.x; Python 3.9, 3.8, 3.7; Ruby 2).
  3. Payment for the use of only resources for the duration of the function.
  4. Easy to set up. Prepare the necessary script, create a function, and select a trigger to run.

Payment for Using Lambda AWS Serverless Functions.

You are only billed for the resources you use. The cost is calculated depending on the number of feature requests and their duration (the time your code is used). The Lambda code usage time is calculated from the start of the code execution to the return of a value or termination of work for another reason, rounded to a multiple of 1 ms. The price depends on the amount of RAM allocated to the Amazon Lambda function.

In AWSLambda functions you can choose the amount of memory it will use. By this choice, CPU power and other resources are also assigned. So the memory can be selected from 128 MB to 10,240 MB in 1 MB increments. At 1769MB, the function is equivalent to one vCPU (one vCPU-second of credits per second).

The free tier includes 1 million free requests per month and 400,00 GB of computing seconds per month, which can be used on both x86 and Arm processors. There is also a multilevel pricing model (Savings Plans). Which provides for a reduction in payment for using the service, subject to the mandatory use of a constant amount of Lambda computing resources (measured in USD / hour) over one or three years. Savings are achieved through duration and Provisioned Concurrency.

If the Amazon Lambda function will use other AWS resources, then you need to create an IAM Role that the function will use. There is a separate Lambda@Edge service. It works as an add-on to the Amazon CloudFront service. As a result, you can run your code in AWS locations closer to your users. Which improves system performance and reduces latency and allows you to make your applications globally distributed. The cost of use is calculated for the number of requests and the resources used. The AWS website has pricing examples.

For example, if the Lambda@Edge function is executed 10 million times a month and each execution takes 10 ms, the cost would be:

Total Charges = Computing fees  + Request fees  = $0.63 + $6.00 = $6.63 per month.

How Do You Get Started Using Lambda in AWS?

If you do not have an AWS account, you can create one and use certain products and services for free within certain limits for 12 months. This allows you to test applications for free to understand the technology and choose the solution that is best for you.

When registering, be sure to provide your credit card details. You need to keep track of the resources used so as not to exceed the values ​​provided by the free tier. You can do this by periodically reviewing the AWS Billing Dashboard.

You can also control costs using AWS Budget. Namely:

  1.  Monitor certain AWS services.
  2.  Control your expenses so that they do not exceed a certain threshold. If the amount exceeds the threshold, then you can set up notifications through the AWS SNS service to receive SMS to the phone, and E-mail notifications, using the AWS Chatbot service (communication service) send a message to Slack. You can also set up the automatic shutdown of instances (servers), etc.
  3. Control of the percentage of resource use.  If there is a fixed charge, for example for reserved resources, you can find out the usage percentage of those resources.

Before getting started with AWS services, I recommend setting up AWS Budget to control your spending. In a few clicks, you can set up an e-mail alert when spending exceeds the threshold you set.

AWS Lambda Example

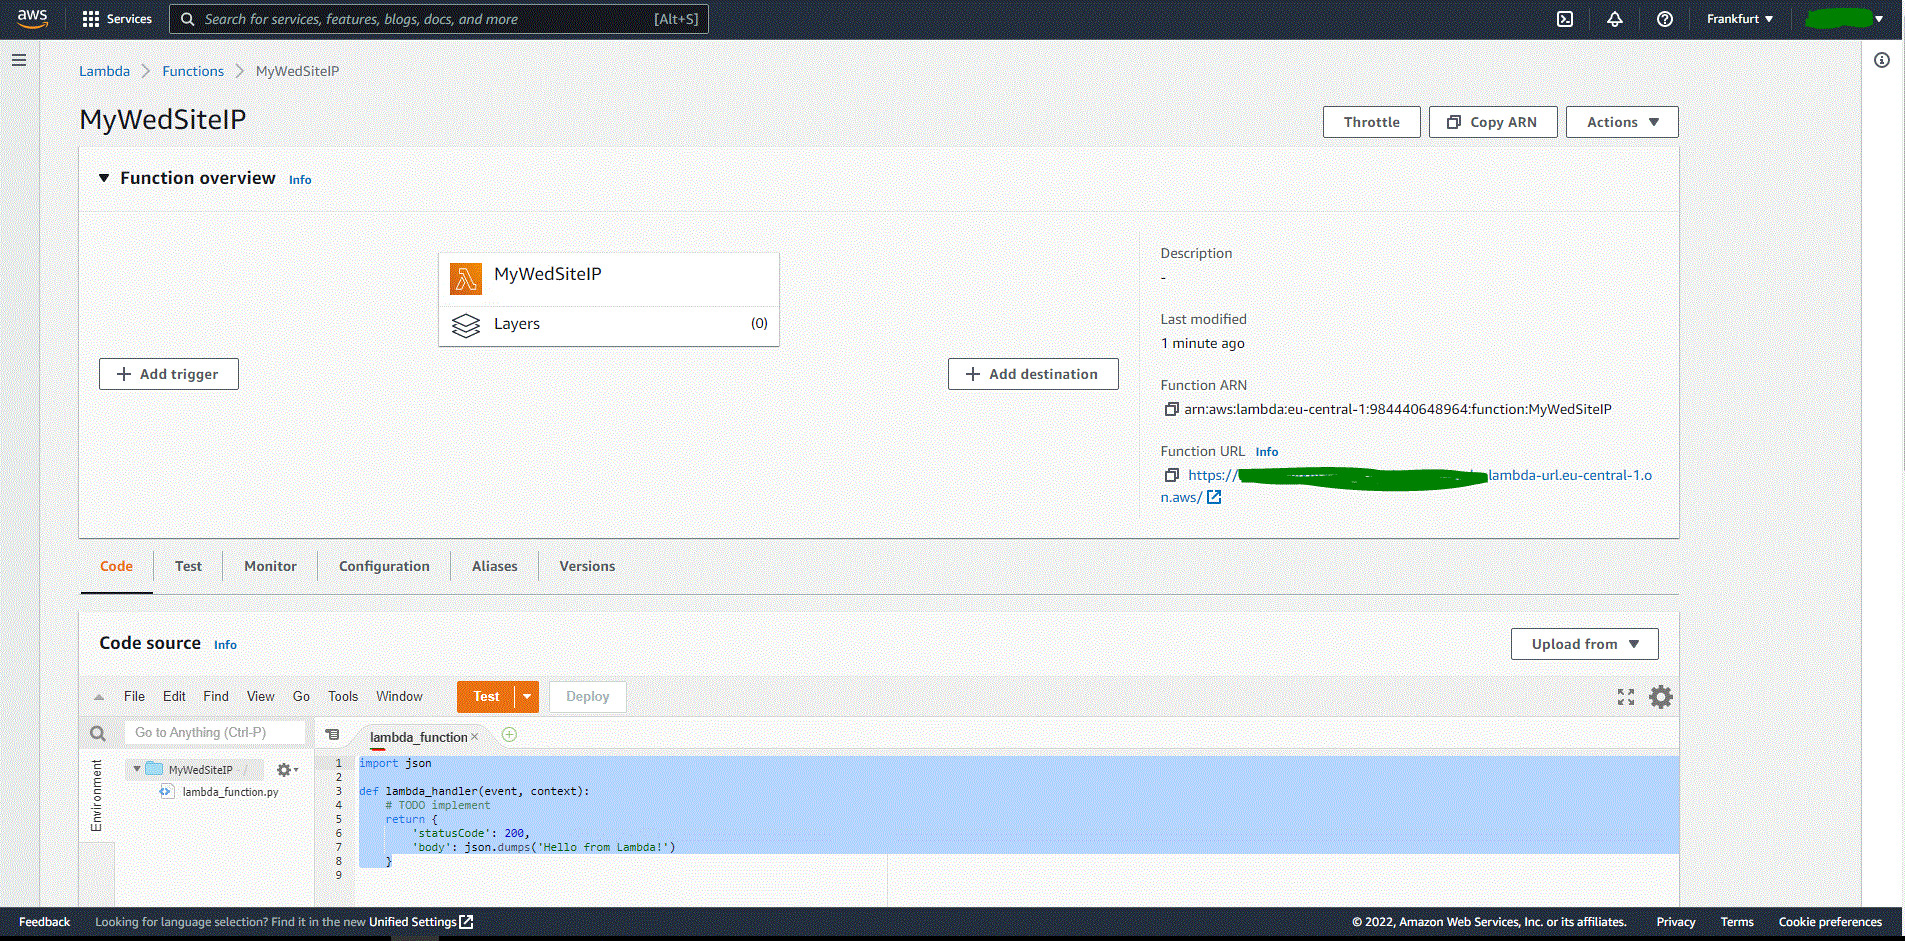
I will provide an example of how to quickly deploy a simple web page in the AWS console. The page expands within two minutes. First, we go to the AWS console, look for the Lambda AWS service, and select the region we need. 

AWS Lambda example

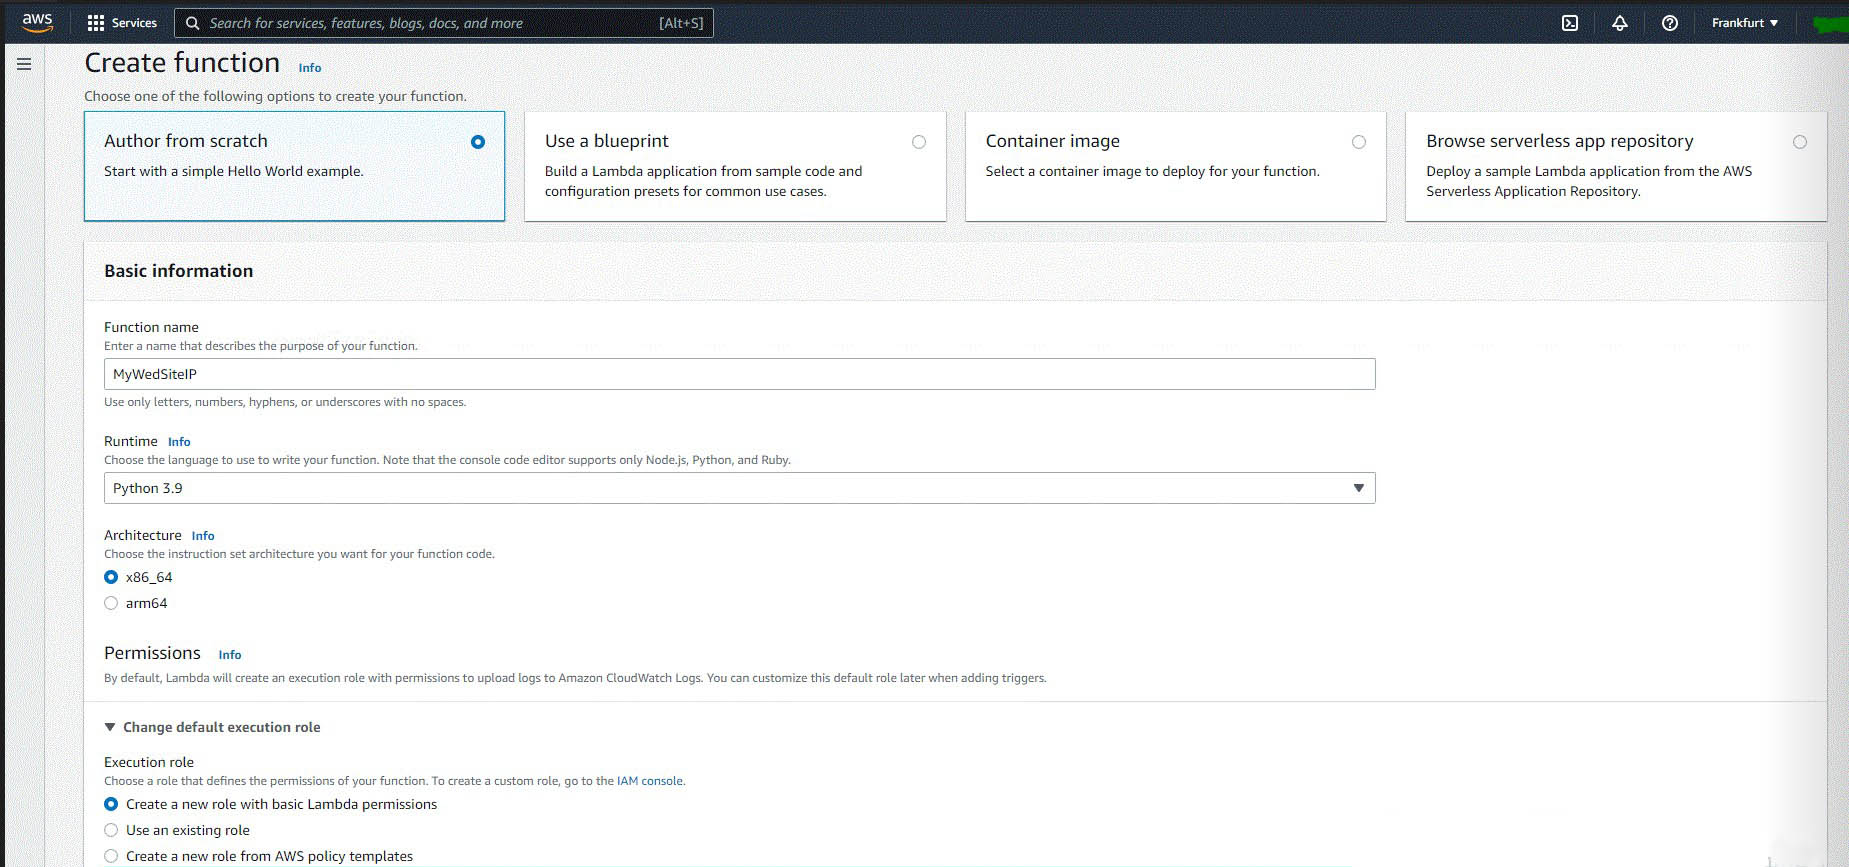
The region should be chosen taking into account where most of your customers are located.I chose the region Europe(Frankfurt) eu-central-1. Click Create Function.

AWS Lambda example 2

In “Advanced settings” check “Enable function URL”. If in “Auth type” select “NONE”, then all users, when they click on your URL, can run your Lambda function. Enabling Tags and adding it to an AWS resource allows you to quickly allocate resources that belong to a specific group later. Next, click “Create function”.

AWS Lambda example 3

Here in the “Lambda_function” tab paste your code (in our case, in Python 3.9).

Lambda Function

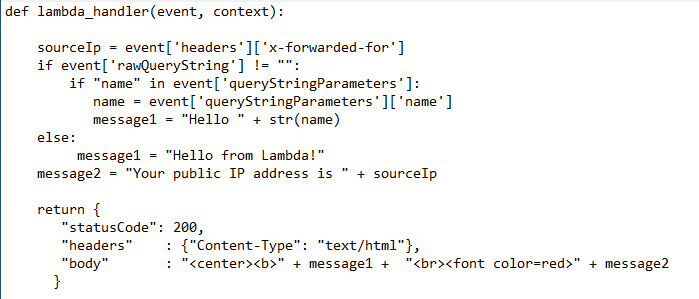
AWS Lambda function example

Short description of the Python code:

In source IP, we write the IP address from where the request came from .Checking rawQueryString – passing additional parameters in the request. If there is an additional parameter called Name, then the response will be “Hello <Name parameter value> Your public IP address is …….. “If there are no additional parameters, then the response will be “Hello from Lambda! Your public IP address is ……”. To write the code to our function, you need to click “Deploy”. Also, the code can be uploaded in a .zip file by clicking “Upload from”. There is a file upload size limit. For files larger than 10 MB, consider uploading using Amazon S3. Now when you click on the “Function URL” link https://<URL-ID>.lambda-url.eu-central-1.on.aws We will go to our website, which will indicate your public IP address.

Also, the code can be uploaded in a .zip file by clicking “Upload from”. There is a limit on the size of the uploaded file. For files larger than 10 MB, consider uploading using Amazon S3. 

Now when you click on the “Function URL” link https://<URL-ID>.lambda-url.eu-central-1.on.aws/We will go to our website, which will indicate your public IP address.

Amazon Lambda

If we pass an additional parameter with URL name=Robert

https:// <URL-ID>.lambda-url.eu-central-1.on.aws/?name=Robert

We get it in a web browser

Amazon Lambda 2

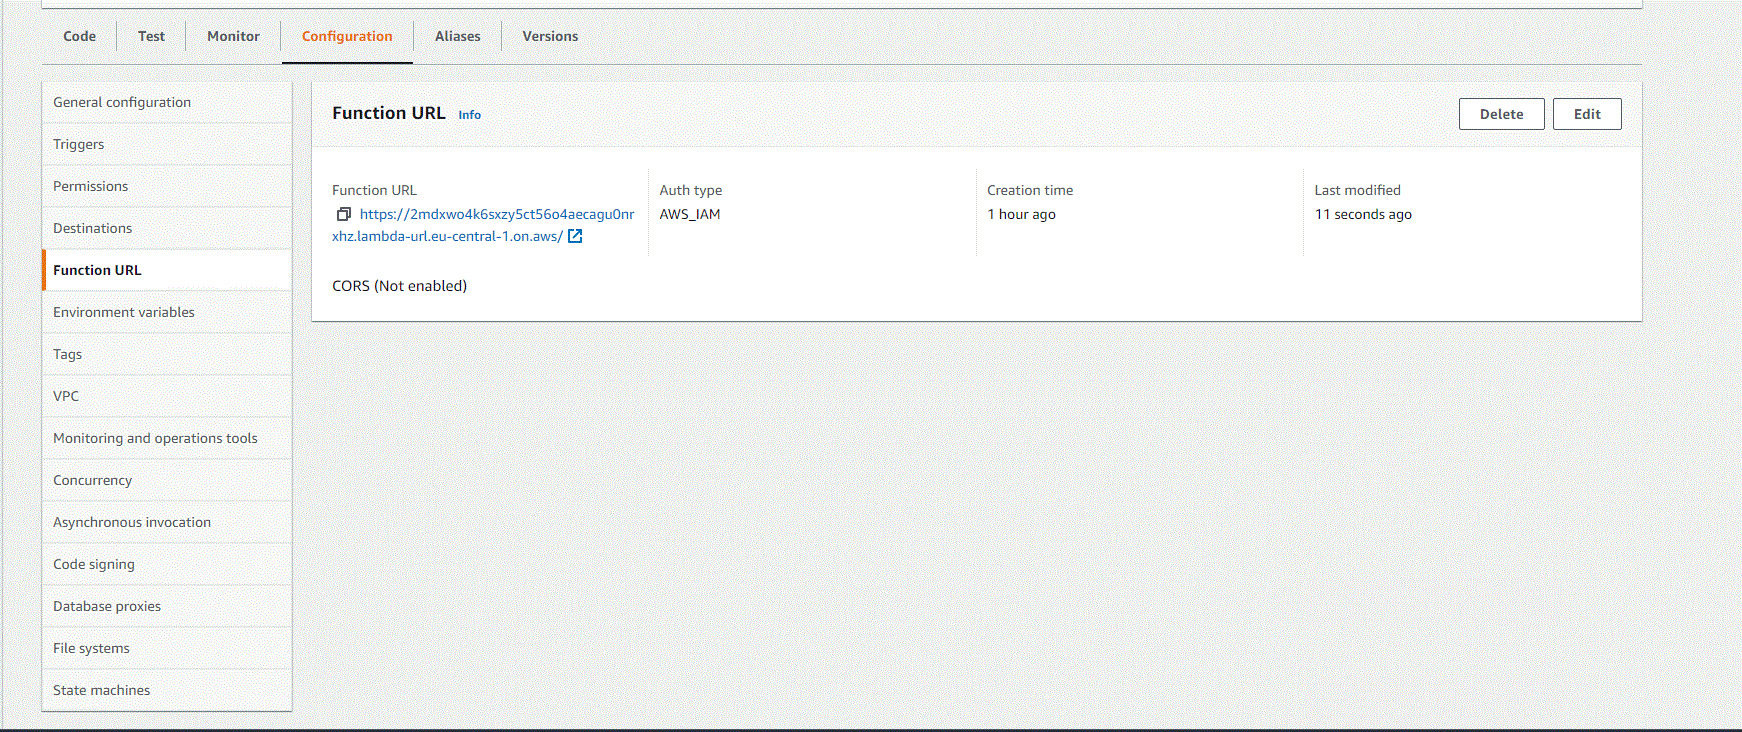
We can always change the settings in the Function URL and change the “Auth type”. For example, by selecting “AWS_IAM”. Only authenticated IAM users and roles can make requests to your function URL

Amazon Lambda example

 The deployment of your site is very fast. Within 2 minutes you get your simple website.

If you want to use Lambda to work with AWS services to get information about created AWS resources and manage them (create, delete, stop, start).

Then you need to grant additional permissions to the AWS Lambda function.

 Conclusion

In this article, I briefly described what AWS Lambda is and gave an example of its use.The AWS Lambda function is a very powerful tool for working with AWS services. With it, you can better configure your systemIf you will be using AWS, be sure to try using AWS Lambda functions.