What do you mean by a Unit test?
In the process of developing software, unit tests basically check that discrete pieces of code, often known as units, function as intended by the author. A unit test is a piece of code created by any programmer to test discrete functionalities of larger programs. A “UNIT” in this sense is the smallest component of the vast code part that makes sense to test, typically a method out of numerous methods of some class. Unit testing is always intended to be basic. The test cases are typically expressed as functions that evaluate and assess whether the result returned after running a unit test is equal to the value you anticipated when you wrote the function. Unit testing’s primary goal is to isolate a single piece of code and ensure that it is dependable and correct.
What Unit Testing Is?
Let’s think about what genuinely qualifies now that that is out of the way. Specific pieces of your code are isolated and tested via unit tests. Okay. I’ll admit that I just punted by defining a term with a word already included in the phrase. But in order to span linguistic barriers, the term’s designers purposefully left the designation unclear.
A unit is similar to a method in C#. So, by creating something that tests a method, you create a unit test, and it isolates testing a single aspect of that approach. You shouldn’t make a program called TestAllTheThings and then call each method in a namespace.
That’s all there is to it, basically. You’ll see that I’ve left off certain items that may have come to mind, including test-driven development (TDD), unit test frameworks, test runners, mocks, or other unit testing tools. Let’s avoid jumping the gun. TDD and mocks are independent topics, so put them off till later. For now, disregard test runners and frameworks. Although we’ll discuss them, a unit test isn’t technically speaking required to have them.
Unit Testing in C#: The Simplest Example
Let’s assume that my sales pitch was successful. At the very least, it convinced you to keep reading. Most instructors would begin by giving you a formal description of unit testing at this point. I won’t employ that strategy because I want to demonstrate to you how simple the notion can be. For the time being, disregard test projects, unit test runners, and everything else that makes you think, “Maybe tomorrow.” Here is the unit testing in the familiar and beloved plain old C#.
Consider the following killer implementation that you created.
public class Calculator
{
public int Add(int x, int y)
{
return x + y;
}
}
How would you put it to the test? If this device operated some sort of GUI, you could open it, enter two numbers, and examine the output. “I entered 15 and 20 and get 35, which appears correct.”
However, it takes a lot of manual labor to do that. Additionally, it doesn’t endure after your manual testing attempt. What if you created an automatic verification program? What if you carried out such an action?
static void Main(string[] args)<br>{<br>var calculator = new Calculator();<p></p>
<p>if (calculator.Add(15, 20) != 35)<br>throw new InvalidOperationException();<br>}</p>
This could be done fairly easily. You create a new console project with a reference to your code and place it in the same solution as your Calculator class. You may now execute this code whenever you want by writing it in Main. All appears well if it leaves without incident. If you attempt to execute this and receive an exception, someone has modified the Add() method and broken it in some way.
Unit Testing in C# done in the right way
This idea of automated unit testing is actually quite straightforward. And this demonstrates where the custom originated. The ability to automate code checking became clear to developers. Developers that they were, they quickly began creating several frameworks for this. Now that you know how and why they achieved that, you can understand how unit tests function when they are used in a conventional manner.
Consider the Main code from earlier. What occurs if you want to include more test cases? That method becomes disorderly as you continue to pack more and more code into it.
Even if you separate the checks into their own methods, running them still makes it difficult to figure out what went wrong and why. And how are you going to execute all the elaborate tasks that people perform, such as integrating this into your build?
This could be done fairly easily. You create a new console project with a reference to your code and place it in the same solution as your Calculator class. You may now execute this code whenever you want by writing it in Main. All appears well if it leaves without incident. If you attempt to execute this and receive an exception, someone has modified the Add() method and broken it in some way.
Tutorial on implementing Unit Testing
Let’s stay entirely within Visual Studio to keep things as straightforward as possible. Although you have a Calculator class, you want to put it to the test. And you want to fully test it without including your own custom test-running methodology.

You create a class:
public class Calculator
{
public int Add(int x, int y)
{
return x + y;
}
}
You have a single class, Calculator as seen above. You still need to test it, if only to prove your rightness to others.
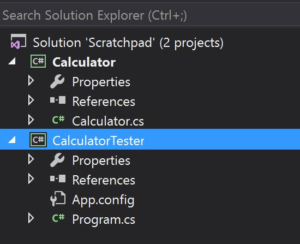
To accomplish this, let’s add a new console project and reference the project that contains calculator in the manner shown.

Now, let’s do the following in the main of the Calculator Tester.
class Program
{
static void Main(string[] args)
{
var calculator = new Calculator();
int result = calculator.Add(5, 6);
if (result != 11)
throw new InvalidOperationException();
}
}
Congratulations! You’ve just written your very own unit test!

Unit Testing Best Practices
Arrange, Act, Assert
Now let’s think about a different kind of unit test anatomy. Here, I’m referring to the logical elements of an effective unit test. They are in their most fundamental form on the test I wrote. Given the title of this section, it may not come as a surprise that those elements are “organize, act, and affirm.”
To grasp the true meaning of this, make extensive use of the scientific method. Think of your test as an experiment and your test run as a hypothesis. With inputs of 4 and 3, we predict that the add method will return 7.
We first set up all of the equipment we will need to conduct this experiment. Very nothing needs to happen in this situation. We only create an object called a calculator. In other, more complicated situations, you might need to execute a specific constructor or seed an object with some variable values.
After the preparation, we take action. In this instance, we use the add method and record the outcome. The unit testing show’s main attraction is represented by the “act.” Everything before it is preparation, and everything after it is reflection.
And finally, we claim. That one was probably disclosed by the Assert class’s invocation. However, you cannot omit a broad category of action and still have a unit test because the assert idea in the unit test represents it. It backs up the hypothesis directly. The essence of testing is asserting something.
One Assert Per Test Method
Veterans of a particular testing methodology who have experience with unit testing may criticize me for this, but so be it. Although not everyone will necessarily concur, I think you should aim for one assert per test method. Each test formulates and states a hypothesis. (The contrary position would contend that several claims can serve to indicate a single hypothesis.)
I won’t go so far as to claim that a test should never have more than one assertion. However, I will note that the test-to-assert ratio in your unit test suite needs to be pretty darn close to 1.
Unit tests Beginners frequently commit the error of using one test method to evaluate everything. After all, it makes sense to do further tests. This motivates them to assert a lot of things in order to maximize their return on investment with each test.
But keep in mind: experiment, hypothesis. Consider examining the test’s output from the test runner. Even if you claim 20 things, there is still only one failure. How will you be able to tell which of your 20 assumptions failed and what went wrong at a glance?
Avoid Test Interdependence
There should be a setup and teardown procedure for each test. The test runner will carry out your instructions in any order it sees fit, and depending on the particular runner you employ (advanced topic), it may even carry out the instructions simultaneously.
As a result, you can’t rely on the test suite or the class you’re evaluating to keep its state consistent across tests. However, it won’t always be evident to you.
For instance, the test runner can choose to run your tests in the same order each time if you have two tests. You could become dependent on this after being given a false sense of security.
A few weeks later, adding a third test disrupts the balance, causing one of your tests to start failing intermittently due to the ordering.
You’ll be frustrated and perplexed by this. At all costs, avoid this reliance.
Keep it short
I’ve been down this road before and experienced the pain. The urge to abstract test setup (also known as “the arrange”) into other classes should be resisted, especially the urge to abstract it into a base class. Although I would argue that base classes are never acceptable in this context, I won’t say that you’ll never find this abstraction appropriate. Instead, look to avoid it.
It makes sense in this case. You want to know what went wrong when a test fails. Therefore, you want a test where all of the setup logic is immediately apparent. You’ll have a big treasure hunt on your hands if your logic is dispersed throughout the class or spread out throughout different classrooms.
Add to the build
The post will be concluded with what is likely the most significant best practice. When your codebase contains only one test, get started on this one right away because you are just beginning your unit testing journey.
Add the execution of your new unit test suite to the build if your team uses a continuous integration process. The build fails if any tests are unsuccessful. No ifs, ands, or buts, and no exclusions. On this one, believe me. If your team’s development isn’t halted by unit test failures, ultimately, as the pressure to deliver increases, your team will begin to ignore the failures. It is a matter of when, not if. Learning unit testing and perfecting it take time. At first, achieving that mastery will seem exceedingly difficult, but if you don’t put everything on the line, you’ll never succeed. Make your writing count if you’re going to do it.
This Is Only the Beginning
Hopefully, you now have a fundamental grasp of unit testing in C#. The core idea is really straightforward and effective. Don’t let the experiences and technologies that have been added on top of it divert your attention from it.
However, keep in mind that in the decades since its introduction and automation, the world has learnt a lot about unit testing. Although you now grasp the basics, there is still a lot of learning and practicing that needs to be done. There is no better time to begin than right now.