In today's fast-paced business landscape, managing payroll and employee data efficiently is critical for organizations of all sizes. Odoo, an open-source ERP system, offers a robust suite of tools to streamline these processes through its Payroll and Employees modules. Whether you're a startup or a global enterprise, mastering these modules can revolutionize your administrative workflows. They automate repetitive tasks, ensure compliance with regulations, and minimize errors, saving valuable time. From onboarding new hires to generating precise payslips, Odoo provides a scalable, user-friendly platform tailored to your business needs. This article will guide you through setting up detailed employee contracts, calculating payslips, and integrating with local tax rules, empowering you to optimize your HR operations with Odoo.
Odoo's modular architecture is a key strength, offering extensive customization to fit your company's requirements. The Employees module manages essential data such as personal details, job roles, and performance metrics, while the Payroll module handles salary calculations, deductions, and reporting. Together, they eliminate data silos, a common challenge with fragmented software that leads to inconsistencies and compliance risks. By centralizing information in a single database, Odoo simplifies tracking an employee's lifecycle from hiring to offboarding. As we delve into the details, you'll discover how this integration enhances productivity and ensures seamless workforce management.
Understanding the Basics of Odoo Employees and Payroll Modules
Efficient workforce management relies on mastering the right tools. Odoo’s Employees and Payroll modules work seamlessly together to create a robust system for handling employee information and financial computations. The Employees module acts as the core, storing essential data such as personal information, job roles, and performance metrics. The Payroll module enhances this by automating wage calculations, tax deductions, and benefit adjustments, ensuring precision and streamlining operations.
Picture a workday without the hassle of managing multiple spreadsheets or disconnected software—Odoo integrates everything into one user-friendly platform. While the initial setup might feel complex for beginners, its intuitive design simplifies the process. These modules are highly adaptable, catering to businesses of varying sizes and industries, from retail to manufacturing or services. With frequent updates and strong community support, Odoo keeps pace with modern workforce needs, including features like remote work monitoring and digital contract signing. As we delve deeper, you’ll discover how these tools save time and enhance employee satisfaction through clear, automated payroll processes.
A key strength is real-time data integration. Changes to employee details, such as promotions or leaves, instantly update payroll calculations, minimizing administrative tasks and ensuring compliance with labor regulations. For instance, updating an employee’s address in the Employees module automatically adjusts tax settings in the Payroll module. This automation distinguishes Odoo from traditional systems that demand manual updates across multiple tools. Let’s now explore the practical steps, beginning with the setup of employee contracts, the foundation of accurate payroll processing.
Setting Up Employee Contracts in Odoo: A Comprehensive Guide
Employee contracts form the foundation of your compensation and benefits framework, acting as both legal documents and operational guides. In Odoo, setting up and managing contracts is a straightforward process that ensures transparency, compliance, and seamless integration with payroll. Why does this matter? A well-defined contract sets clear expectations for employers and employees, enables accurate payroll automation, and reduces potential conflicts, creating a supportive workplace. Odoo’s intuitive interface makes this process approachable, even for those new to HR, freeing you to prioritize business development over administrative tasks.
To start, navigate to the Employees app and click the Create button in the top-left corner. Build a new employee profile by entering essential information such as name, department, and position. Then, complete all mandatory fields and include any additional relevant details.
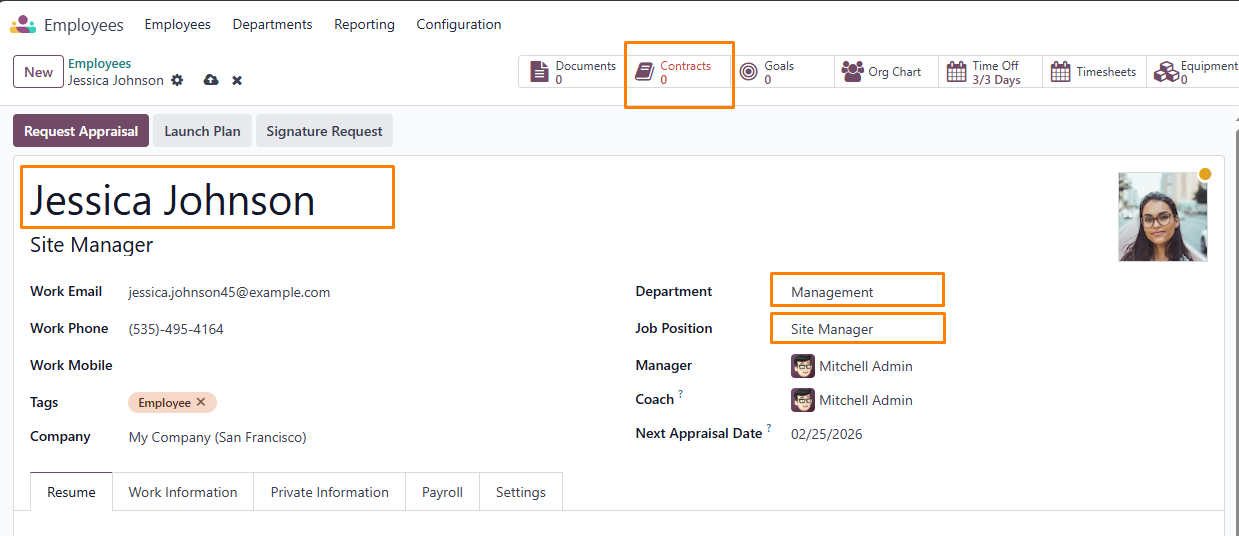
Next, access the Contracts tab to define the contract details, including the type (e.g., full-time, part-time, or freelance), start and end dates, work schedule, and salary structure. Odoo offers customizable templates for standard contract types, allowing you to add specific terms such as probation periods or non-compete agreements.
The contract form includes several fields and sections to ensure precise configuration. Below is a detailed overview of these elements to guide you through the setup process accurately.
This section captures the essential details of an employment contract, outlining the primary hiring conditions.
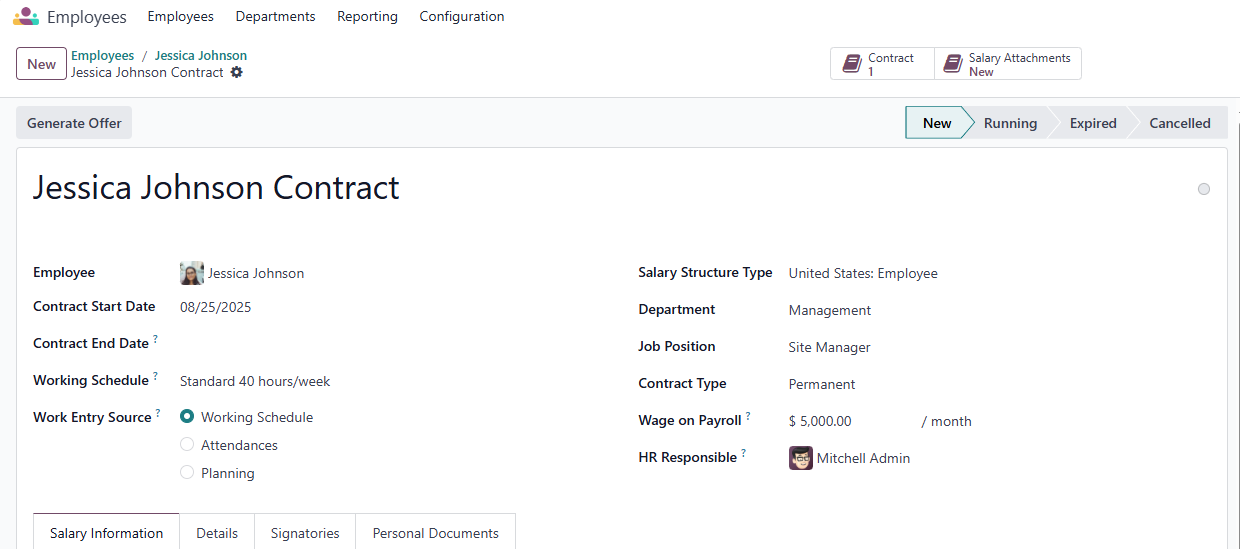
- Contract Reference: Input a unique identifier, such as “Jessica Johnson Contract,” to keep records clear. Descriptive names help prevent confusion, particularly in larger organizations. This field is mandatory.
- Contract Start Date: Use the calendar tool to set the effective start date, which determines when payroll calculations begin for the employee.
- Contract End Date: For temporary or project-based contracts, select the end date using the calendar widget.
- Working Schedule: Pick a predefined schedule from the dropdown menu, like “40 Hours/Week” or “Flexible Hours.” This required field impacts salary computations.
- Work Entry Source: Specify how payroll work entries are generated. Options include:
Working Schedule: Based on the selected timetable
Attendances: Derived from clock-in/out records in the Attendance app.
Planning: Sourced from employee shifts in the Planning app, ideal for shift- based or project roles.
- Salary Structure Type: Choose a payroll structure, such as “Employee” for salaried staff or “Worker” for hourly/contract roles. Custom structures can be defined in the Payroll settings if needed.
- Department: Select the employee’s department, such as “Sales” or “Engineering,” to aid in reporting and analytics.
- Job Position: Indicate the specific role, like “Junior Developer” or “HR Manager,” to align with HR and payroll analytics.
- Contract Type: Select the employment type, such as permanent, temporary, seasonal, full-time, or part-time.
- Wage on Payroll: Enter the employee’s monthly salary amount.
- HR Responsible: Assign the HR officer or manager responsible for overseeing and approving the contract.
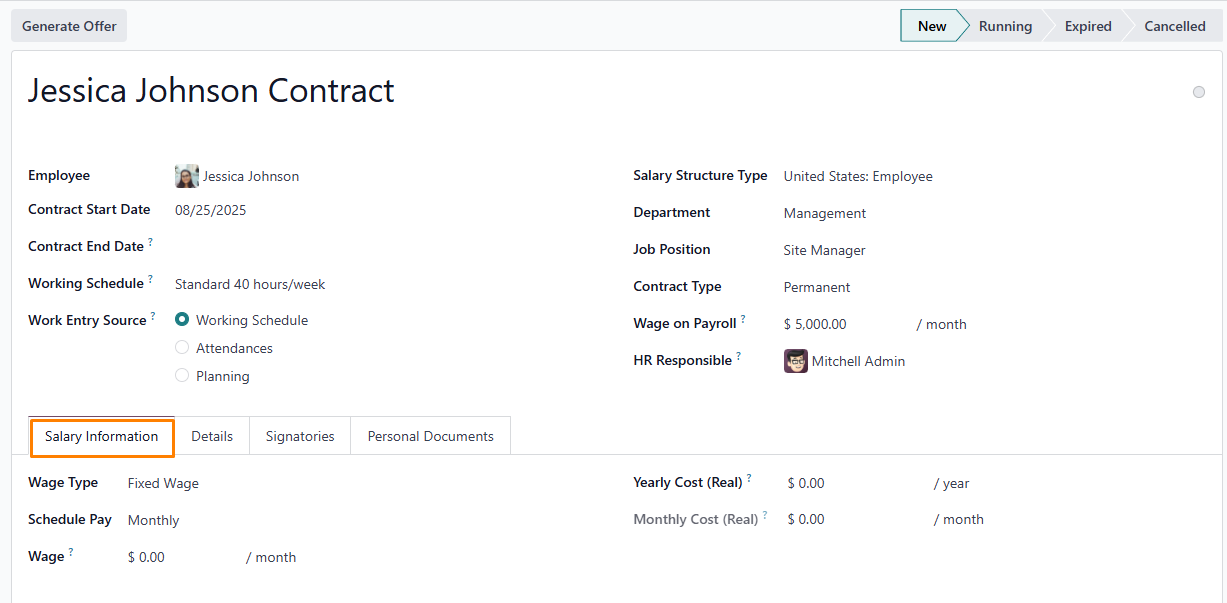
Salary Information
- Yearly Cost (Real): This field auto-calculates based on the Scheduled Pay and Wage fields, showing the total annual cost to the employer. You can manually adjust this value, but doing so will also update the Wage field. Always verify the accuracy of both the Wage and Yearly Cost (Real) after making changes.
- Monthly Cost (Real): Automatically generated from the Scheduled Pay and Wage fields, this field displays the employer’s monthly cost, derived from the Yearly Cost (Real). It cannot be directly modified.
Details Tab
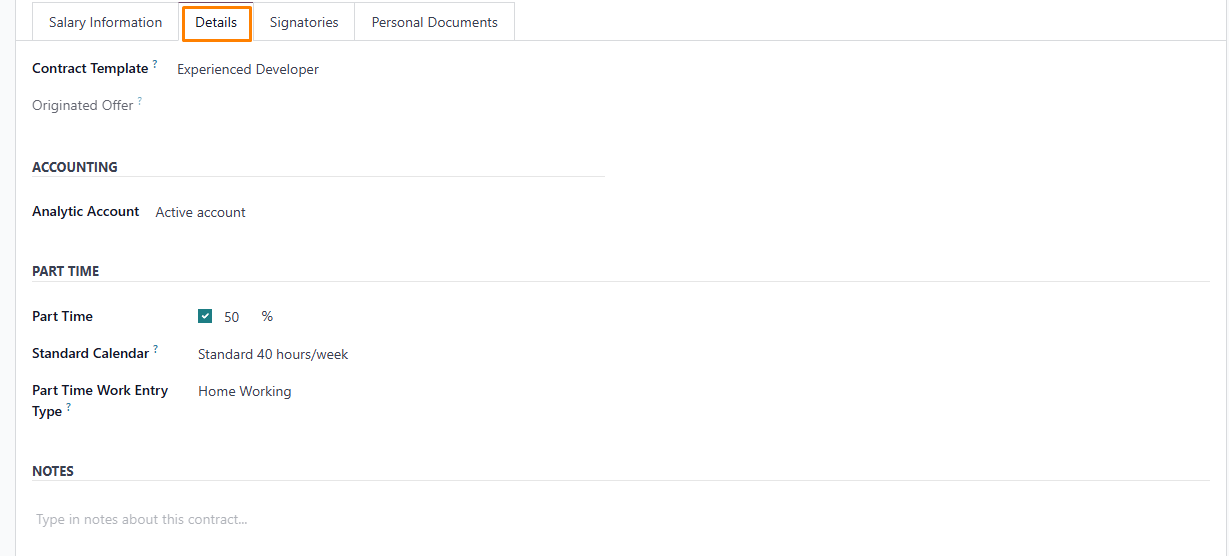
The Details tab allows you to configure or modify a contract and specify the template to use for new contracts. All fields in this section are mandatory for successful contract creation.
- Contract Template: Choose a predefined contract template from the dropdown menu. Templates are typically set up in the Configuration menu and stored in the Documents app.
- Accounting Section: Aligns the contract with financial records. Select the appropriate Analytic Account from the dropdown menu to ensure accurate budgeting and financial reporting. For example, choose “Marketing Expenses” for a marketing employee’s contract. Coordinate with the accounting team to select the correct account.
- Part Time Section: When activated, this section displays additional fields for part-time employees:
Percentage (%): Enter the percentage of hours worked relative to a full-time schedule.
Standard Calendar: Select the reference full-time work schedule.
Part Time Work Entry Type: Choose the work entry type that aligns the part-time schedule with the full-time reference.
- Notes Section: Add any relevant details or comments about the contract in this free-text field, such as special terms, temporary conditions, or internal references. This helps document context for future HR or payroll reviews.
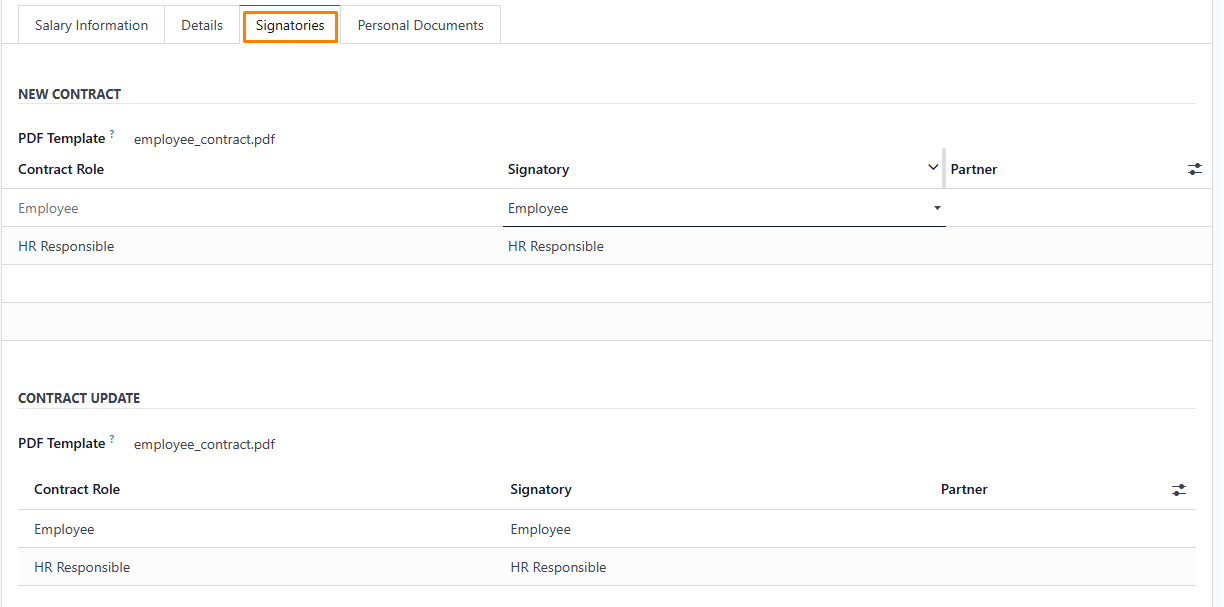
- New Contract Document Template: Choose a contract template from the dropdown menu to use or adapt for the new employee contract. These templates are stored in the Sign app.
- Contract Update Document Template: Select a template from the dropdown menu if an existing employee contract requires updates. These templates are also managed in the Sign app.
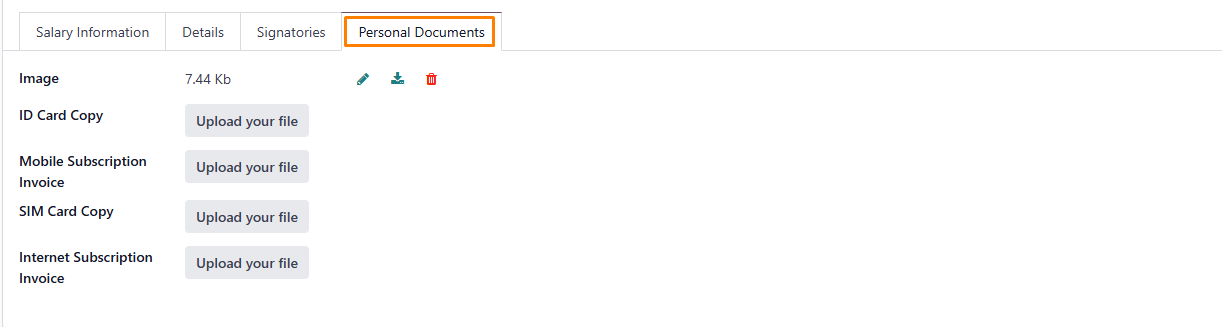
Personal Documents
The Personal Documents tab appears only after selecting an employee and displays all documents linked to their profile.
You cannot manually add documents to this tab; it only shows files previously uploaded and associated with the employee. To download a document, click the Download icon next to the file.
-
After
entering all required details, click Save
to store the contract information.
Generate Offer
To create an offer, click Generate Offer, which opens a pop-up window showing essential contract details. If the Salary Configurator is active, this window also includes a link to the contract.

- Click Send to send an email to the employee, so they can sign the contract.
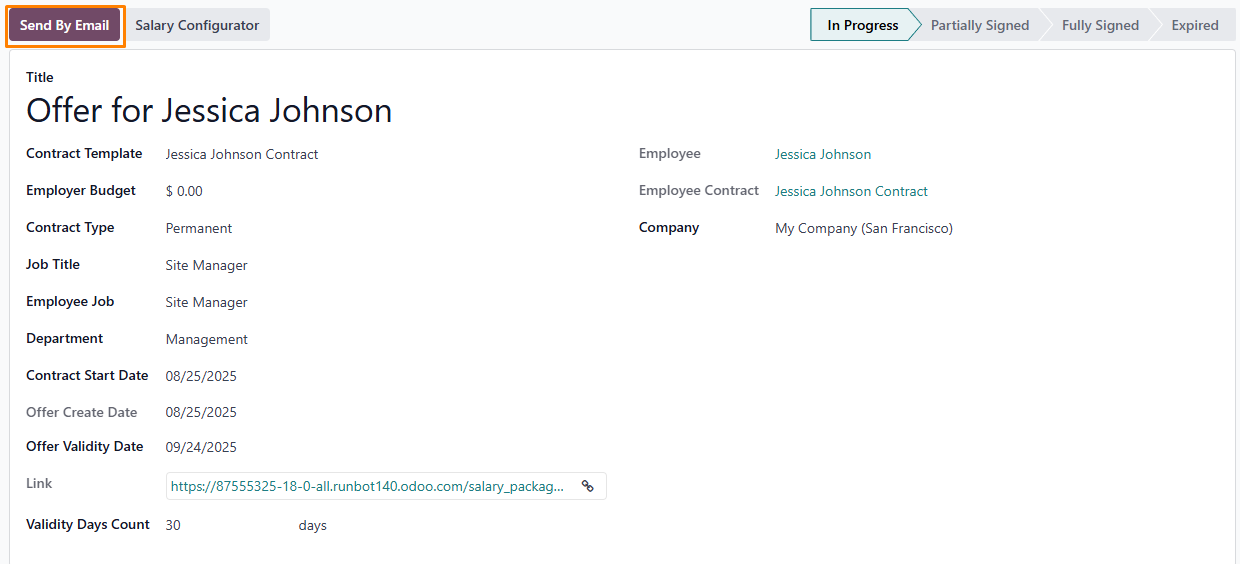
- Make sure that the contract is in Running status.

Configuring Salary Structure in Odoo 18
In Odoo, an employee’s payslip is based on structures and structure types, which both affect how an employee enters timesheets. Each structure type is an individual set of rules for processing a timesheet entry, which consists of different structures nested within it. Structure types define how often an employee gets paid, the working hours, and if wages are based on a salary (fixed) or how many hours the employee worked (varied).
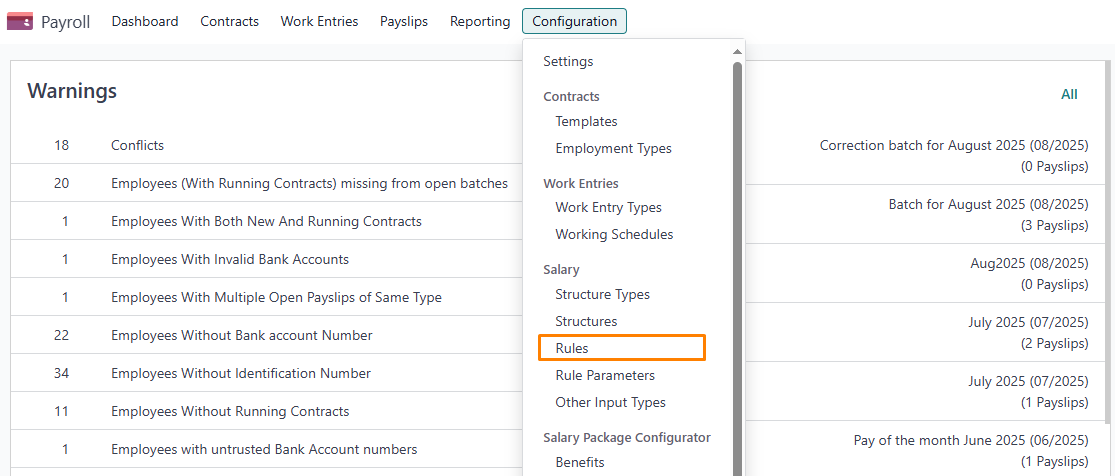
- To view all the various structures for each structure type, go to Payroll app ‣ Configuration ‣ Structures.
- Each structure type lists the various structures associated with it. Each structure contains a set of rules that define it.

- Click on a structure to view its Salary Rules. These rules define how the payslip will be computed for the employee.
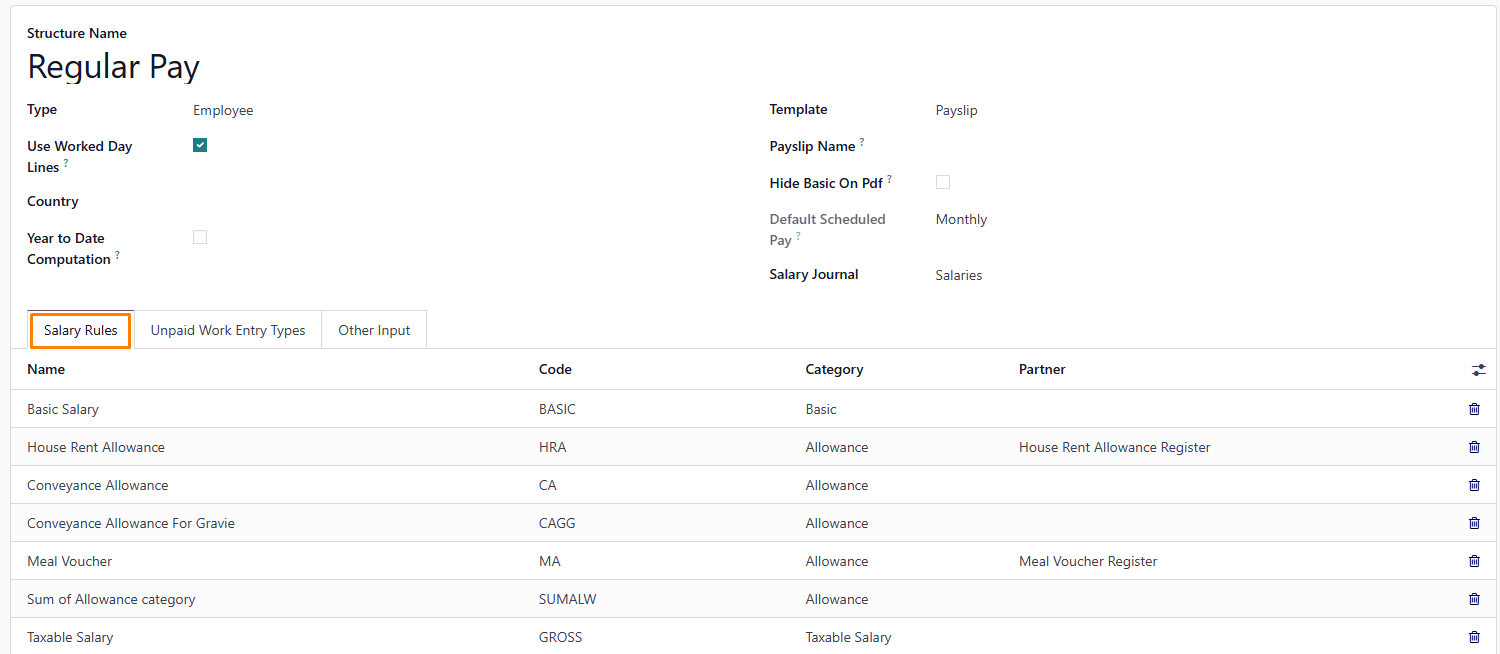
- To view all the rules, go to Payroll app ‣ Configuration ‣ Salary ‣ Rules. Click on a structure (such as Regular Pay) to view all the rules.
Creating a New Rule
To create a new rule, click New. A new rule form will appear. Fill in the following fields:
Top Section
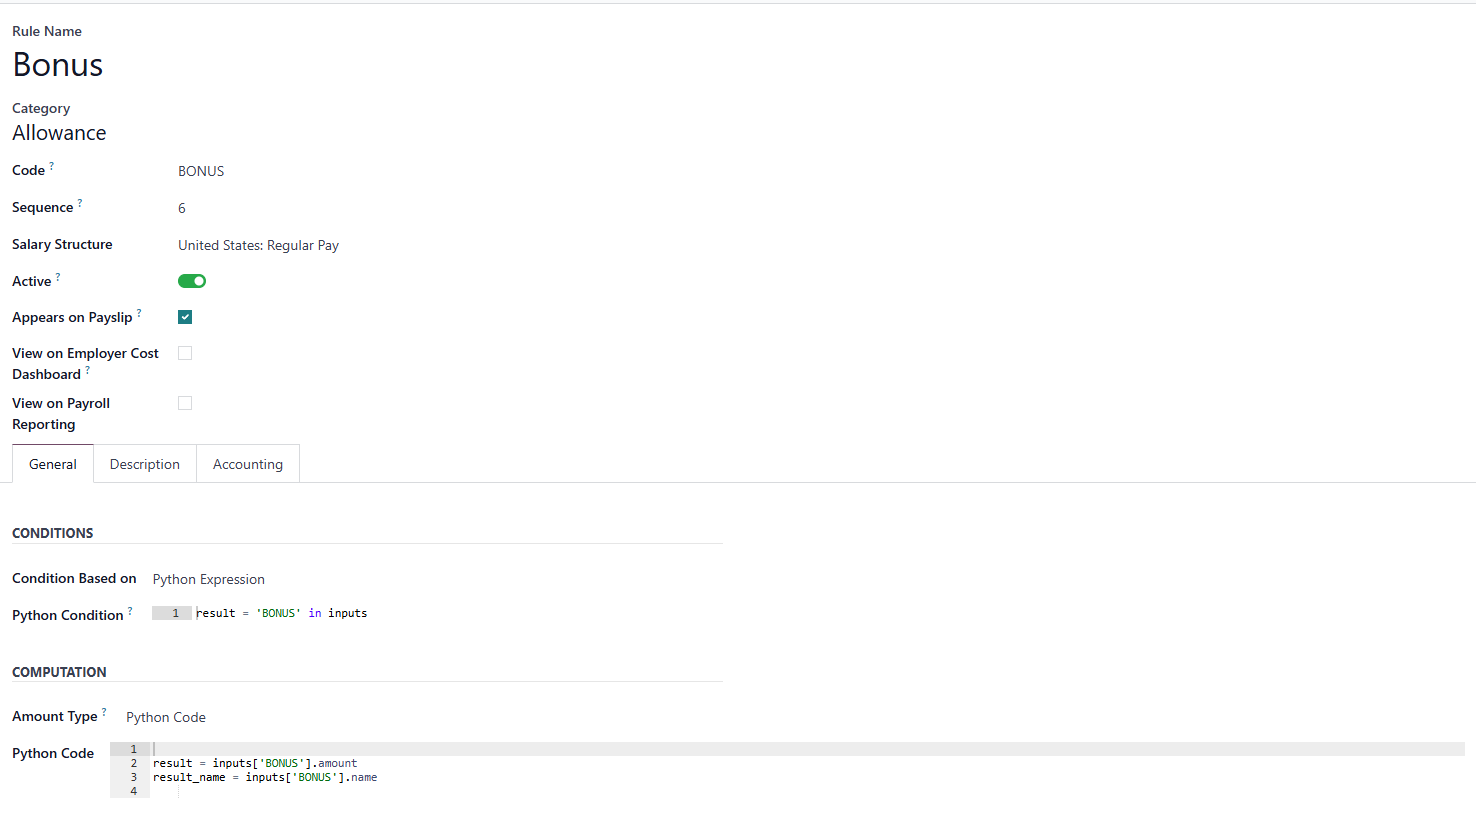
- Rule Name: Enter a name for the rule. (Required)
- Category: Select an applicable category from the drop-down menu, or create a new one. (Required)
- Code: Enter a code to identify this rule. (Required)
- Sequence: Enter a number that defines the order in which this rule is calculated, relative to other rules.
- Salary Structure: Select a salary structure from the drop-down menu, or create a new one. (Required)
- Active: Toggle on to make the rule available for use. Toggle off to keep it visible on payslips but exclude it from calculations.
- Appears on Payslip: Check this box to display the rule on employee payslips.
- View on Employer Cost Dashboard: Check this box to include the rule in the Employer Cost report on the Payroll app dashboard.
- View on Payroll Reporting: Check this box to include the rule in payroll reports.
General Settings Tab
Rule Conditions
Condition Type: From the dropdown menu, choose how the rule is applied:
- Always Active: The rule applies in all cases.
- Range-Based: The rule applies within a specified range, defined below.
- Python Expression: Enter a Python code snippet below to set the condition. This field must be completed.
Calculation Method
Amount Type: Select the calculation method from the dropdown menu:
- Fixed Value: Specify a set amount.
- Percentage (%): Enter a percentage value.
- Python Code: Provide Python code for the calculation. After selecting the type, input the corresponding value (amount, percentage, or code). This field is required.
Company Contributions
Partner: If another company contributes financially to this rule, select it from the dropdown menu.
Description Tab
Add any supplementary details or notes in this tab to clarify the rule’s purpose. This tab is visible only in the rule configuration form.
Accounting Tab
Debit Account: Choose the debit account affected by this rule from the dropdown menu.
Credit Account: Select the credit account impacted by this rule from the dropdown menu.
Exclude from Net Accounting: If checked, the rule’s amount will be displayed separately from the net salary, improving accounting reports.
Calculating Payslips in Odoo: Automating Accuracy and Efficiency
To access a complete list of payslips, regardless of their status, navigate to the Payroll app, then select Payslips > All Payslips. This opens the Employee Payslips page, which displays all payslips grouped by batch in a default nested list view.
Creating a New Payslip
To generate a new payslip, go to the Employee Payslips page and click the Create button located in the top-left corner. This action opens a blank payslip form where you can input the required details.
Completing the Payslip Form
The payslip form includes several mandatory fields, many of which are automatically filled once an employee is selected. Provide the following information:
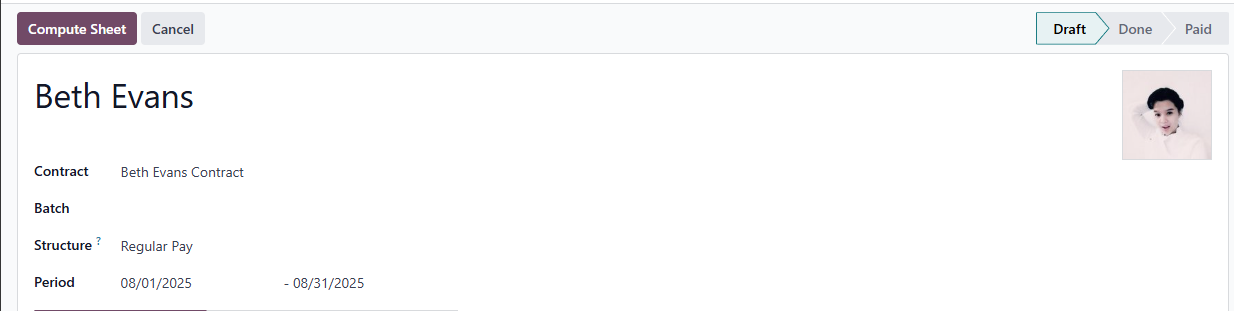
- Employee: Enter the employee’s name manually or choose the appropriate employee from the dropdown list. This field is mandatory.
- Period: By default, the period fields are set to cover the first and last day of the current month. You can adjust these dates if neede.
- Contract: From the dropdown menu, select the relevant contract for the employee. Only contracts associated with the chosen employee will be available. This field is mandatory.
- Batch: Choose the batch to which this payslip should be added from the dropdown menu.
- Structure: Select the appropriate salary structure type from the dropdown menu. Only structures linked to the selected employee’s contract will appear as options.
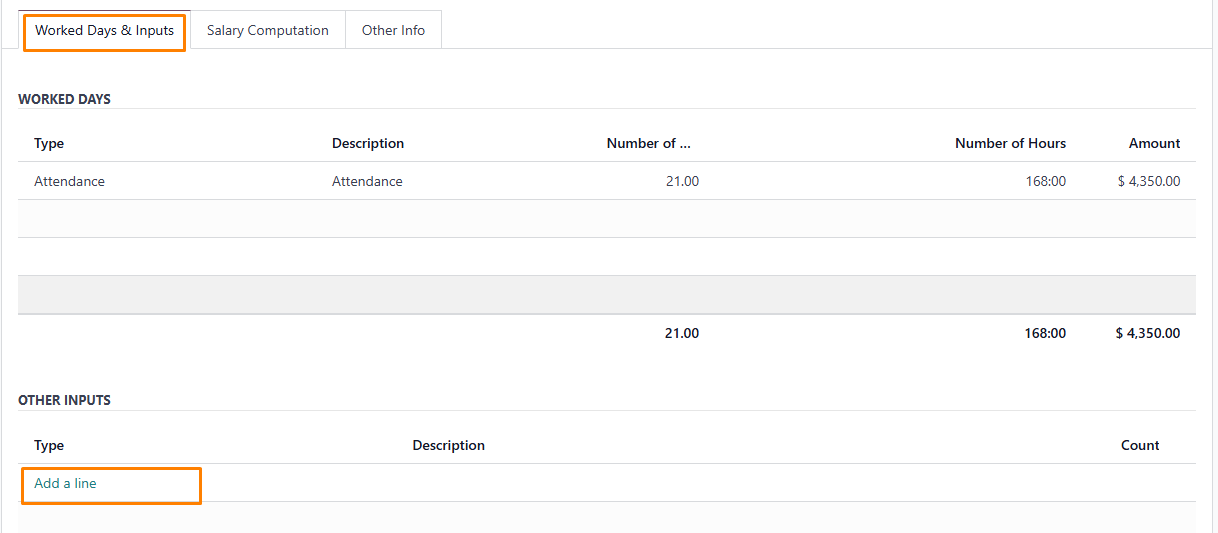
Worked days & inputs tab
The Worked Days section automatically populates details such as Type, Description, Number of Days, Number of Hours, and Amount. These entries are generated based on the data provided in the Period, Contract, and Structure fields of the payslip form.
Other Inputs Section
Use the Other Inputs section to add entries like deductions, reimbursements, or expenses that affect the payslip. Click Add a Line, select the input type from the dropdown menu, optionally add a description, and enter the value in the Count field.
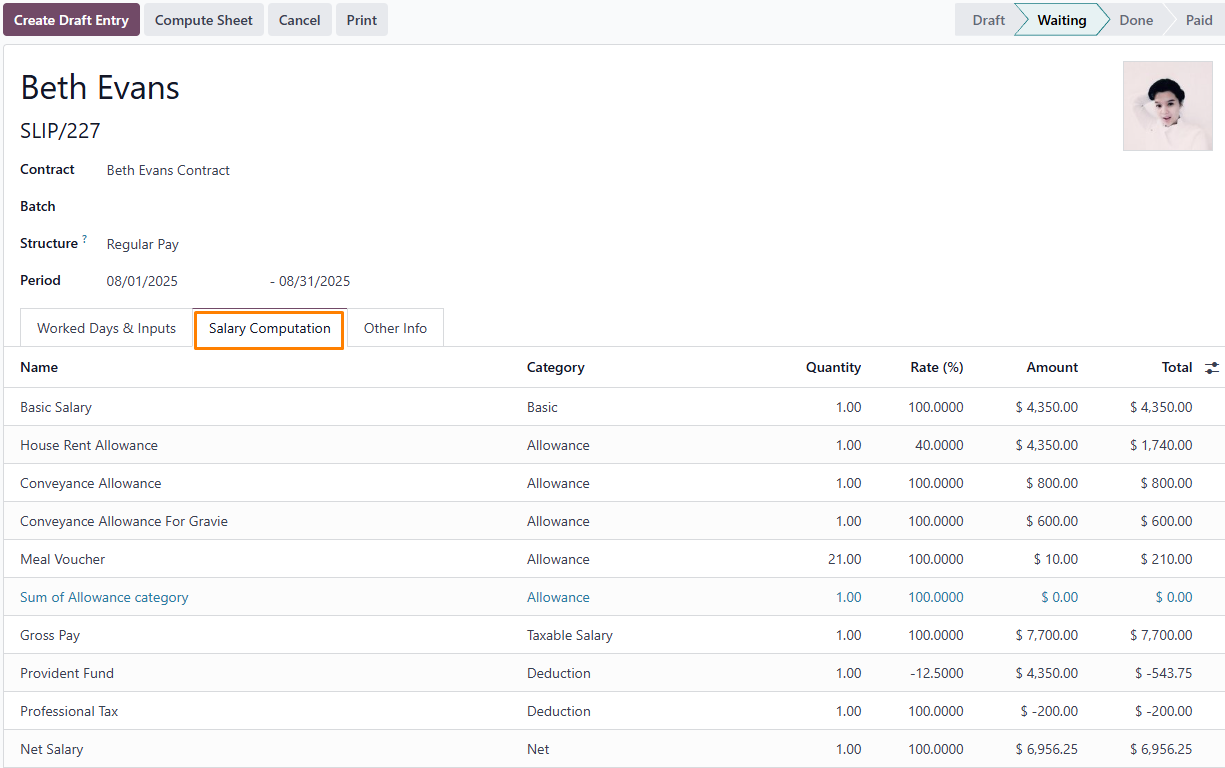
Salary computation tab
The Salary Computation tab auto-populates after clicking the Compute Sheet button, showing details such as wages, deductions, taxes, and other relevant calculations for the payslip entry.
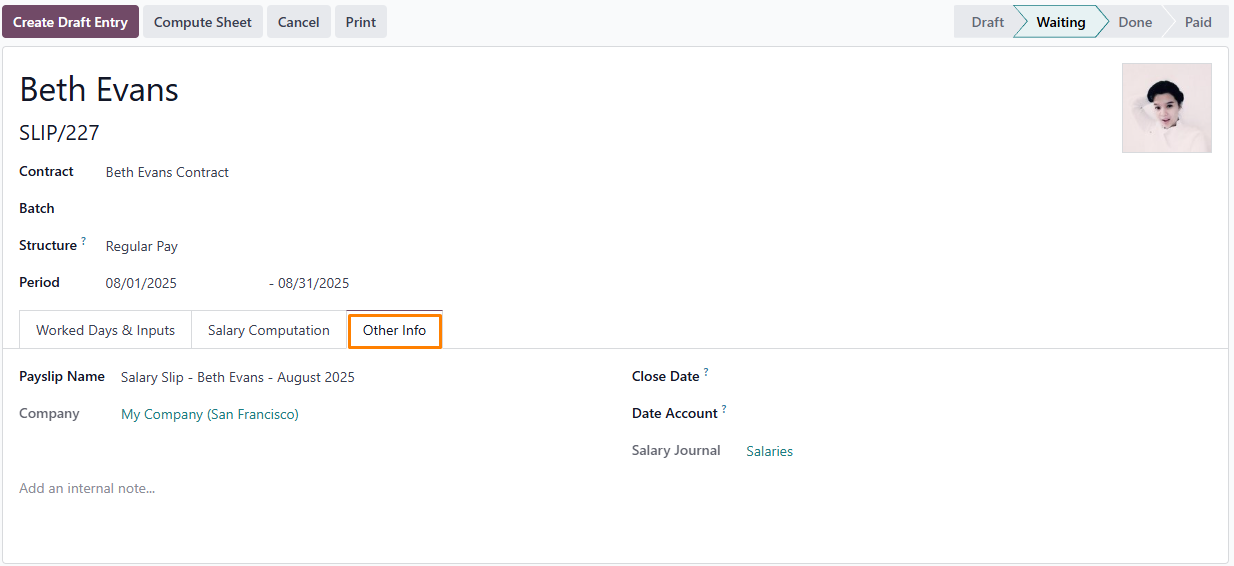
Other info tab
In the Other Info tab, enter the following details for the payslip:
- Payslip Name: Input a concise, descriptive name, such as "[Employee Name] April 2023." This field is mandatory.
- Company: Choose the relevant company from the dropdown menu. This field is required.
- Close Date: Specify the payment date by clicking the field to open a calendar pop-up. Use the < (previous) and > (next) icons to select the desired month and year, then click the date to set it.
- Date Account: Enter the date for posting the payslip to accounting records.
- Salary Journal: This field automatically fills after selecting an employee and is non-editable due to its link to the Accounting app. It is mandatory.
- Accounting Entry: If relevant, this field auto-populates upon payslip confirmation and cannot be changed.
- Internal Note: Add any additional comments or references for the payslip in this optional field.
Integrating Odoo Payroll with Local Tax Rules: Ensuring Global Compliance
Payroll localization involves tailoring payroll systems, policies, and procedures to meet the unique labor laws, tax regulations, and social security requirements of a specific country or region. This process ensures accurate calculation of employee wages, benefits, deductions, and contributions while adhering to local legal and financial standards. It encompasses country-specific elements like statutory benefits, vacation allowances, termination policies, and reporting obligations, enabling businesses to minimize legal risks and ensure employees receive correct payments.
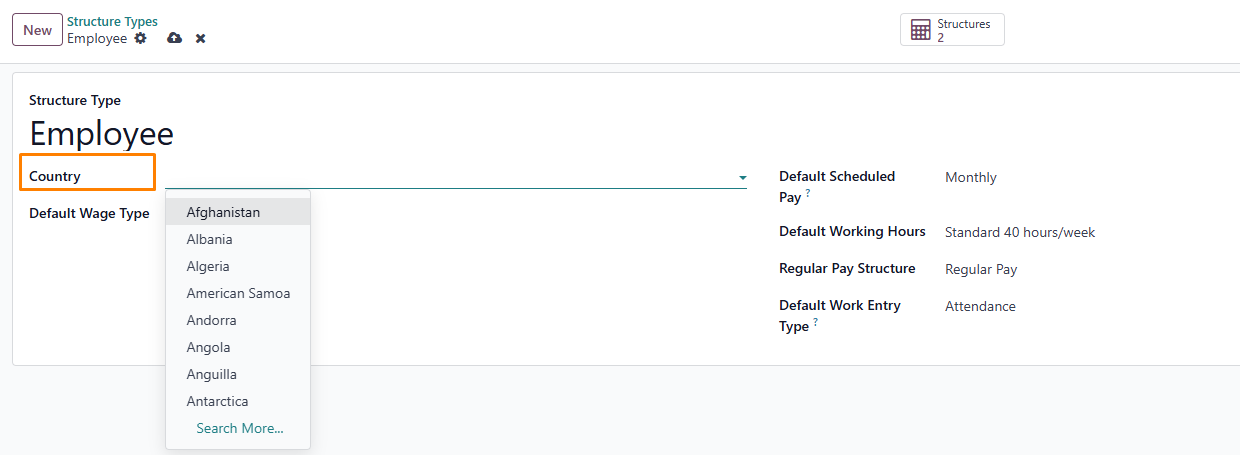
To apply localization, select the relevant country from the dropdown menu when setting up structure types, choosing from available localization modules.
Conclusion: Elevate Your HR and Payroll with Odoo
Leveraging Odoo’s HR and Payroll modules turns administrative tasks into strategic opportunities. From creating detailed employee contracts to automating payslip processing and ensuring compliance with tax regulations, Odoo provides a flexible solution that scales with your organization. Adopting these tools enhances efficiency, precision, and employee satisfaction. Ready to transform your workflows? Start using Odoo now and see the impact!