In today's fast-paced business environment, managing finances effectively is crucial for success. Whether you're a small startup or a growing enterprise, having a reliable system to handle invoicing can make all the difference. Odoo, as an open-source ERP platform, offers powerful tools that streamline these processes, allowing you to focus on what matters most—growing your business. This article dives deep into the essentials of invoicing in Odoo, providing practical insights and step-by-step guidance.
Understanding Customer Invoices in Odoo
Before diving into the nitty-gritty of creating customer invoices, it's important to appreciate how Odoo simplifies what can often be a cumbersome task. In a world where timely billing directly impacts cash flow, Odoo's intuitive interface ensures that even beginners can generate professional invoices quickly. This section explores the foundational steps, helping you build a solid understanding of the process.
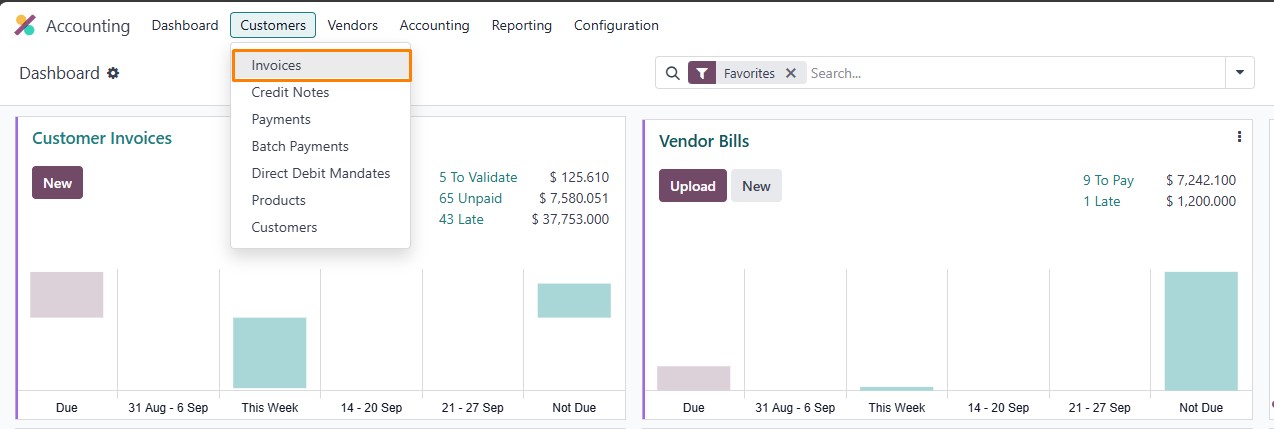
Customer invoices in Odoo can be created manually or automatically from sales orders, ensuring flexibility for different business needs. To start, navigate to the Accounting app and select Customer Invoices from the dashboard.
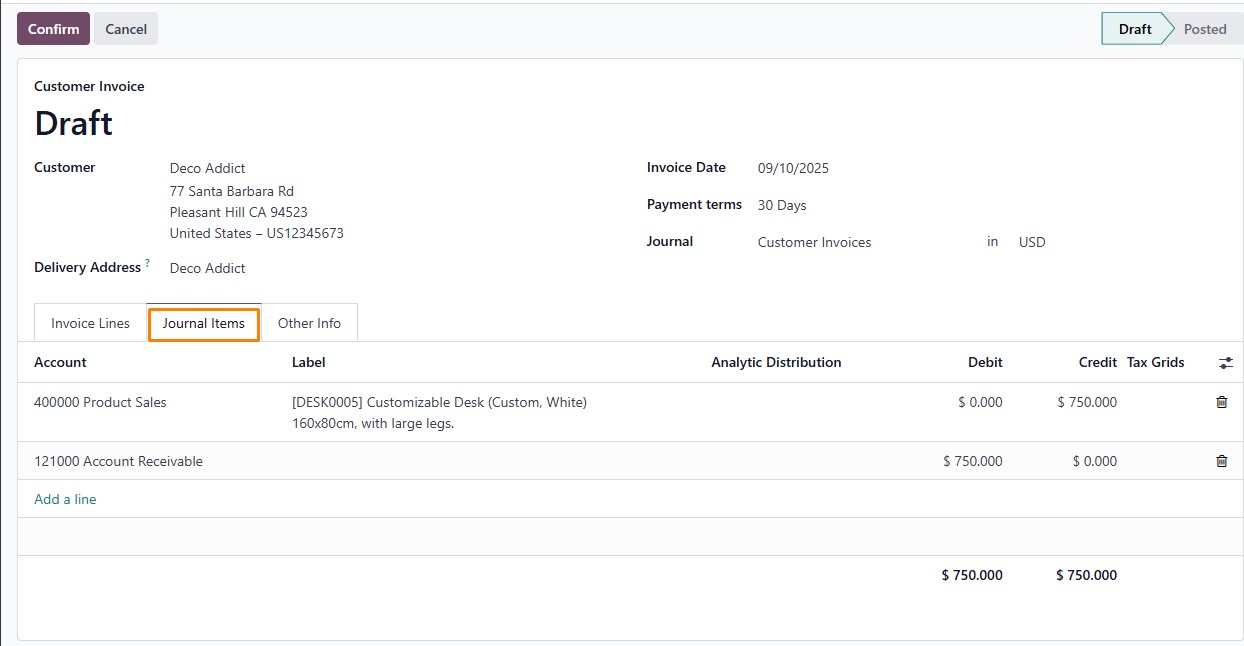
Click "New" to begin drafting an invoice. Key fields include selecting the customer, which auto-fills details like address and payment terms from their contact record. You can adjust these if needed for specific cases without altering the permanent record.
Next, set the invoice date, due date, and payment terms to define when payment is expected. Add invoice lines by choosing products, quantities, prices, and taxes. For efficiency, use the "Catalog" button to browse and select items from your product database.

Once complete, review the Journal Items tab for accounting entries and the Other Info tab for additional details like fiscal positions or customer references.
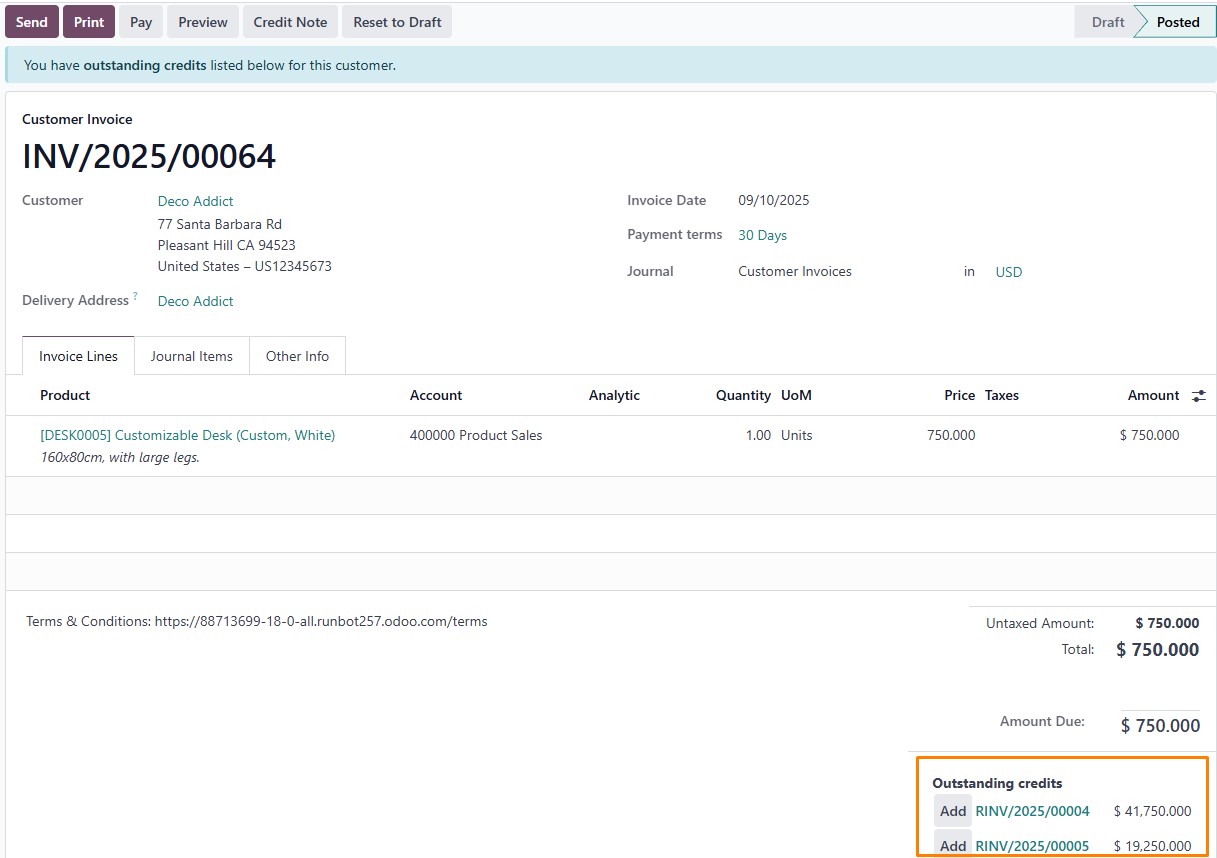
Confirming the invoice posts it to your accounting ledger, generating a unique sequence number. This integration ensures all financial data is accurately recorded in real time. If changes are required post-confirmation, reset to draft mode. Odoo's system supports multiple workflows, such as invoicing based on delivered quantities or advance payments, making it adaptable to retail, eCommerce, or service-based businesses. Additionally, Odoo facilitates handling unapplied payments for a customer. If there are outstanding credits, the system notifies you with a message: "You have outstanding credits listed below for this customer." Below this alert, you can select and apply an existing payment from the list to the invoice, streamlining the reconciliation process and ensuring accurate financial tracking.
Sending Invoices Efficiently
Sending invoices might seem straightforward, but in practice, it involves strategic choices that can enhance customer relationships and speed up payments. Imagine the convenience of automating reminders and using digital methods to reduce delays—Odoo makes this a reality. Let's break down the options available to ensure your invoices reach clients promptly and professionally.
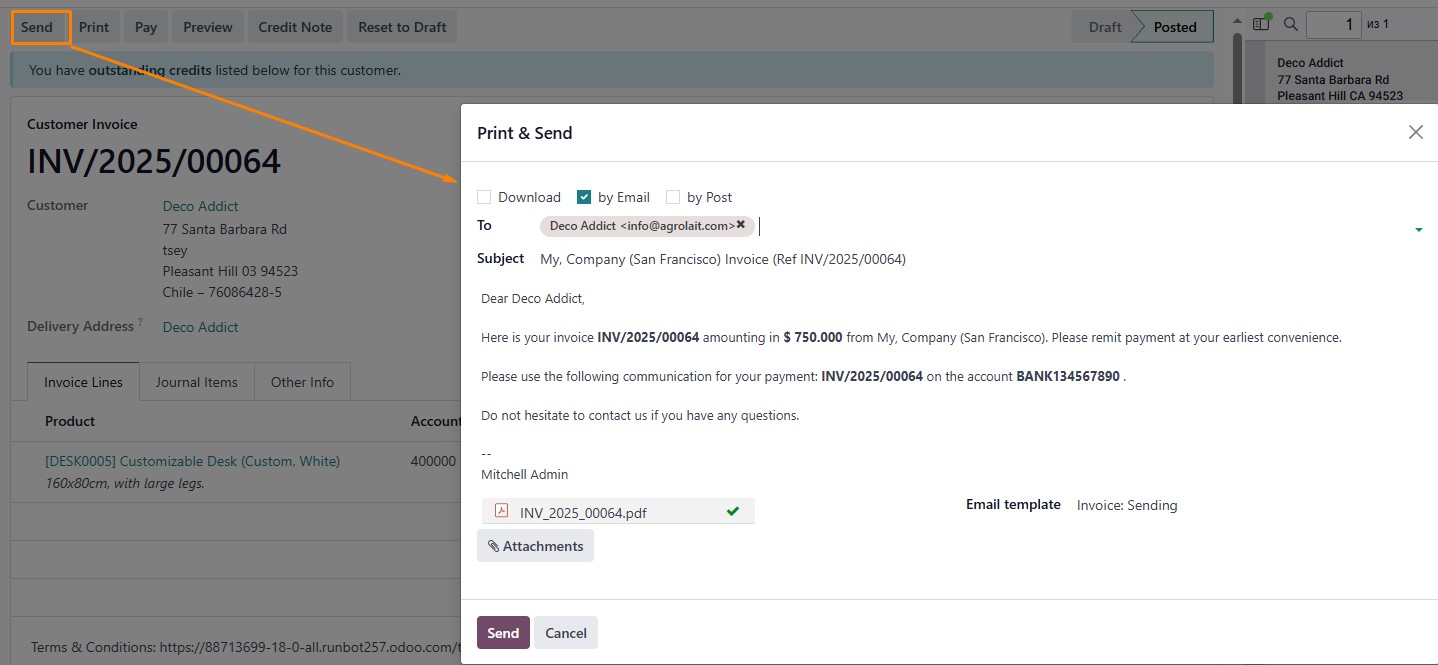
To send an invoice to a customer , click the Send button located at the top of the screen. The Print & Send window opens, defaulting to the customer’s preferred sending method if set. You can change it if needed or manually choose Send by Email, Download, or Send by Post. Click Send to email the invoice to the customer’s registered address.
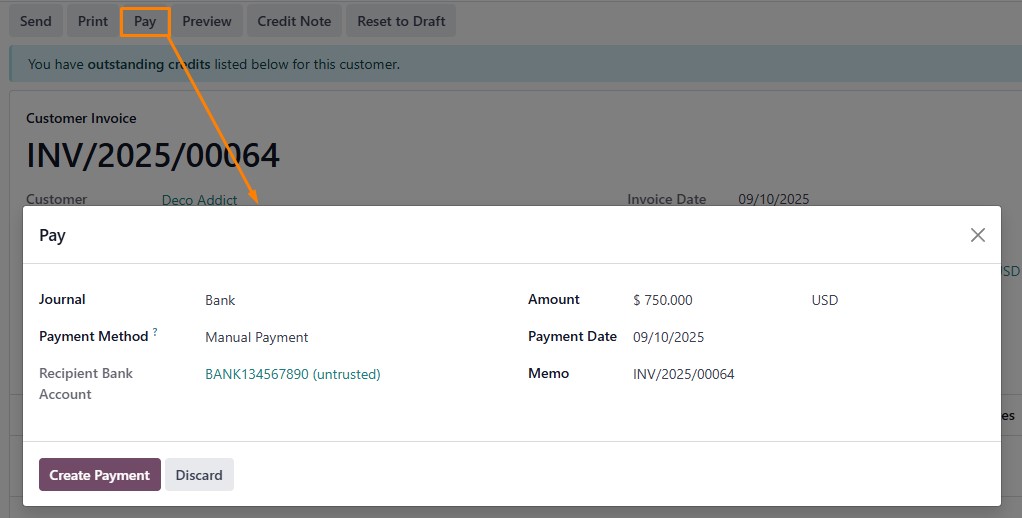
To register a payment, click the "Pay" button at the top. In the pop-up window, select the journal for recording the payment and edit the payment amount if needed. Confirm the changes by clicking "Create Payment."
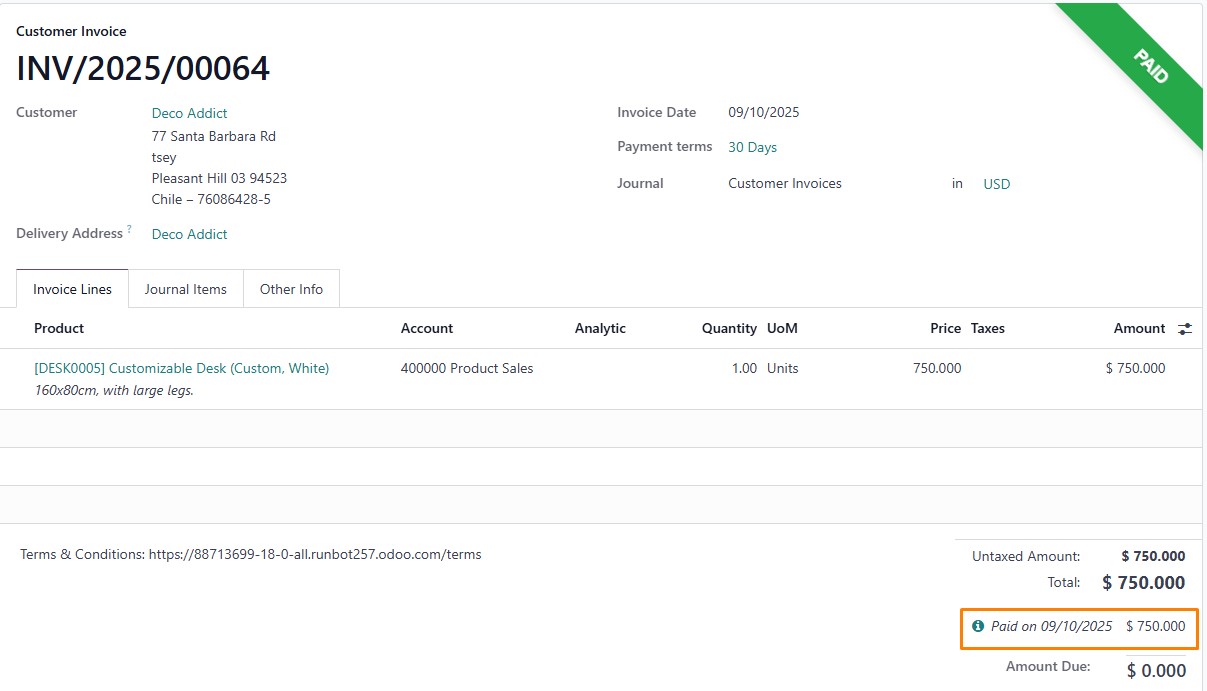
The system marks the invoice as paid. Below, you can view details about the payment date and amount.
Managing Vendor Bills with Precision
Vendor bills represent the flip side of invoicing—handling incoming expenses that keep your operations running smoothly. It's easy to overlook the importance of accurate bill management, but poor handling can lead to cash flow issues or strained supplier relationships. Odoo addresses this by providing tools that automate and verify bills, saving time and reducing manual errors. In this section, we'll cover the essentials to help you stay on top of your payables.
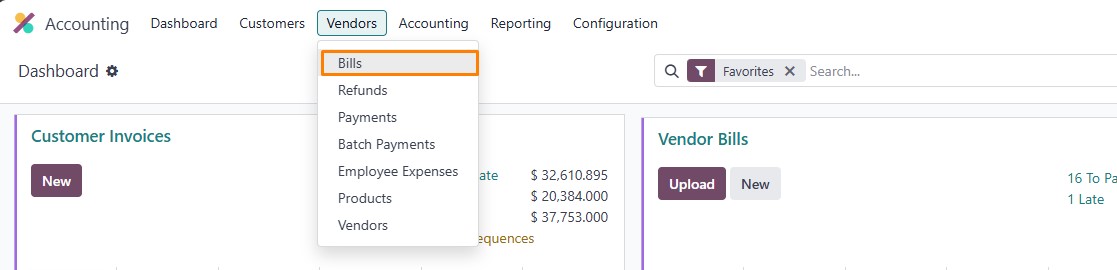
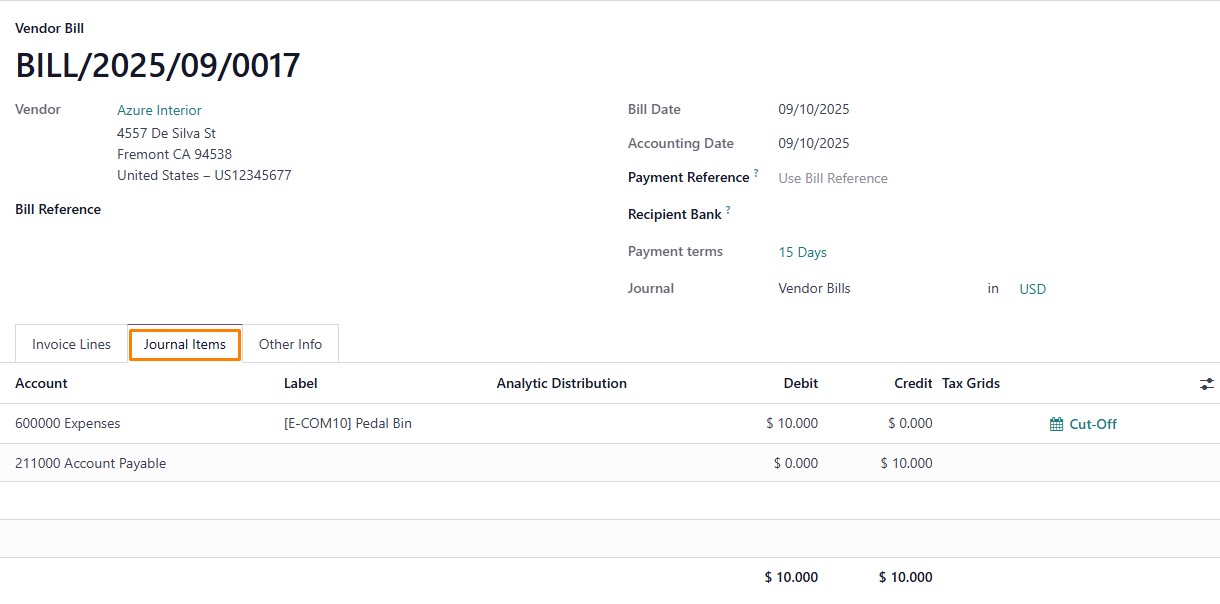
Create vendor bills manually via Accounting > Vendors > Bills and clicking "New".
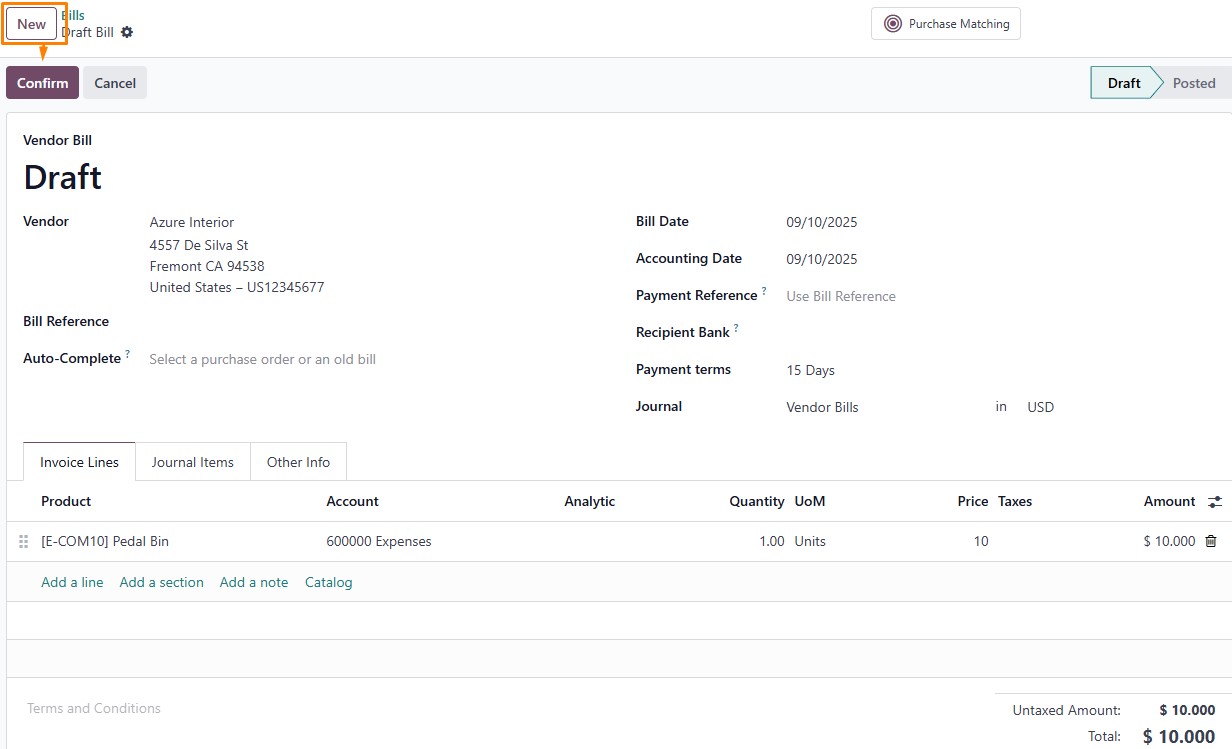
Complete fields such as payment terms and bill date. Add lines for products or descriptions, using the catalog for selection. Confirm to post the bill, creating journal entries.
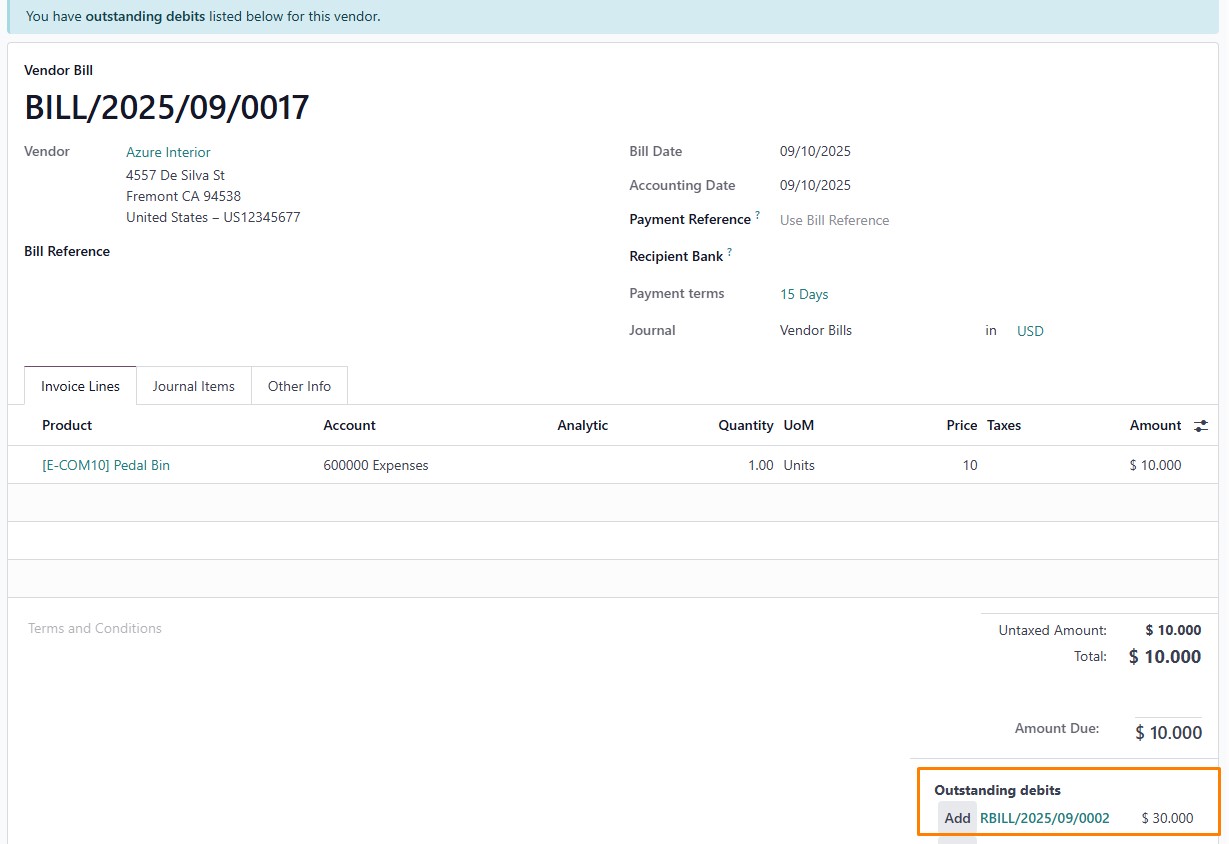
The system automatically retrieves unapplied payments for the customer and notifies with a message at the top: "You have outstanding debits listed below for this vendor."
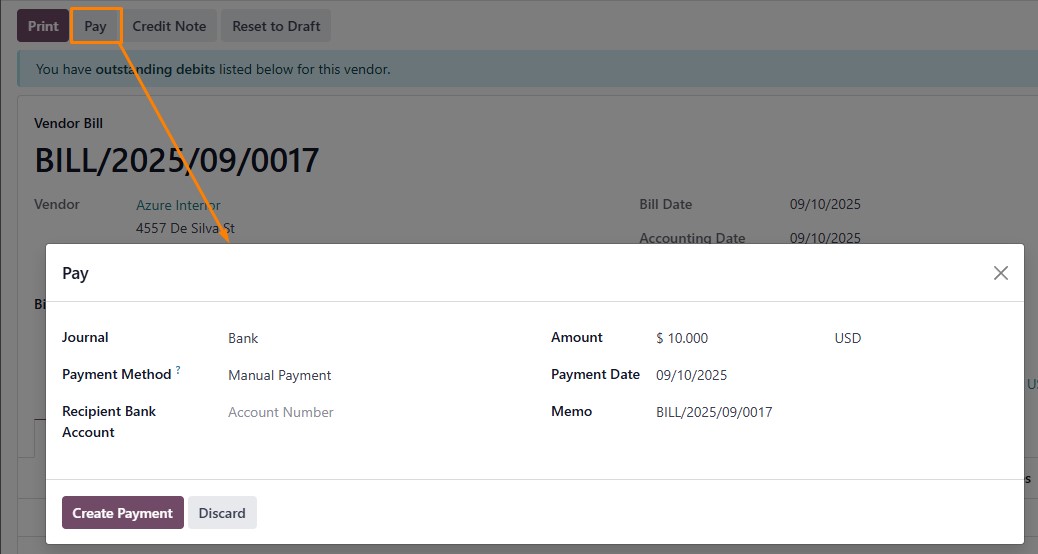
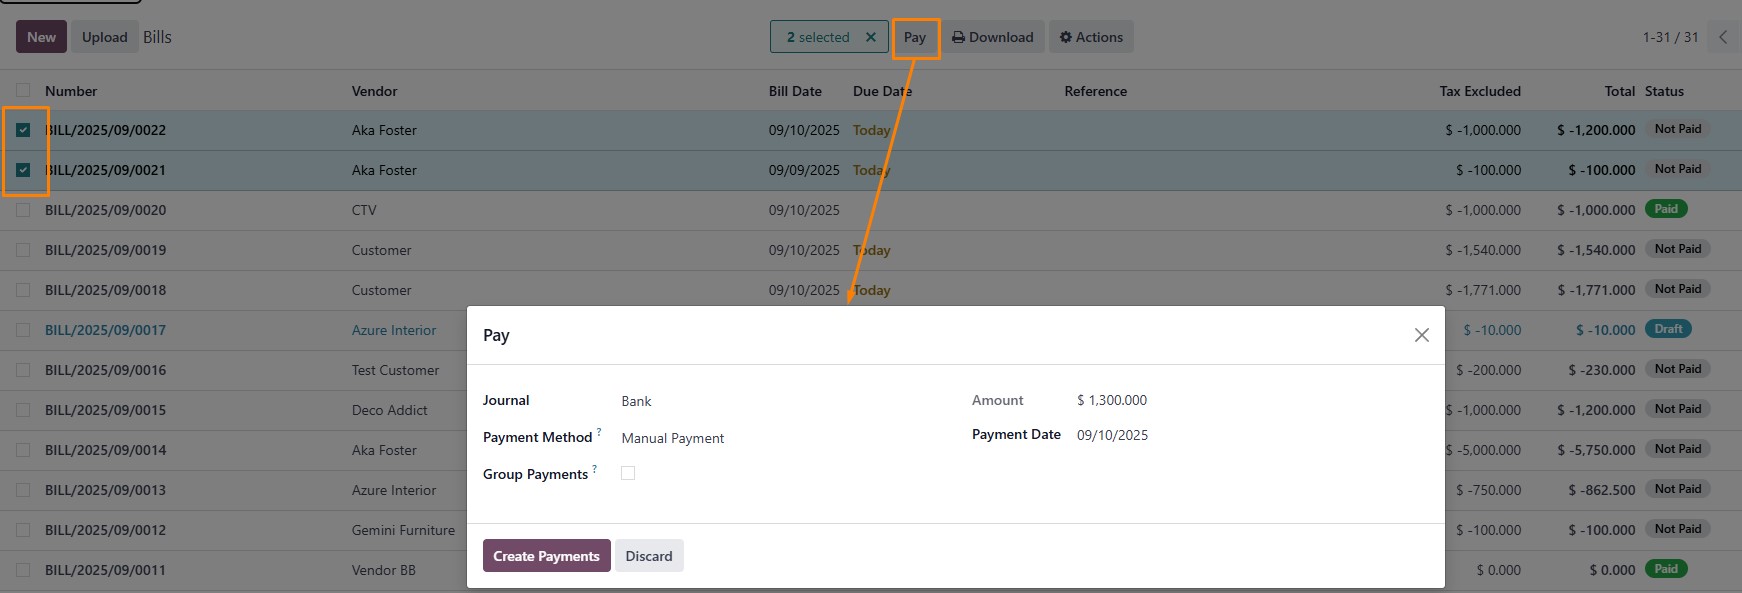
For payments, click "Pay," select method
and amount, and create the payment.
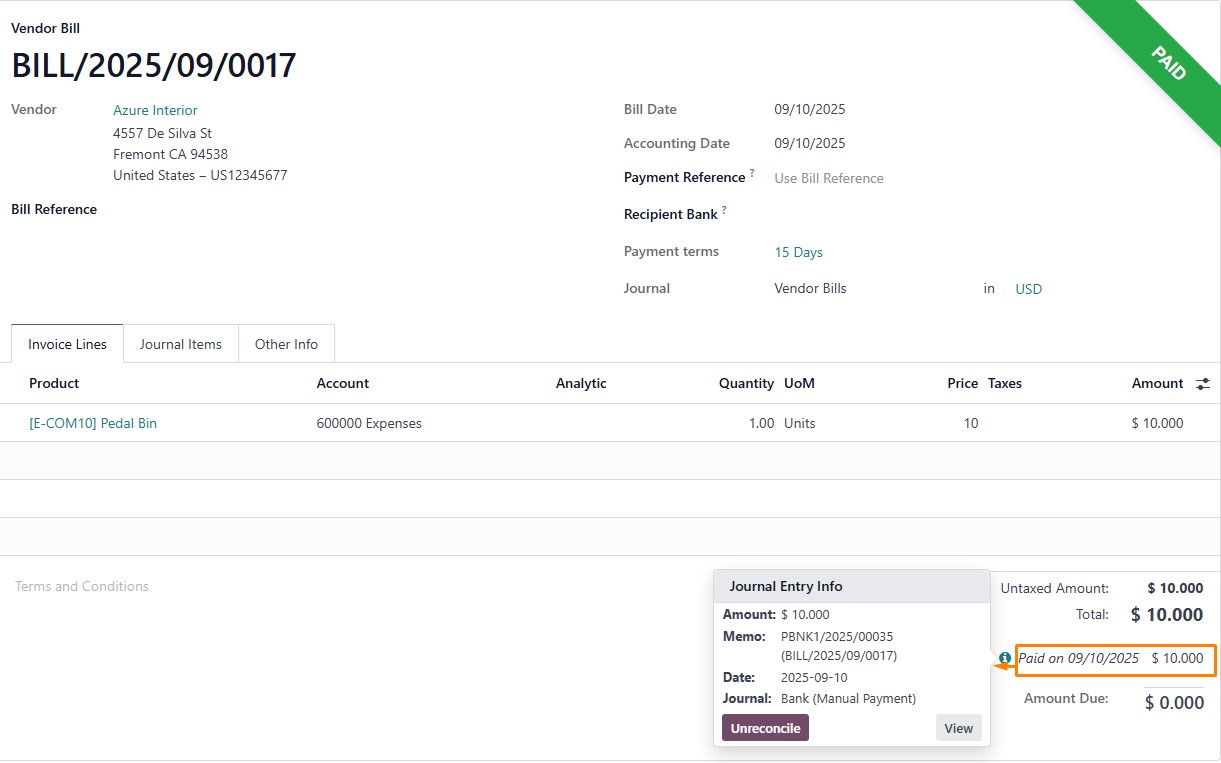
Partial payments are supported, with reconciliation marking the bill as paid. Below, you can view details about the payment date and amount.
Streamline Finances: Batch Payments for Vendor Bills in Odoo
Managing multiple vendor bills can be time-consuming, but Odoo’s batch payment feature simplifies the process, saving time and reducing errors. This section guides you through handling batch payments efficiently.
In the Accounting app, go to Vendors > Bills, select multiple bills you want to pay from one or more vendors, and click the "Pay" button at the top.
Integrating with Accounting for Comprehensive Control
In Odoo, customer invoices and vendor bills are directly integrated with the Accounting module. This ensures that sales and purchase transactions are automatically recorded in the books, improving accuracy and reducing manual effort.
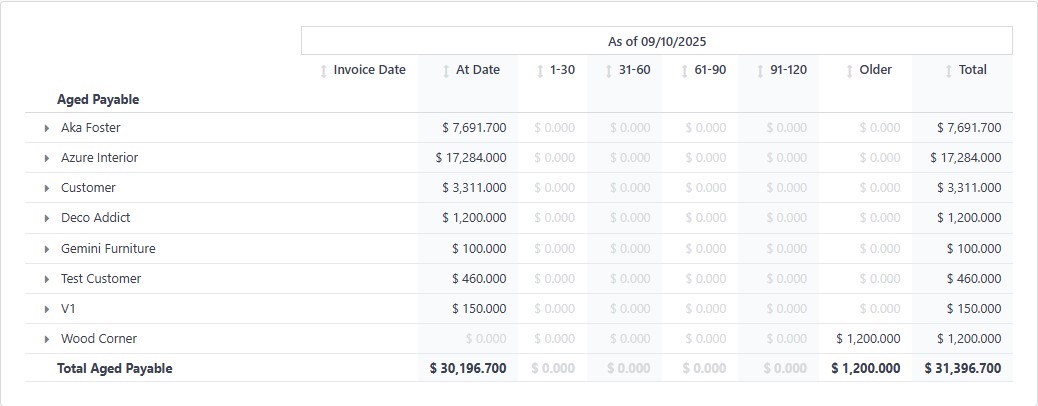
As an example of this integration, Odoo provides Aged Receivable and Aged Payable reports. Both can be found under Accounting → Reporting.
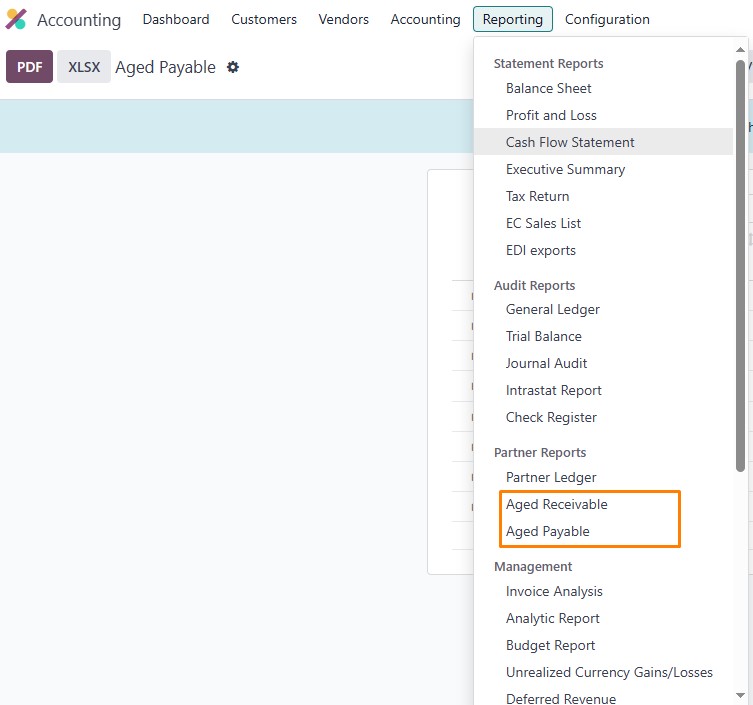
Aged Receivable: displays outstanding customer invoices grouped by due date ranges (e.g., 1–30, 31–60, 61–90 days), helping businesses monitor overdue payments and manage customer credit.

Aged Payable: shows unpaid vendor bills categorized by aging periods, enabling companies to track upcoming obligations, manage cash outflows, and maintain strong supplier relationships.
In conclusion, mastering invoicing in Odoo transforms financial tasks from burdensome to effortless. By following these steps, you'll enhance efficiency, accuracy, and overall business performance. Explore Odoo's modules further to unlock even more potential.